1987 MirroCraft project - what did I get myself into?!?!

Status
Not open for further replies.

sberl

Petty Officer 3rd Class
Joined
Jul 15, 2017
Messages
97
Thanks for the confirmation. Just wanted to make sure I wasn't overlooking something.
 

sberl

Petty Officer 3rd Class
Joined
Jul 15, 2017
Messages
97
So as I was drilling holes thru the wood floor into the hull ribs I missed the rib on one and went out the bottom of the hull instead. Pretty much got that sick feeling as I looked thru the hole and saw light coming thru. From reading others threads on here in the past I know it's not the end of the world however. Just wondering what would be the best way to patch a 9/64 hole in the bottom of the boat?
 

Watermann

Starmada Splash of the Year 2014
Joined
Jan 12, 2013
Messages
13,753
That's a pretty small hole, must have been for a pilot for screws. Get a SS machine screw and nyloc, smallest you can find would be a #8 probably so you'll have to drill the hole out larger. Use 5200 to seal the deal inside and out. When done and if you're the anal type you can fill the phillips slots with JB weld and sand smooth making it look like just another rivet albeit in an odd place. :lol:
 

Watermann

Starmada Splash of the Year 2014
Joined
Jan 12, 2013
Messages
13,753
On the rear casting deck I have a few pics of how I did mine on the Sea Nymph, half the casting deck was hinged. I could just unlatch it and lift it up to gain access to the 6 gal fuel tank.

Closed

y4msOCWO0KnlA-zm8V1d_XxGOmA6S3JiQ5rUSwqkh75oTXHmGWAdYAPfxJl1gUKl7KG0OOz3fwm6nbF7NT9s3EGuw2zbYIUyo5UP6VyWZOmUraGMyAgUkjWDYUgHxnM87ov-t4-RLdJJzx-qIDEyRvmIjAol_UtlFfD6gZuDL0hvzkDCTcara67IjFLo48ZccNwrnknq059-d19zcvrjTVZiA


Opened

y4mh6ZAXuAF9F7Ttyj1NVvvLkBN5W-HTI9Pl-3dDwkc4Cj7eAx_Hauy73b_ZEJKUTXMxUa4oUA1NXpdwyiBLHW9cTGVKH8RJqtXDKkjqXy35HJ2Wgko0Aq1nTD0QsmvpC1vBGCvrbUX4CtdtouR2ahsyDLL_KMfvPvfvjRti0txs9B54szH2LAqQjAdwC-m95gfo5f4BEhlue4_v1W5KUemLg
 

sberl

Petty Officer 3rd Class
Joined
Jul 15, 2017
Messages
97
Hey Watermann - yeah it was a pilot hole. I thought the drill bit hit the high point of the rib (which was the intention) so I pushed on thru. Pulled the drill out and saw light thru the hole. Instantly wished I could take back the previous 15 seconds! :eek:
The problem is I drilled thru the flange part of the rib and then thru the hull, it's not just a hole in the hull. Looking at the image below, the rib is running horizontally so you can see the hole is right in line with flange. I don't think a machine screw with a nut on top of the rib flange would create a water tight seal would it?

When done and if you're the anal type you can fill the phillips slots with JB weld and sand smooth making it look like just another rivet albeit in an odd place. :lol:

Haha I am a bit anal, but at this point I'd just like the hole plugged :facepalm:

Thanks for the pics of your deck and tank area - I'll keep that in mind when I get back to it.

IMG_6114.JPG
 

Watermann

Starmada Splash of the Year 2014
Joined
Jan 12, 2013
Messages
13,753
Yes with 5200 it will seal up for good and isolate the SS from the AL so you can move on without fear. I really don't like to make hole repairs in the bottom of the boat with epoxy type products. The lesser of 2 evils. You can always do the repair and then leak test after the 5200 sets up.

That is a really nice hole though. :lol:

fetch
 

sberl

Petty Officer 3rd Class
Joined
Jul 15, 2017
Messages
97
Ok, thanks for the info! So I assume just inject some 5200 into the hole, coat the screw and then tighten the nut? Make the nut good and snug or not so much because that would squeeze out the 5200?

That is a really nice hole though. :lol:

Thanks for noticing the quality of the hole! It's a shame I have to cover it up with a screw head! :embarassed:
 

Watermann

Starmada Splash of the Year 2014
Joined
Jan 12, 2013
Messages
13,753
Yeah I would snug up the nut while having someone hold the head still so that way you don't spin the 5200 out of the hole and stop when there's full squeeze out around the screw / nut. Wipe off the excess so there's nothing to look ugly or catch and rip out the seal.
 

sberl

Petty Officer 3rd Class
Joined
Jul 15, 2017
Messages
97
Since I'm not putting the live well back in I have 2 unnecessary holes below the waterline. Whats the best way to deal with those? Is there a simple plug I can put in or should I remove all the hardware and patch them like you mentioned in another thread Watermann?

Watermann said:
Use a hole saw to cut 2 x 1.5" patches, one patch for the inside and one for the outside. Use a 1/4" machine screw to run through the hole in the center of the patch. Use a fender type ss washer to put in the 3/4" hole in the hull to take up the gap with one patch on the outside run the screw through the patch and then the washer, next through the inside patch and tighten down the nyloc nut inside. Use 3M 5200 on each surface including the screw head with plenty of squeeze out to seal the deal and be a super strong adhesive.
 

Watermann

Starmada Splash of the Year 2014
Joined
Jan 12, 2013
Messages
13,753
So the holes would be on the transom then below the waterline. Since impact is highly unlikely on the transom you could do that method above. Or something like a stainless kitchen sink hole plug along with 5200 to seal it. Not unsightly either.


sberl

Petty Officer 3rd Class
Joined
Jul 15, 2017
Messages
97
I like the sink plug idea. I can't find any real SS ones however, they all just have a stainless finish. I assume as long as it's some kind of plastic it should be fine.
 

Watermann

Starmada Splash of the Year 2014
Joined
Jan 12, 2013
Messages
13,753
Yeah as long as they're on the transom nothing should ever impact them.
 

sberl

Petty Officer 3rd Class
Joined
Jul 15, 2017
Messages
97
The winter seemed long but the temps have warmed up enough now and I'm back making progress on the boat. Hoping it will see water this spring or summer.

The sink plugs seemed to work great. I may have way over did the 5200 but that's how the original fittings looked so I just followed what they did. The inside looks the same so they really shouldn't leak hopefully. I'll definitely be keeping an eye on them for the first few outings though.
sink.jpg

I bought a drip pan to set the gas tank on to hopefully keep the gas and oil from getting into the carpet. However, I have a limited amount of space in the back of the boat and the pan was quite a bit larger than what the tank needed. After searching online for a smaller one and realizing they didn't come any smaller, I resorted to raiding my wife's stock of cookie sheets. Unfortunately none of those were large enough however. So, after pondering it for a bit, I did the next best thing and formed my exact required shape from the one I purchased. Turned out pretty good actually.
pan2.jpg

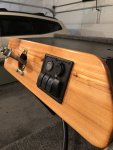
Still have the wiring to do but I did get the console put back together. Initially I wasn't crazy about having a wood dash but I'm pretty happy with how it looks. I put the fuse block on the back side of the console which is wood and obviously the switches are on the dash. I'm not sure how to run the wires between the two since they'll need to be run alongside the metal console. Any suggestions on how to run wire along a metal wall and somehow keeping it secure?

The dash - just waiting for the steering wheel to come now. dash2.jpg

I still have more work to do on the back decking but hopefully that will be finished up in a couple of weeks. I do think I can see a light at the end of this tunnel!
 

Attachments

  • dashClose2.jpg
    dashClose2.jpg
    1.4 MB · Views: 0

Watermann

Starmada Splash of the Year 2014
Joined
Jan 12, 2013
Messages
13,753
Hey that fuel tank pan will work out great, should keep everything nice and tidy. :thumb:
 

sberl

Petty Officer 3rd Class
Joined
Jul 15, 2017
Messages
97
Well I've been making some progress. My day job has been keeping me super busy so my boat restore time has been somewhat limited. Hoping to have her on the water in August. Some updated pics....

Finished console:
dash.jpg


Fuse block complete (I'm hoping):
fuse.jpg

This isn't the greatest pic but I've got the decals on:
full.jpg

Fired up the the motor yesterday. Good news is it purred like a kitten; bad new is there was no water coming out of the telltale. All the passages seem clear so I now have the lower unit off and a water pump kit on order. Hopefully with some guidance in the Mercury forum I can get it replaced without any issues.
LU.jpg
 
Joined
Nov 29, 2018
Messages
18
What did you end up doing for the rear tow strap rubbing on the paint?
have you done a leak test on your livewell holes in the transom?
 
Status
Not open for further replies.
Top