1987 MirroCraft project - what did I get myself into?!?!

Status
Not open for further replies.

sberl

Petty Officer 3rd Class
Joined
Jul 15, 2017
Messages
97
I was just looking for a decent fishing boat. It didn't have to be pretty or anything, as long as it would float and had a motor I was going to be happy. Well we found one and it followed us home a couple weeks ago. The carpet was pretty shot so I figured I'd just replace that - no big deal. Well, the seats were pretty rough looking too so what the heck right? Oh, and since it only has 2 seats I wanted to add a third, which meant moving one of the current ones. Of course you can't just move a pedestal seat without leaving a mess from the hole left behind! Fine, I'll replace the wood floor too.... Well, actually the rest of the wood platforms etc are pretty rotten so they have to be replaced too.
However, I told myself I was NOT going to paint the outside. But my research kept bringing me back here and I found myself looking at other boat restores and how awesome they all look in the end with the hull stripped and painted fresh. Fine - if I'm going to do it I might as well go all the way! I'm sure I'll have a lot of questions along the way and have gotten so much help already, this forum and the individuals on it are incredible!

And so begins my journey....

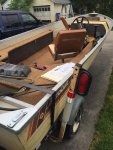
Picking up the boat from the previous owner...
1.JPG

This was the first time I had ever pulled anything behind a vehicle so we made a pit stop in a school parking lot so I could practice backing up. Because, when I got it home I was going to be faced with backing into my driveway and on into the garage. As it turned out, it was much easier than I thought it was going to be - whew!

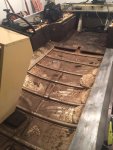
So the tear down began:

IMG_5768-3.jpg


2.JPG


IMG_5789.JPG

The floor towards the back of the boat was completely waterlogged but luckily all the foam is as dry as a bone.

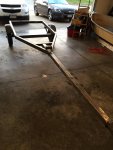
The next picture shows what starts out as a 2x6 and is tapered down as it runs toward the back of the boat. It's really not in bad shape considering it's 30 years old. My question is what do I replace it with? Just a normal pine 2x6 and give it several coats of finish? It lays on top of the aluminum ribs down the center of the hull the whole length of the boat.
IMG_5790.JPG


Thanks for reading!
 

Attachments

  • image_271776.jpg
    image_271776.jpg
    151.9 KB · Views: 5
  • image_271779.jpg
    image_271779.jpg
    162.4 KB · Views: 6
Last edited:

Scott Danforth

Grumpy Vintage Moderator still playing with boats
Staff member
Joined
Jul 23, 2011
Messages
47,499
only one of your pictures showed up

for the center 2x6, i would simply replace with pine and use Woodonglass 's old-timers wood preservative. the original 2x6 lasted this long and was not treated
 

sberl

Petty Officer 3rd Class
Joined
Jul 15, 2017
Messages
97
Darn it! I can see them if I'm logged in to iboats. I'll try to fix when I get home later today.

Sounds good for the 2x6. That's the formula I plan to use for the plywood as well.
 

ezmobee

Supreme Mariner
Joined
Mar 26, 2007
Messages
23,767
Welcome to iboats! Lots and lots of good aluminum boat restores here. It's real off that your Mirrocraft had a big wooden stringer in it. They are almost always aluminum angle. I can't remember if it was Mirrorcraft that had a couple years of an entirely foam sub-structure, perhaps it was and your boat has had a deck replacement once already. I'll wait for the other pics.
 

sberl

Petty Officer 3rd Class
Joined
Jul 15, 2017
Messages
97
Ok, I think the pics should be there now.
I'm pretty sure it's all original because ALL of the wood has the same color brown stain. That 2x6 is actually in remarkable shape for it's age if it is original.
 

briangcc

Commander
Joined
Jul 10, 2012
Messages
2,115
This might have been mentioned elsewhere so if it has I apologize but I'd recommend turning the bolt around so you're not gouging the hull.

y4mI3ifYctOlSCWuOh7OQCq6EoOLGX7vlmyjsF1ckLnlTBjZgVrF-px8ew0swdwXZcfdtskaPS5pniQr0mggczV0CHydhvNAhRID0H9A1TgCkWrN5ZMp_4IHBu05bsL0RguVxmTecrt1YyVwhxnwsQB3hEj-ag-Ej50zpYkirGmPCFVaDze5x__QE1RDCTbWu9oXw1Z0dHhgBPB5k0GdwRltA


Hide the extra length of the bolt behind the tail light where it can't get to your boat....or, if the trailer allows, move the light down low completely.

Is that particleboard by chance???
 

sberl

Petty Officer 3rd Class
Joined
Jul 15, 2017
Messages
97
Ya I need to fix those bolts. I plan to do some work to the trailer once I have the boat off and flipped onto some sawhorses for stripping/painting.
I spent some quality time with her tonight scrubbing away at the 30 years of gunk built up on the inside of the hull.
shine.JPG
 

sberl

Petty Officer 3rd Class
Joined
Jul 15, 2017
Messages
97
We just got back from spending a week at our cabin in northern Wisconsin which is where this boat will be most of the time. Needless to say not much progress has been made. I did build the motor stand today from plans on this site. Next up will be leak testing, cutting and sealing the plywood panels and motor removal.

This may be a dumb questions but if I paint the hull using the Woodonglass method of using "Tractor Paint", will it still look nice after several years of use? I have access to a spray gun but since I don't have access to a spray booth I'll just be doing this outside. I noticed in the Tractor Paint thread it said it would be fine for boats left in the water for 3 or 4 days, what about up to 7 days in the water?

Another issue I have is shown the the pic below. What can I do to prevent this strap from rubbing the paint off like it has in the past?
IMG_5830.JPG
 

sberl

Petty Officer 3rd Class
Joined
Jul 15, 2017
Messages
97
I like to consider myself somewhat mechanically inclined but in trying to remove the steering from the console I'm a bit confused. I have the actual wheel off but in order to gain access to the bolts holding the whole thing to the wood panel (is that called the console or dash?) I need to remove the plastic collar. It should just slide off the steering shaft but there is a key in the way. I've given the key some lube and used a little persuasion but I'm afraid to use too much since I'm not even sure how it's held in place. I'd appreciate any guidance I can get. Pics in case my explanation was not clear.
IMG_5850.JPG

IMG_5851.JPG
 

sberl

Petty Officer 3rd Class
Joined
Jul 15, 2017
Messages
97
Never mind haha. I asked a couple of co-workers today and they said it was likely a half moon key and should just pull straight out. Got home and tried just pulling and sure enough. :facepalm:

IMG_5858.JPG
 

sberl

Petty Officer 3rd Class
Joined
Jul 15, 2017
Messages
97
A few things I've been pondering:

1) Electronics - These are the items I'm planning to install/power from the starting battery (separate battery for trolling motor):
Lights (bow and stern)
live well pump
live well aerator (maybe? is that a good idea or better to just keep the pump running fresh water in?)
Bilge pump
Depth finder

Installing this switch on the console to control the lights, pumps and aerator.

Snap2.jpg

The boat currently (from the factory I assume) has 0 fuses. Well, the live well pump has an inline one but that's it. Would it be wise of me to install a fuse block or just wire straight to the battery? If a fuse block is the smart thing to do, what would be the recommended one for the above equipment?
 

Woodonglass

Supreme Mariner
Joined
Dec 29, 2009
Messages
25,924
The tractor paint is fine for two weeks in the water just make sure she gets a good wash down after she is on the trailer
 

sberl

Petty Officer 3rd Class
Joined
Jul 15, 2017
Messages
97
Sounds good Wood! She will definitely get cleaned up once back on the trailer!
Been making quite a bit of progress on both the boat and trailer. My wife may not think so as I haven't started putting anything back into the boat yet but I have all the wood cut, sealed and varnished (except for the floor). My son and I are working on this together and I think we've changed our minds on the paint. Actually I think this is about the hundredth time we've changed our minds on it haha. Yesterday while I was grinding the trailer (which turned out to be not as "fun" as I thought it would be) he was buffing the bottom of the boat just to see what it would look like. The bottom is actually in pretty good shape, it has areas of missing paint but I expect those same areas would look the same after a few outings if we did repaint the bottom. Sooo, our thoughts are at this time is to leave the bottom, factory paint as is and just strip and paint the sides. Is there any downside to that approach?

I'll post some updated pics in the next day or so.
 

sberl

Petty Officer 3rd Class
Joined
Jul 15, 2017
Messages
97
I'm in the process of paint removal and have a couple questions.

1) in the picture below you can see a nice bead of caulking or some other sealant on the painted surface next to the horizontal line of rivets. The paint remover I'm using is doing a number on it as you can see. Is that ok or should I not use paint remover over those areas?

2) The area in the bottom right of the pic I went over with 220 sandpaper (I don't have anything finer at the moment). Is that what I should be starting with and then go finer or should I be starting with 400 or more?

IMG_5935.JPG
 

Dwayne433

Recruit
Joined
Sep 26, 2015
Messages
1
has anyone out there installed a new console? My new one is plastic, and I don't have the throttle in it - just whatever gages I use and the steering wheel.
 

sberl

Petty Officer 3rd Class
Joined
Jul 15, 2017
Messages
97
has anyone out there installed a new console? My new one is plastic, and I don't have the throttle in it - just whatever gages I use and the steering wheel.


Dwayne, I think you meant to create your own post but instead posted here. Sorry though as i don't have any answers for you.
 

sberl

Petty Officer 3rd Class
Joined
Jul 15, 2017
Messages
97
It's been a while since I've updated this thread so I guess it's time...

All the wood has been cut and each is at some point in the sealing process. I used 1/2 and 3/4 inch Arauco plywood for all pieces.

Some pieces were a little more difficult than others to use as a template haha
IMG_5866.JPG

Some of the puzzle pieces drying
IMG_5879.JPG

Checking the dry fit (my boat model (aka wife) was a little camera shy :))
IMG_5870.JPG

Moved on to the trailer as it also needed quite a bit of work. Notice the left bunk :laugh:
IMG_5890.JPG

Made some progress that day but got rained out and had to move into the garage. So what was once a two car garage is now a 1 boat garage. I Tried to move through this phase as quickly as possible so my wife could put her car back in the garage... "If moma aint happy nobody's happy".

IMG_5896.JPG


A fresh coat of paint
IMG_5931.JPG

New tires, lights, bunks and chains and it looks like new. Just need to mount the spare and get a new wench for it.
IMG_5949.JPG

Now back to the boat. Let the stripping begin!!!
IMG_5954.JPG

Fast forward a bit and this is where I'm currently at.
IMG_5955.JPG
 

Attachments

  • IMG_5896.JPG
    IMG_5896.JPG
    175.9 KB · Views: 2

Watermann

Starmada Splash of the Year 2014
Joined
Jan 12, 2013
Messages
13,753
Nice progress and the decking fit look good :encouragement:

I have a few things for you to think about.

Be sure to do a leak test before going any further, these older riveted boats do tend to develop leaks. Any damaged or loose rivets need replaced or rebucked. Most of us also re-seal the seams with gluvit epoxy. It's also a good idea to fit your boat on the trailer before painting it to avoid any damage to the fresh paint. I would ask you to consider not painting the bottom of your boat, I left the bottom bare on my SS and will never paint the bottom of another tin boat. It's kind of like painting the underside of a car, nobody will ever see it unless you run them over that is :lol:
 

sberl

Petty Officer 3rd Class
Joined
Jul 15, 2017
Messages
97
I've already done the leak test and none were found. All rivets appear solid so I think I lucked out there. As for re-sealing, does the gluvit just go over top of the existing seal or would that need to be removed first? I didn't get an answer to my question about the stripper around the seal so I just stayed clear of it and was able to remove the paint without damaging the rest of the seal like shown in the pic below.

I do have a question on the placement of the boat on the trailer. Should the majority of the weight be supported by the rollers on the keel or by the bunks. When I brought the boat home the transom was the only area being supported by the bunks but they were in really bad shape.

Regarding painting the bottom, that is a good point and would get the boat out on the water faster haha.

seal.jpg
 
Status
Not open for further replies.
Top