1976 Grady White Transom Rebuild

demarko210

Chief Petty Officer
Joined
Jan 2, 2015
Messages
512
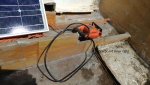
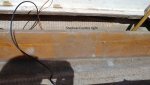
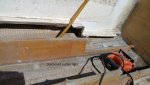
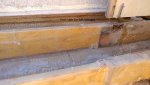
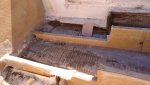
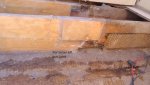
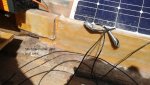
I was going to through some 40 grit on it and its 1 1/8 in wide. People say they use it to grind metals with it. I have not made the final decision on the cut yet but it will be cut and at that location. I wanted to control the dust it was my main reason for buying this. I still need to do some grinding in the cabin floor and if I do not have to clean dust particles after i finish like the guy referenced in the video i will be ahead (just catch and vac lol). Hard to do with the angle grinder when it wants to jump out of your hand.
 

demarko210

Chief Petty Officer
Joined
Jan 2, 2015
Messages
512
I had another question KC.The original stringer section that was removed had a width of 1 inch and the wood was lumber. I used 3/4 and 1/4 ply wood and one layer of 1708. I will add another layer at the butt joints. Should I add another layer around the stringers even though i am already at the thickness and should i sand before if yes? And should i add a layer of MATT or 1708 on the hull bottom if i should?
 
Last edited:

kcassells

Fleet Admiral
Joined
Oct 16, 2012
Messages
8,600
Ply has more structural integrity than dimensional lumber so 3/4" alone would e fine. I would wrap 2 layers of 1708 on both sides. Make 1 go 3" onto hull and the 2nd one go 6" onto hull. Do the corners the same way, 3" over lay then 6" overlay.
Glass and tabbing done!
You can also do the 2 layers wet on wet. So you work the 2nd pc. over the 1st pc makes for a better chemical/mechanical bond.
You can also do the bulkheads and stringers on a table {on the flat** wet on wet. Reak easy to work on the bubbles. Then set pc, in pb then double tab each side like described above.
Use what ends up feeling comfortable for you. works for you. Always 2x tab or 2x glass.
If not wet on wet then with poly I believe a quick rough sand and an acetone wipe off.
!708 has matt so not necessary. I actualyy made my glass/tabs fill the entire space between structures so what I end up looking at is all new. May be overkill but I don't care.

Keep the pics coming.
 

demarko210

Chief Petty Officer
Joined
Jan 2, 2015
Messages
512
OK I had already cut the 1708 for the stringer last year. I was not sure if I need another layer being that the new wood as you said has more structure integrity. My first layer already on the stringer does go 3 inches up the stringer and 3 inches on the hull. The other that i cut last year was cut to go 6 inches up and 6 inches on the hull so that's good. Actually 3 and 6 will cover the hull bottom except for were the tank will go in the middle. Its not over kill layers of more glass at the bottom, we will have a more solid hull bottom i suspect.

I wish i would have laid some mat on the stringers before i installed them (I like your saying mat if its flat). You are right about doing it on the table. I did the center stringer, and the bulkheads on the table with mat. No bubbles at all. You learn from your mistakes. When i look 1708 on the stringer now, i see some bubbles that I will need to sand and I will just add some PB back to seal it. This is where that new sander will come in handy spot checking. I tried to cap the stringer with 1708 and it was rough. Some was good some made things height uneven. I will need to cut and replace some of the stringer caps with some pulled mat instead of 1708.
 

boedekerj

Seaman
Joined
Jul 24, 2017
Messages
71
Depending on the size of the bubble you could try injecting. I’ve had good luck filling bubbles and dry laminates by injecting resin. Go to your local Farm and Fleet or FleetFarm and get some livestock injection needles. Drill a very small hole down to the bubble, draw some catalyzed resin into the needle, inject, done. I had a few bubble and dry laminates where I was able to save myself quite a bit of grinding and backfill with this process.
 

demarko210

Chief Petty Officer
Joined
Jan 2, 2015
Messages
512
I watched that video many of times before i even got started on the work. I think I watched almost every video i could before i got started. Here are some photos of the stringers close up. Let me know what you think for a first timer cutting wood and fiber glassing! The work was done last July and was left exposed to the weather over the winter. I also made that cut yesterday. I went on and used @oldrem advice and whipped out the jig saw. You can see the hd version of the images in my signature. I cut about 3 inch sections across then cut them out. I placed a piece of wood between the outter skin and the wood since that part is not sealed to the transom.
 

Attachments

  • 0324181404b.jpg
    0324181404b.jpg
    175.7 KB · Views: 0
  • 0324181404d.jpg
    0324181404d.jpg
    159.3 KB · Views: 0
  • 0324181404e.jpg
    0324181404e.jpg
    150.2 KB · Views: 0
  • 0324181417_HDR.jpg
    0324181417_HDR.jpg
    193.1 KB · Views: 0
  • 0324181403.jpg
    0324181403.jpg
    154.1 KB · Views: 0
  • 0324181403a.jpg
    0324181403a.jpg
    145.7 KB · Views: 0
  • 0324181403b.jpg
    0324181403b.jpg
    154.3 KB · Views: 0
  • 0324181403d.jpg
    0324181403d.jpg
    162.9 KB · Views: 0
  • 0324181403e.jpg
    0324181403e.jpg
    144.6 KB · Views: 0
  • 0324181404.jpg
    0324181404.jpg
    186.3 KB · Views: 0
  • 0324181404_HDR.jpg
    0324181404_HDR.jpg
    165.2 KB · Views: 0
  • 0324181404a.jpg
    0324181404a.jpg
    163 KB · Views: 0
Last edited:

kcassells

Fleet Admiral
Joined
Oct 16, 2012
Messages
8,600
Pics look good. That's alot of nice work and figgerin out. On the port iiner left side at the but joint whats going on below the but/hull area?
Looks rough, rotted, bare. Can't really magnify the pic closer to see.Glassing is funny. As you now know since your in it it gets easier and better as you move along.
 

demarko210

Chief Petty Officer
Joined
Jan 2, 2015
Messages
512
kcassells

That is on both inner stringers. I believe the manufacture or whoever make that cutout for water to drain to the bilge. It was cut in the shape of a arc, then they added woven. Finally they drilled a hole at an angle toward the bilge on both for water to drain. That what i think but its not rotten. I sanded everything before to make sure i got all the rot. that is why i did not need to go under the cabin. I stop cutting when the chainsaw started throwing light brown wood lol. Also it was less to cut during demo at that point.That is were all the rotten wood stopped. Typing this message

i just realized that every section of the stringer that rotted was against the foam. I suppose that is why i did not need to go under the cabin. No foam under the cabin.
 

kcassells

Fleet Admiral
Joined
Oct 16, 2012
Messages
8,600
Got it. May want to put a pc of pvc pipe in there and seal all around it. Protect the wood. Or make some thick pb and coat it a few times. Soak the crap out of them with resin first.
Yea the foam once it gets wet lets the water pool and that's just a slow death for the underdeck. Water always gets in below no matter how well it's put together. Water finds the path of least resistance. Could be a simple above deck mount that begins the process. has nothing to do with the integrity of the deck, or below fabrication.
Those sealed areas without limber holes and todays mfg practices of making everything concealed are going to be the next big rehab adventure.
Plenty more boats to do for us!
babble babble babble.... snowing again here...
 

demarko210

Chief Petty Officer
Joined
Jan 2, 2015
Messages
512
image_287397.jpg

Here is a picture of my MEKP. This means I can use if air temp is 55 or higher? Or should I be more concern with surface temps?
 

demarko210

Chief Petty Officer
Joined
Jan 2, 2015
Messages
512
kcassells

what i will do is fill the area with PB on both sides if I can then glass over it. I will not worry about drainage for the foam in that area. What I did and what I will continue to do as long as I have the boat is keep tilted upward so the water can drain toward the back into the bilge. I cut holes at the ends of the stringer to drain down to the bilge area. Would this be a problem leaving 3 small drain holes from under the deck for water to get out?

str1.pngstr2.png
 

kcassells

Fleet Admiral
Joined
Oct 16, 2012
Messages
8,600
demarko210
Poly is a lot different to temps than EEEppoooxxxyy. With poly and temp swings you may not get it to cure. With epoxy it will eventually cure. Watch your temp swings and also surface temp is important. If you can get some heat in there you'll prob. be fine.

what i will do is fill the area with PB on both sides if I can then glass over it. I will not worry about drainage for the foam in that area.
----Yup, you are filling the void and then glassing over them. Good
What I did and what I will continue to do as long as I have the boat is keep tilted upward so the water can drain toward the back into the bilge.
--- Definitely
I cut holes at the ends of the stringer to drain down to the bilge area. Would this be a problem leaving 3 small drain holes from under the deck for water to get out?
---Nope, no problem, you mean holes in the stringer/bulkheads? You gonna do that foam vid thing you showed me earlier?
Are you foaming those areas?

Getting ready for the easter dinner thingy and trying to do a couple of boaty things. Hopefully get moving a little now that temps are going my way.
 

demarko210

Chief Petty Officer
Joined
Jan 2, 2015
Messages
512
kcassells

---Nope, no problem, you mean holes in the stringer/bulkheads? You gonna do that foam vid thing you showed me earlier?
Are you foaming those areas?

I removed foam from there. That area is where my above deck gas tank sat on the portside, and the battery on the starboard. I have decided that I will foam in the entire the area i removed the foam from including under the cabin. I will not refoam that tail end where the stringer meets the transom. Hopefully water will free flow back there if any gets in.

Getting ready for the easter dinner thingy and trying to do a couple of boaty things. Hopefully get moving a little now that temps are going my way.

ENjoy your holiday. I will just wait to do any glassing until we area steady around 65 degrees. I am going over today and do some grinding of the the rear cap and center stringer. I have to remove that old lip and sand it down.


0709170955_HDR.jpg
 

boedekerj

Seaman
Joined
Jul 24, 2017
Messages
71
I deleted this, as I found about 3 millions posts about "DON'T USE POOL NOODLES!!!". Sorry to post silly questions...
 
Last edited:
Top