1987 lund Mr. Pike rebuild

Status
Not open for further replies.

james4022

Cadet
Joined
Sep 28, 2015
Messages
20
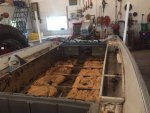
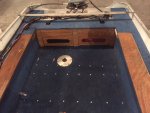
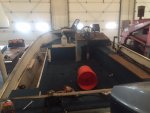
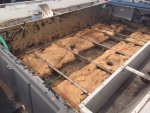
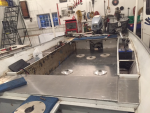
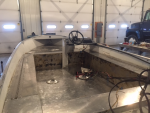
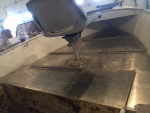
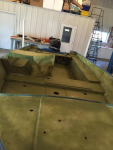
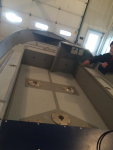
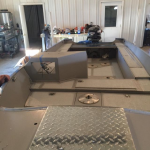
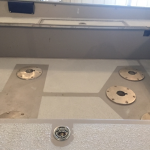
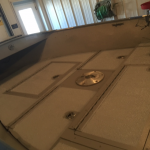
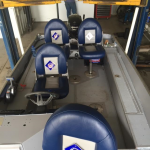
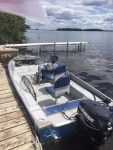
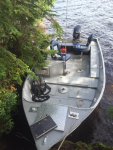
Fellow iboater's I have taken the plunge and started to rebuild a 1987 lund mr. pike. My plan is to remove the rotten flooring, replace with 3/16 inch aluminum, rework some storage space, and build a trolling station up front with depth finder. This weekend I took out the floor and performed a leak test (only 1 rivet was leaking, gotta love the lunds). I'll post some pics to keep everybody updated. Thanks for all the information on this site that has helped me to plan out this project.
 

Attachments

  • IMG_1358.JPG
    IMG_1358.JPG
    98.2 KB · Views: 21
  • IMG_1357.JPG
    IMG_1357.JPG
    115.7 KB · Views: 16
  • IMG_1349.JPG
    IMG_1349.JPG
    103.9 KB · Views: 18
  • IMG_1350.JPG
    IMG_1350.JPG
    90.4 KB · Views: 18
  • IMG_1360.JPG
    IMG_1360.JPG
    130.6 KB · Views: 17

james4022

Cadet
Joined
Sep 28, 2015
Messages
20
No Title

So I have completed my restoration and want to post the pics to inspire more restorations in the future and to make sure no one makes the same mistakes as I did. I used 3/16 aluminum and riveted it down so I don't have to worry about rotting. The decking ended up being slightly heavier that the 3/4 inch decking, but with the carpet and the water log it ended up being lighter
 

Attachments

  • photo259684.png
    photo259684.png
    494.2 KB · Views: 12

james4022

Cadet
Joined
Sep 28, 2015
Messages
20
No Title

Here is the completed aluminum decking on the boat
 

Attachments

  • photo259685.png
    photo259685.png
    441.1 KB · Views: 10

james4022

Cadet
Joined
Sep 28, 2015
Messages
20
No Title

I used stainless hinges for all the live wells and the compartments. They are quite industrial and really solidify the tops. I used clearance stainless slam hatches for all the compartments and the live well. Thank you gemlux for all the help and the instructions on installation.
 

Attachments

  • photo259686.png
    photo259686.png
    410.2 KB · Views: 8

james4022

Cadet
Joined
Sep 28, 2015
Messages
20
No Title

Here I used an etching primer to prep the surface. I washed all the aluminum down twice with soap to get all the gunk off. Than I washed with hot water to get the soap off. I than used a vinegar solution to start the etching process, than finished with the etching paint. There are a few places it has flaked off, but it has help up 99% with this application.
 

Attachments

  • photo259687.png
    photo259687.png
    387.8 KB · Views: 9

james4022

Cadet
Joined
Sep 28, 2015
Messages
20
No Title

I base coated with an industrial gray primer for metal services. I used and hvlp gun and it took me about 4 coats to make it look nice. I applied the kiwigrip antiskid for texture. I have used it for about three trips and it has help up well. It is easy to clean, just hose it down and put it away, very low maintenance.
 

Attachments

  • photo259688.png
    photo259688.png
    301.8 KB · Views: 9

james4022

Cadet
Joined
Sep 28, 2015
Messages
20
No Title

Front view of kiwigrip drying
 

Attachments

  • photo259689.png
    photo259689.png
    509.6 KB · Views: 6

james4022

Cadet
Joined
Sep 28, 2015
Messages
20
No Title

Floor design around post bases
 

Attachments

  • photo259690.png
    photo259690.png
    454.9 KB · Views: 2

james4022

Cadet
Joined
Sep 28, 2015
Messages
20
No Title

antiskid around the front hatches and the livewell
 

Attachments

  • photo259691.png
    photo259691.png
    466.9 KB · Views: 4

james4022

Cadet
Joined
Sep 28, 2015
Messages
20
No Title

Here is the complete project with seats installed
 

Attachments

  • photo259692.png
    photo259692.png
    534 KB · Views: 11

james4022

Cadet
Joined
Sep 28, 2015
Messages
20
No Title

Here she is sitting in Canada on her first trip. Everything worked great, I love my e-tec
 

Attachments

  • photo259693.png
    photo259693.png
    480.3 KB · Views: 9

james4022

Cadet
Joined
Sep 28, 2015
Messages
20
No Title

Here I am pulling up to a island in Canada for a shore lunch. I like having a little extra weight in the bottom, it handles like a dream. I can tell you it feels like you are walking on solid iron on the deck, there is absolutely no flex, I like the diamond plate, gives it the industrial look.
 

Attachments

  • photo259694.png
    photo259694.png
    540.2 KB · Views: 10

james4022

Cadet
Joined
Sep 28, 2015
Messages
20
I installed a stealth battery charging system for the trolling motor and it is great. I have to get a new trolling motor to compete the ensemble but that will be next year. The etec trolls me right along all day and I can go all day on a 6 gal tank of gas. I hope this will inspire some more transformations. I did nothing to the outside so it still looks like an old fishing boat, but when you take the cover off and start fishing, it is awesome. Thanks for looking.
 

ezmobee

Supreme Mariner
Joined
Mar 26, 2007
Messages
23,767
Really nice work! Love the metal deck. That boat will passed on to your grandkids.
 

James0007

Recruit
Joined
Sep 11, 2021
Messages
1
That looks amazing, i myself bought a 1987 Mr Pike 16’ with a1999 50 hp merc this spring. You wouldn’t have any scamatics on the plumbing and electrical would you. The previous owner disconnected the live well.
A814EA78-8921-421A-A2E1-1FD22CEC7BB8.jpegE1121CA8-079A-474C-8975-E52C1B7762AC.jpeg
 
Last edited:

Joeflynn96

Recruit
Joined
Mar 1, 2024
Messages
1
That looks amazing, i myself bought a 1987 Mr Pike 16’ with a1999 50 hp merc this spring. You wouldn’t have any scamatics on the plumbing and electrical would you. The previous owner disconnected the live well.
View attachment 349590View attachment 349591
James, Did you happen to find the schematics for the plumbing? I have the same exact boat and I am needing to pull the floor to rebuild the plumbing system due to a joint going bad and wasn't sure where it may be? unless you figured it out.
 
Status
Not open for further replies.
Top