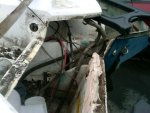
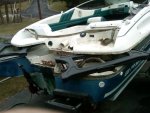
my 1991 capri rebuild

bleedblue94

Petty Officer 1st Class
Joined
Oct 11, 2010
Messages
272
Re: my 1991 capri rebuild

here are some more pictures of the boxes
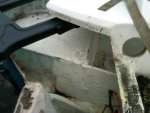
IMG-20120214-0004-.jpg
IMG-20120214-0003465.jpg
IMG-20120214-000398.jpg

now i think the plan is:
cut the transom out and the knee braces
install a new transom
cut out the boxes designed under the rear swim platforms
put the cap back in place and cut the floor and stringers out
then with the cap on cut and install the stringers, install the fuel tank, and then install the deck
at that point raise the cap again and cut and reinstall those boxes under the rear swim platforms
the permanently reinstall the cap

any comments or suggestions?
 

bleedblue94

Petty Officer 1st Class
Joined
Oct 11, 2010
Messages
272
Re: my 1991 capri rebuild

it appears the knee design bayliner did it very poor as the knees are on the side of the transom and not against it
 

Woodonglass

Supreme Mariner
Joined
Dec 29, 2009
Messages
25,924
Re: my 1991 capri rebuild

I think you should get some help and totally remove the cap. Then totally remove the Floor/Deck. I think you will find your "Knees" are actually extensions of stringers. I may be wrong but that's what I think. It's usually customary to remove the cap, deck and stringers and take everything down to the bare hull. this gives you a clean slate to start your build from there. Check the link in my signature on how to fabricate the deck, stringers and transom.
 

bleedblue94

Petty Officer 1st Class
Joined
Oct 11, 2010
Messages
272
Re: my 1991 capri rebuild

i understand this but im referring to how the knees meet the transom. they actually are pushing against the rear hull skin and are attached to the side of the transom wood. they are not pushing against the transom wood. so in a way its creating two small points of pressure on the rear hull skin, rather then displacing those two pressure points over the transom wood. just seems like a very poor design or poor workmanship. im going to do it the way i listed above to remove any chances of the hull changing shape during this build. the hull is so shockingly thin that portions flex even when its supported.
 

Decker83

Commander
Joined
Apr 5, 2011
Messages
2,592
Re: my 1991 capri rebuild

I couldn't tell from any of the pics here. How or you supporting the hull?
Just asking :)
 

bleedblue94

Petty Officer 1st Class
Joined
Oct 11, 2010
Messages
272
Re: my 1991 capri rebuild

its not shown but there is a cradle and straps run around the hull to maintain the shape, but even so ive just had nightmares about getting everything done and going to put the cap on and she says NO. there should be enough room to work when the cap is back on with the exception of those funky boxes in the rear swim platform spaces
 

Decker83

Commander
Joined
Apr 5, 2011
Messages
2,592
Re: my 1991 capri rebuild

Yeah I know what you mean. Taking on a project like this for the first time is alittle scarry.
It would probably be easier to do it with the cap off, but I would do what makes me feel the most confident.
It may be alittle harder to get to all the places in the boat, but you can do it and feel better about it then go for it.
Plus you can always take the cap off if you really have to at any time.
 

bleedblue94

Petty Officer 1st Class
Joined
Oct 11, 2010
Messages
272
Re: my 1991 capri rebuild

ive done stuff like this before but not with wood and glass, and ive done glass work before, but not in such a large structural manner. so really im not too worried, but i figure the general idea would be to follow and improve upon the original design and build, however as i explained in a previous post, i do not understand the thinking of the way the knee braces go on the side of the transom wood and press against the hull skin rather then the transom wood. just seems ridiculous to me that they would design or assemble it in such a way
 

bleedblue94

Petty Officer 1st Class
Joined
Oct 11, 2010
Messages
272
Re: my 1991 capri rebuild

didnt get to spend as much time as i planned yesterday bc my friend brought his son's car over to be fixed, but i did get the transom out and just couldnt believe how bad it was. also the knee braces are complete mush. only thing supporting this boat was fiberglass and a couple spots where no glass was used and just resin. the floatation boxes in the rear mulch under the weak and thin layer of glass. float is all wet. this is the kind of stuff that worries me for the sake of other boaters who dont examine boats....

the transom design was a stepped transom. is there any real draw back to building a transom that extends further on the sides then how far the original, narrow transom was?
 

oops!

Supreme Mariner
Joined
Oct 18, 2007
Messages
12,932
Re: my 1991 capri rebuild

the transom design was a stepped transom. is there any real draw back to building a transom that extends further on the sides then how far the original, narrow transom was?


nope, as long as you can get the new wood flat against the hull....you are good to go
 

bleedblue94

Petty Officer 1st Class
Joined
Oct 11, 2010
Messages
272
Re: my 1991 capri rebuild

thats what i figured... allot of peanut butter should do the trick. im just appalled by some of the things i am finding. makes me never want a production boat again. just let me buy a hull and a cap....
 

bleedblue94

Petty Officer 1st Class
Joined
Oct 11, 2010
Messages
272
Re: my 1991 capri rebuild

have another question regarding the fuel tank. the stock tank from this boat is plastic. i had a larger capacity metal tank i considered using but i will not fit properly. someone posted the install instructions for a metal tank and all the details with spacing to prevent rust. my question is with a plastic tank is it ok to just run a length wise half cut pvc pipe along the bottom of the hull for drainage from the ski locker to the bilge, then make a sub floor over that pvc, lay the tank on the sub floor, and then install the forward bulkhead tight to the tank? obviously the tank would be removed a couple times to properly glass the bulkheads, but the original design had the stringers tight against the tank while there was a gap between the tank and the forward bulkhead which was filled with foam. id like to avoid the foam obviously.

also any other capri builders installed an auxiliary tank? id liek to have a backup tank installed on the boat rather then carry a spare with me and need to always store it. any ideas on locations? ive debated mounting it in the bow under the floor in the front section of the ski locker or under/within one of the rear jump seats.not sure if anyone has any better ideas

also with all the resin experts on this site what is the minimum temp i can get away with using the resin and how long should it be allowed to cure before it can be subjected to colder environments? i understand different resins have different specs but im looking for a general rule of thumb. i spoke to a person at us composites about their 435 resin i bought and they were telling me their "recommendations," but he finished by saying that its judgement and you dont need to follow those details which i found odd. im in upstate ny and the weather/temps/humidity is a pain to work around.

thanks again guys
 

Woodonglass

Supreme Mariner
Joined
Dec 29, 2009
Messages
25,924
Re: my 1991 capri rebuild

not much help with your tank, but as far as resin goes, you should not lay it down unless the ambient temp for the resin and the substrate will be @ or above 50? for a mimimum of 4 hours. You can "Tent" the area being glassed and use "Heat Lamps" to bring the temp up and maintain it.
 

bleedblue94

Petty Officer 1st Class
Joined
Oct 11, 2010
Messages
272
Re: my 1991 capri rebuild

not much help with your tank, but as far as resin goes, you should not lay it down unless the ambient temp for the resin and the substrate will be @ or above 50? for a mimimum of 4 hours. You can "Tent" the area being glassed and use "Heat Lamps" to bring the temp up and maintain it.

hmm i do have a spare ceramic heater i could use as i do segments. us composites said something about 24hrs, thats what kind of threw me for a loop
 

Woodonglass

Supreme Mariner
Joined
Dec 29, 2009
Messages
25,924
Re: my 1991 capri rebuild

24 hours for full cure. 4 hours will let it initially set and start the cure process and the heat of the cure to abate. You would NOT want it to FREEZE in the first 24 hours.
 

bleedblue94

Petty Officer 1st Class
Joined
Oct 11, 2010
Messages
272
Re: my 1991 capri rebuild

24 hours for full cure. 4 hours will let it initially set and start the cure process and the heat of the cure to abate. You would NOT want it to FREEZE in the first 24 hours.

ok but beyond the 24hrs we should be good then correct?
 

Woodonglass

Supreme Mariner
Joined
Dec 29, 2009
Messages
25,924
Re: my 1991 capri rebuild

Yeppir, the chemical bond usually occurs within 24 hours but cooler temps slow it down. If you can keep it close to 60 for 24 hours you are golden. Like I said "Tenting" and heat lamps will do the trick.
 

bleedblue94

Petty Officer 1st Class
Joined
Oct 11, 2010
Messages
272
Re: my 1991 capri rebuild

Yeppir, the chemical bond usually occurs within 24 hours but cooler temps slow it down. If you can keep it close to 60 for 24 hours you are golden. Like I said "Tenting" and heat lamps will do the trick.

would there be any specific visible signs of a poor bond during that initial curing phase? thanks for all the help
 

Woodonglass

Supreme Mariner
Joined
Dec 29, 2009
Messages
25,924
Re: my 1991 capri rebuild

Not really, but it would not adhere properly and you would easily be able to rip it off. If its stuck then you're good. Remember however, you need to apply the next layer of CSM as soon as the previous layer tacks off. This helps the next layer to Chemically bond to the previous one during that 24 hour chemical bonding period.
 

bleedblue94

Petty Officer 1st Class
Joined
Oct 11, 2010
Messages
272
Re: my 1991 capri rebuild

ok transom is all but done. just need to hit it with the belt sander. couple more questions now:

-with regards to the drain tube, i am planning to use some pvc tube. do people recommend using the full circular tube or cutting it in half length wise?

-do people recommend attaching the transom wood to the hull skin with peanut butter or pl? ive had pretty good success with pl, but im curious about this.

-how will i glass/tab the top of the transom to the hull? im curious with the splashwell portion of the cap coming down on top of it how to do this. also how do i level it to match the cap? or do i even need to worry about that?

-any tips/techniques on how to redrill the new transom wood to match the original holes in the hull and splashwell for the splashwell draintubes?
 
Top