Exhaust elbow mercruiser 470 flapper and retainer

aarons 470

Petty Officer 1st Class
Joined
Aug 29, 2012
Messages
351
But the exhaust goes down through the 4" then out back of boat correct? so you would have it right dodge. I'm leaving it until Tomm lol.

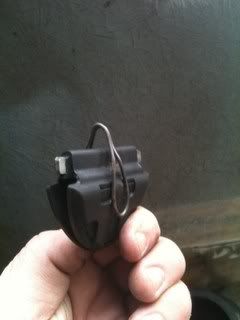
Thing is though, no matter what way I flip the flapper it does open up at all it's hitting the pipe where it reduces immediately. So either way the flapper is in would not allow any exhaust to flow through from the top (larger opening) downward. It can flow the other way though as the pipe doesn't decrease that direction.

So I must have the wrong flapper? Or I'd need shorter retainer clips but I doubt they made 2 sizes.

I didn't get much done with engine install. My engine mount bracket that goes around the flywheel is the wrong one. I have one with to small of a space between the 2 engine mount bolt holes. I need one that's around 14-1/2 apart.
 
Last edited:

aarons 470

Petty Officer 1st Class
Joined
Aug 29, 2012
Messages
351
Yes, that is what it looks like Terry. Thanks.

And now the next mystery the flapper is the same part
Number 45586.

This is the one I just bought and isn't working, (unless shop gave me the wrong part?)
 

alldodge

Moderator
Staff member
Joined
Mar 8, 2009
Messages
40,760
Did you use something to keep it together when installing like this

IMG_0398640x480.jpg
 

aarons 470

Petty Officer 1st Class
Joined
Aug 29, 2012
Messages
351
No, I saw that in the link. I attached it to the brackets then just carefully lowered it into tube. Basically where
The pipe narrows the flapper sits right when brackets are screwed on- so no matter what position flapper is flipped, it can't let pressure downward it hits pipe.

Would Work fine flowing up through the larger 4" side.

The parts listing you gave me dodge- the flapper part number is the same as the one terry gave me.

But my setup is the same as picture terry found. My origional one is exactly like that picture.

My replacement is the same but it's a 1 piece elbow. Same retainer clips and pipe size/shape though.
 

aarons 470

Petty Officer 1st Class
Joined
Aug 29, 2012
Messages
351
No Title

My replacement looks like this, doesn't have the flange in the middle. Same diameter though.

My origional had one retainer clip left and it is the same as the ones in my replacement tube.
 

Attachments

  • photo256336.PNG
    photo256336.PNG
    1.3 MB · Views: 0

alldodge

Moderator
Staff member
Joined
Mar 8, 2009
Messages
40,760
Just guessing here. The issue with many of the old parts is the parts list get copied and pasted even at Merc. The exhaust tube number is 72082A2, but if you look at the images that show up, there are two variations but no difference n part numbers. In review I found different keeps which are shorter using part number 45798 which is no longer available and were used on. Merc site does not list the 470 and this part shows up at Merc and BAM with the 120

45798.jpg
 

aarons 470

Petty Officer 1st Class
Joined
Aug 29, 2012
Messages
351
Thanks dodge- So sounds like I'm out of luck until I can find some smaller clips that aren't made anymore.

I wonder what flapper was in there originally with these longer clips. Maybe there is one out there that will fit my retaining clips
 

alldodge

Moderator
Staff member
Joined
Mar 8, 2009
Messages
40,760
As before I'm just guessing. Also just found another flapper number 60930 which is Sierra 18-2727. In post 2 these other flappers were used and if we use the pic, it kind of shows the neck is smaller then the main exhaust tube, this is the reverse of what you currently have. Maybe a transition time during change over. Can go at this in two directions, shorter retainers or smaller flapper. Need to find the specs on the flappers

http://www.iboats.com/Exhaust-Water-Shutter-18-2727-Sierra/dm/view_id.172505
 

aarons 470

Petty Officer 1st Class
Joined
Aug 29, 2012
Messages
351
Ok thanks dodge. I'll get My hands on one and see
If the flapper is smaller.
 

aarons 470

Petty Officer 1st Class
Joined
Aug 29, 2012
Messages
351
Flapper number 2 is on its way local shop will have one for me Tomm. 60930-keeping fingers crossed.

I think this one is also used in the 3 liter engines so good chance its smaller.

Dodge in the picture you posted with the flapper. As your holding it the flow would be allowed to go downwards correct? So the corrigated/ beveled edge piece faces up on my riser?

The flappers seem weak in both directions so kind of hard to tell. but I guess there designed to rub against pipe in the one direction to hold it in place like a check.
 

aarons 470

Petty Officer 1st Class
Joined
Aug 29, 2012
Messages
351
And another question, never ends! Lol
So the lower part of my tube with the 3 bolts. I'm not seeing a gasket listed for this.

Does it need one? Figure I can make one if needed or should I just use some RTV?
 

aarons 470

Petty Officer 1st Class
Joined
Aug 29, 2012
Messages
351
Did you use something to keep it together when installing like this

IMG_0398640x480.jpg

Dodge you have me thinking. The pic you asked me about with the flapper being bent down, from the link Terry provided.

You asked if I installed it that way. I didn't, I just laid it in there and it went pretty easy with the retainer. But it wouldn't go down to open up for the exhaust. Maybe it needs to go just below that point to work? As you said folded position?

The guy in that link appears to have my tube and he made the flapper work that I just returned.

So maybe I have to fold it to get it down a tad farther on the edges to butterfly it? It seemed really tight but that guy did it. I didn't try this as it seemed to big. Maybe the pipe flares out just enough below the spot I had it at. It was just so tight though, I don't see how it could move either direction.

I'll try this and the new flapper Tomm
 
Last edited:

Fun Times

Moderator
Staff member
Joined
May 16, 2009
Messages
8,809
Dodge you have me thinking. The pic you asked me about with the flapper being bent down, from the link Terry provided.

You asked if I installed it that way. I didn't, I just laid it in there and it went pretty easy with the retainer. But it wouldn't go down to open up for the exhaust. Maybe it needs to go just below that point to work? As you said folded position?

The guy in that link appears to have my tube and he made the flapper work that I just returned.

So maybe I have to fold it to get it down a tad farther on the edges to butterfly it? It seemed really tight but that guy did it. I didn't try this as it seemed to big. Maybe the pipe flares out just enough below the spot I had it at. It was just so tight though, I don't see how it could move either direction.

I'll try this and the new flapper Tomm
The idea of the flapper is to allow the exhaust gasses and engine water flow to exit the engine out through the transom exhaust pipe...Along with not allowing any backwash wake water from the lake to go back up into the engine creating a engine hydro lock situation.

With that, while installing the flaps, they (the tips) need to be collapsed downwards inside the pipe/towards the bottom of the pipe/boat/out towards the exiting water flow from the engine exhaust system like seen in the photo with the wire holding the flaps down so that the engine water can flow out the rear of the boat...The photo you posted with how they are installed in the pipe right now appears incorrect as the flaps won't fall/be pushed downwards under engine pressure thus not allowing the exhaust water/gasses to flow out "correctly" potentially affecting engine performance, engine temperature and possible engine damage too.

Essentially all you would have to do is remove them one more time from the pipe, find a way to hold the flaps collapsed downwards like the photo with the wire, insert the flaps with the tips downwards, bolt the holders down then remove the holding wire so the tips naturally flap upwards resting on the inside pipes.
With the tips down, water from the lake can't flow back up to the engine as the flaps would be pushed up against the pipe even tighter than the small area that you are working with/in now but yet allow water to flow outwards.
 

aarons 470

Petty Officer 1st Class
Joined
Aug 29, 2012
Messages
351
Ok thanks for gasket number.
Thanks for the orientation clarification. Makes sense how the bevel would push upward to form the seal if needed.

It's a pretty bad check valve. Rubber in a hot location, with horrible access once installed. Oh, it's a boat that explains it!
 

aarons 470

Petty Officer 1st Class
Joined
Aug 29, 2012
Messages
351
And on the transom o ring. My tube piece doesn't have an inset for an o ring, it's flat faced.And the transom side has a raised faced.
Should I just make a gasket? My gasket engine kit came with some material.

And to note for clarity my origional set up is the odd 2 piece tube assembly that Terry found. My replacement tube is basically same but the flange face or
Style may be different. If I still have the origional I'll take a look, not sure I still have it.
 
Last edited:

stonyloam

Vice Admiral
Joined
Mar 13, 2009
Messages
5,827
It's a pretty bad check valve. Rubber in a hot location, with horrible access once installed. Oh, it's a boat that explains it!

Actually it is not that hot. The raw cooling water exiting from the heat exchanger dumps into the exhaust and keeps all of the rubber parts cool. If the impeller should fail or it is run in the driveway without muffs then there is no exhaust cooling and that is when things get hot and burn up.
 

aarons 470

Petty Officer 1st Class
Joined
Aug 29, 2012
Messages
351
Good to know. I didn't t make it to shop today to try out the other flapper. Hopefully tomorrow. Would like to get this engine in this coming weekend
 
Top