*ding*...You've got oil

pantaloonz

Petty Officer 1st Class
Joined
Nov 28, 2014
Messages
237
Hi Skippy

The tool is on the way..

I have seen the 2X4 insertion method.. :)

I'm being a bit of a grump, I really wanted to boat this weekend and not wait another 5 days for yet another darn tool :)

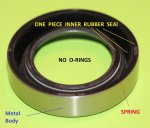
Bearing: It's very greased up.. the grease I delivered from the actual gimbal nipple is coating that sucker, but I'll look it over and add more if needed
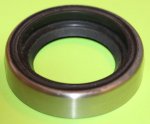
I should be able to reach the area the bearing sits to clean out where it sits

I guess I gotta dry the tears and get past the lost weekend..

I'm surprised that the drive shaft fits THAT snugly on that bearing.. shouldn't SOMETHING be holding that thing in place?

-Pantz
 

skippy2235

Petty Officer 2nd Class
Joined
Aug 24, 2009
Messages
138
Grease needs to be inside the side seal, on the balls and races. Not on the outside.
Also clean up the drive shaft, with scotch bright, that bearing should slide on and off that shaft easily. Clean all rust and debris off, look for any scratches, or burrs.
 

bruceb58

Supreme Mariner
Joined
Mar 5, 2006
Messages
30,480
That bearing normally should not come out very easily. It's a very snug fit. I actually throw the bearing in the freezer first to make it easier to install.
 

pantaloonz

Petty Officer 1st Class
Joined
Nov 28, 2014
Messages
237
Hi Gents,

Ok let me understand both sides here:

First the bearing itself and where it sits should not have grease around it, just inside on the rollers and races? Peering inside the area there is too much grease then and I will need to address that. The bearing should fit in it's spot very snug, I get that because you need to set it with either the bearing tool or a device that will provide adequate pressure to the entire bearing to seat it.

2nd and this one has me concerned.. the drive shaft is tapered.. the shaft does not pass easily through this bearing at all. I had to use a soft mallet to hammer to tap the bearing off.. Granted it wasn't a lot of force but as it is now it will not slide easily past. In the current state it would take a bit of effort to get this anywhere near the two o-rings.. this bearing might be going bad?

I looked over the bearing again this morning and would like some guidance, Even those it rotates smoothly without noise or resistance, the bearing it not flush. In other words; laying the bearing flat on the table, the part that actually rotates with the drive shaft is not sitting flush with the rest of the bearing, it's something slight like 2 - 3 degrees, but it's noticeable; A picture is 1000 words so here it is;

20150808_084602.jpg

If that inner part (sorry my terminology is still lax) is supposed to move a little: mine does not..
If it's not supposed to have moved.. MINE has.. hahahaha

I though the gimbal bearing is there to make sure the drive shaft is stable and level and straight.. the universals are responsible for all the angles! If the bearing has gotten this wacked out, the engine is likely out of alignment? The alignment tool is going to be a great assistance.

Time for new bearing too?

I'm now reading up on engine mount adjustments, and looking forward to my alignment tool arriving.

-Pantz

I'm over my little aggravation, it's been replaced with cold determination..
 
Last edited:

pantaloonz

Petty Officer 1st Class
Joined
Nov 28, 2014
Messages
237
Spoke to soon as usual..

After manipulating the bearing a bit.. it does move.. but not terribly easily.. it takes quite a bit push for me to manipulate the bearing,, but it does swivel.

It's feels sort of like stirring a stout tile mix.. The swivel movement is not smooth. apply enough force and it will move jerkily. The entire thing is swathed in grease though..

The bearing is also sliding into position on the shaft, sometimes it goes on eaiser than other times, but it is sliding on.

-Pantz
 

skippy2235

Petty Officer 2nd Class
Joined
Aug 24, 2009
Messages
138
First the bearing itself and where it sits should not have grease around it, just inside on the rollers and races? Correct
Peering inside the area there is too much grease then and I will need to address that. The bearing should fit in it's spot very snug, I get that because you need to set it with either the bearing tool or a device that will provide adequate pressure to the entire bearing to seat it. Correct again


2nd and this one has me concerned.. the drive shaft is tapered.. the shaft does not pass easily through this bearing at all. I had to use a soft mallet to hammer to tap the bearing off.. Granted it wasn't a lot of force but as it is now it will not slide easily past. In the current state it would take a bit of effort to get this anywhere near the two o-rings.. this bearing might be going bad? YES Bearing is very bad.

I looked over the bearing again this morning and would like some guidance, Even those it rotates smoothly without noise or resistance, the bearing it not flush. In other words; laying the bearing flat on the table, the part that actually rotates with the drive shaft is not sitting flush with the rest of the bearing, it's something slight like 2 - 3 degrees, but it's noticeable; A picture is 1000 words so here it is; YES Bearing is very bad. That twist is why it will not slide over the shaft.
If that inner part (sorry my terminology is still lax) is supposed to move a little: mine does not..
If it's not supposed to have moved.. MINE has.. hahahaha There should be NO movement. maybe 1/64 inch just enough for the balls to run in the race

I though the gimbal bearing is there to make sure the drive shaft is stable and level and straight.. the universals are responsible for all the angles! If the bearing has gotten this wacked out, the engine is likely out of alignment? The alignment tool is going to be a great assistance. Correct or the bearing got wet and rusty.

Time for new bearing too? YES
 

pantaloonz

Petty Officer 1st Class
Joined
Nov 28, 2014
Messages
237
Excellent response thank you

As mentioned I have an alignment tool inbound, thanks to Bruce's info

I have also ordered a replacement bearing.

I've been reviewing some exploded drawings of the outdrive upper and lower, and the transom assembly as I'm still pondering the fluid that leaked from the main gasket.

1. Water in the bellows, mixing and gooping up on the universals, drive shaft.. Im starting to see the picture, this fluid is probably not what leaked out, but the fluid is responsible for blowing a seal somewhere else..?

2. Gear oil... so I get water in the universal area, in order for gear oil to have entered here, the oil seal in the bearing carrier would have failed? The bearing carrier is by far the nicest looking part on my outdrive right now :) That oil seal, the gasket and o-ring all directly related to that part were in my gasket kit. I don't have the tool to get the universals out, so I'm kind of at a loss to replace that but : -- is water the only reason for failure of this seal, or do they fail over time?


If my lower drive held pressure (11psi for 8 hrs) .. maybe that wasn't enough pressure or time to verify that seal is still good?

3. Engine oil..the only path I see there is through the oil seal behind the gimbal bearing.. I don't see the oil seal on the bearing but the drawing indicates the gimbal bearing presses on this seal, or the seal presses into the bearing..
gimbal-oil.PNG
As you know I dragged the gimbal out, is the oil seal likely still on the bearing? are these actually part of the gimbal or should I be fishing around for mine?


After I get the outdrive back on, and on the muffs, do you guys feel that running it on the muffs (no load) will be sufficient to very the leak has been addressed, or is this something that has to be verified under load, and submerged?

-Pantz
 

Offrddrver

Petty Officer 3rd Class
Joined
Sep 19, 2009
Messages
95
Pantz,

I'll try to touch on several items here, but I have to head out soon, so more later......

Item 3: You won't have Engine Oil coming into this area through the seal you are showing. There is no direct path from your engine to your drive shaft in regards to engine oil. The coupler is a dry component that bolts onto your flywheel of your motor, which again has no direct oil path from your engine.
To sum this up. If by any chance you got engine oil in this location, you would also have oil all over inside your bilge area.

I highly suggest going to m a r i n e e n g i n e . c o m and viewing all of the parts breakdown diagrams for your motor. It should help you understand the link between your engine and the outdrive better.

You note that you don't have the tool to remove the universal joints.........Yes you probably do......
If you work with wood, then you most likely have a large C-Clamp and you have a standard screw driver and you have sockets.
1. Pop off the C-Clips on the outside of the universal joints with the standard screwdriver.
2. Place a socket, larger than the u-joint head on the outside of one of the universal joints.
3. Clamp the C-Clamp solid side on the socket, and the turning side on the other side of the universal joint. Start pressing the U-Joint in one direction.
4. Once it pushes as far as it can, remove the socket and pull off the CAP/Bearing part of the U-joint on the one side.
5. Reverse press the U-Joint through the other direction, again removing the CAP/Bearing.
6. Once both are out, that section of the drive shaft will come apart.

Hope that is clear enough. It worked for me. No special tools for me pal......

Also, make sure you don't lose any of the pin bearings if you plan to reuse these U-Joints. (I replaced mine for good measure.)

Keep up the fight.

Offrddrver
 

pantaloonz

Petty Officer 1st Class
Joined
Nov 28, 2014
Messages
237
I will get this ....

My c clamps are too small, I do my wood work in my father in law shop so yeah I can go get it!

I figure I'll have some time this up coming week nights. I haven't decided if I'm going to go after the u's or just replace them when I do a fall tear down

I think with the alignment tool, new gimbal, correctly sealing hardware on the upper unit/gear case I should be able to get her back out there!
 

Offrddrver

Petty Officer 3rd Class
Joined
Sep 19, 2009
Messages
95
Pantz,

To continue on my gimble bearing replacement and engine alignment experience....
1. Gimble bearing removal and install:
1a. My gimble bearing(s) have both require a bearing/pulley puller to remove.
1a.1. I bought and modified a cheap pulley puller kit from harbor freight to pull my gimble bearing. (for me this was a fight the first time, so I made a tool that worked for cheap for my second time.)
1b. My two new gimble bearing installs both required tapping the bearing into place to get them back into the gimble bearing housing.
1b.1. I used the old gimble bearing ring (without the bearing) placed over the new gimble bearing ring to tap/hammer into place. (In my opinion, do not tap/hammer directly on your new bearing)
1b.2. Make sure the gimble bearing is fully seated so you don't have any angles.
1c. Your gimble ring has a hole in it. I make sure that hole and the outer cover ring gap are in line with the grease tube when all is installed.

What is my overall point here on number 1: This bearing should be very snug in the bearing housing. As noted by BruceB, he puts his in the freezer to help with install. That should give you a good idea that it is very snug or tight fit. (Since yours just slid out, I'm guessing someone thought it was too tight and may have modified/sanded down the ring to help it slide in easier.....just a theory)
Just take your time with your new install. (again, don't hammer on the new bearing directly)
Check for any burs that may not allow your gimble bearing to fully seat flat in the gimble housing.

2. In both cases of replacing my gimble bearing my gimble bearing seal was damaged. (from your picture/drawing)
2a. On my first gimble bearing (the one that was so far out of engine alignment that I couldn't pull the drive) the seal was shredded and the compression spring within the seal was running around in the bearing.
2b. On my second gimble bearing replacement (do to me not properly aligning the motor to the gimble bearing with the alignment BAR) the seal was also damaged, just not as bad as the first time as I did have better alignment then when I bought the boat)
2b.1. my alignment after the first gimble bearing was completed with the half shaft of the "driveline". Once it slid in/out fairly easy I thought alignment was good. Boy was I wrong. I found out the hard way that it was not as close as it should have been.

My point on item 2: In my case, and in my opinion, you should replace the gimble bearing seal when you replace your bearing.

3. Smart move buying the alignment bar. Some possible advise on this from my experience.
3a. Fit the alignment bar into the coupler first time before installing your gimble bearing.
3a.1. WHY, you ask.....In my case (theory here) the bad alignments from when I bought the boat and from my poor alignment may have caused some minor spline wear inside the coupler. Therefore the alignment tool didn't slide into the spline very easy the first time I tried to install it. (hopefully this is not your case)
3a.1.a. If you have this issue you will have to make a choice. In my case I greased the bar and tapped it in and pulled it out about 1/4 inch at a time until it cleaned up the coupler spline burs. Once the tool bottomed out it slid in/out like butter.

My point on item 3: You may have to correct for old damage prior to the alignment bar fitting properly. However, once correct it should slide in/out (with grease) with near zero resistance and it will not rock up/down side to side if all is good with your coupler. You can also get a rough alignment by checking the gap around the bar is equal.

Once item 3 is tested and any issues resolved, then you can put in the new seal, then the new bearing, and then align the motor to the gimble bearing.
Again, when correct on my boat the alignment tool slid in/out of the coupler and gimble bearing with near zero resistance.
I was amazed how far off I was after my first bearing install Vs using the alignment BAR/tool on my second gimble bearing.


Last note I have is about your outdrive oil plugs. (side and lower, not the top)
On mine there is a little o-ring that presses into a groove on the underside head of the plug screw. Are you sure the o-ring wasn't in that groove and just pressed so flat that it looked like part of the plug screw head? The reason I ask is because I peal my o-rings out and replace them every two seasons when I replace my drive oil. (So far two seasons for me appears to be just right where the oil starts getting a color change, but I don't have water intrusion up to tis point either.)

Hopefully you can pull some advise from my downfalls. I know I did and do, but that is the life of a DIYer.

Regards,

Offrddrver
 

pantaloonz

Petty Officer 1st Class
Joined
Nov 28, 2014
Messages
237
Hi OffD,

Wonderful stuff as usual and I've printed your sheet.
I've gotten the message loud and clear to perform the alignment.

This is an old boat, from a very genuine guy, he was straight up that he only had a few tunes up, and regular winterization with inside storage, he was clear during the sale he was surprised he didnt ever need a major repair.

The point being, I'm not surprised to find myself in the position I'm in.

Good tip on the seal, but I'm confused about it's purpose. if the coupler is a dry component, along with the universals and drive shaft.. what does this seal actually do?

I will be sure to post after I do the alignment testing.

The middle and bottom drain screw.. so that was an O-ring? those things were so damn squished, I figured they were part of the original screw heads. I put the new o-rings right over the top of them when I performed my pressure testing. I'm not opposed to another pressure test. I would like a fitting that fits in the dipstick though simply cause it's easier to get at that hole and I can then test both drain and fill plugs for leakage at the same time.

I wanna get this resolved so we can go back to testing our bog down issue! (the distributor testing is still on my check list) !

-Pantz
 
Last edited:

bruceb58

Supreme Mariner
Joined
Mar 5, 2006
Messages
30,480
Alignment instructions:

1) Once you have the engine height close enough to fully insert the tool without force, then you can start working on setting the proper alignment.
2) Take your time, getting it close enough to insert the tool the first time can sometimes be the hardest (most frustrating) part.
3) Coat the end section of the tool (the smallest diameter area) with a light coat of grease and then insert it fully into the coupler.
4) Without turning the tool, pull it straight out and look at the depth of the teeth marks in the grease.
5) If the teeth marks in the grease are deep on the top side and shallow on the bottom side of the tool then your motor is too high.
6) If the marks in the grease are deeper on the bottom than on the top then your motor is too low.
7) Adjust the engine height accordingly.
8) Keep checking the depth of the marks in the grease until they are equal in depth on top and bottom.
9) Sometimes as little as 1/8th of a turn on the adjusting nut can be the difference between being properly aligned, and just having it "close"
10) Lightly Grease the splines on the shaft (and on the coupler if you can) with Spline grease prior to assembly.


Just because the alignment bar slides in, that doesn't mean its adjusted perfectly. You need to read the grease marks as outlined above.
 
Last edited:

pantaloonz

Petty Officer 1st Class
Joined
Nov 28, 2014
Messages
237
Bruce,

Thanks that's a great set of instructions and is in line with a few of the vidoes I've watched on the process.

When all is said in done how much grease should be on the components?

Should be some in the gimbal, lightly coated on the drive shaft splines, and lightly coated on the universal so it'll pass the bellows lip.

Should I try and clean out all the old grease prior to testing? If I want good clear readings I should start with clean splines?

I have to clear out the gimbal area it's loaded with yucky old grease and some bright blue marine grease..

-Pantz
 

bruceb58

Supreme Mariner
Joined
Mar 5, 2006
Messages
30,480
you can light grease the shaft. Only a little oil on the 2 o-rings on the drive shaft though. If you get too much grease on those, it will be hard to get them through the gimbal bearing.
 

Offrddrver

Petty Officer 3rd Class
Joined
Sep 19, 2009
Messages
95
pantaloons wrote "Good tip on the seal, but I'm confused about it's purpose. if the coupler is a dry component, along with the universals and drive shaft.. what does this seal actually do?"

Pantz,

That seals purpose is to help keep a rush of water out of the bilge if the u-joint bellows takes on water.
However, now that you pose the question back to me I have to be very honest and say it has never worked completely for me.
In my case, both times my u-joint bellows failed, this seal allowed water into my bilge area.

What I can say is that the seal on my boat that was tore up (when I bought my boat) allowed a lot more water into the bilge than my current one does.
That first one allowed a lot of water in, and also remember that I noted the compression spring on that seal got into the bearing and caused more problems.

The current seal is leaking and my u-joint bellows currently has a hole in it (that I tried to RTV for short term), but the current seal with a good engine to drive alignment only takes on maybe 1.5 quartz of water in 5 to 7 hours. (not even enough for the bilge to suck the water)

From my personal experience that is the purpose of a new seal.....Avoid mass amounts of water from rushing in when the bellows gets a hole in it.
If you know for sure your bilge pump is good and that seal is not tore up, then.......
Otherwise I'll call it cheap leak insurance. (ha ha)

Offrddrver
 

pantaloonz

Petty Officer 1st Class
Joined
Nov 28, 2014
Messages
237
Ok.

That makes sense, and to hear you mention compression spring.. when the bearing came out, there was a sliver of metal that came out with it, very thin about the size of the inner portion of the bearing. Could this have been part of that spring?

I used to take on a lot of water but solved that long ago by plugging a poorly created drain. 4 - 5 gallons per 2 hrs, about 2 gallons an hour I would say. Now I'll take on probably 1 pint per hour.. if the bellows is leaking, and this seal is flawed that could be some water entering that way. so...

I cleaned the bearing housing today, and once again checked for problems in the bellows. The bellows are not more than a couple years old, I can see residual from the bellows adhesive that was used and the bellows are very sound. I did store the engine up last winter and I know not to do that now. Inside the bearing housing I used a 3/4' rod wrapped in a degreaser soaked cloth and really cleaned it as best I could. Then I continued to use the degreaser in the bearing housing and then scotch-brite'd it. It's like a different area now, it's dry clean and smooth :)

I can easily see this seal, it had an o-ring which came out tonight, the o-ring was broken and worn but once again the seal itself is firmly seated and it looks really well inserted and sealed up. What holds the seal in place? gasket sealing compound or some other adhesive?

I did also order a replacement seal and some flexible, solid, and bellows adhesive. (2 types)

I don't have the tool to remove the seal though, and I decided not to attack the universals yet. I'll do that in the fall. After the universals were cleaned and re-greased they actually look good. I'm going to bath them in some more degreaser however as I still think I can get them a bit cleaner. And I want nothing but fresh gease in there this time around.

Parts don't come till wedneday, tomorrow I'll clean the univ' and drive shaft and contemplat whether to replace the seal in the upper gear case. Maybe I'll toss it back on the pressure tester for good measure

-Pantz
 

Offrddrver

Petty Officer 3rd Class
Joined
Sep 19, 2009
Messages
95
Pantz,

Not sure about the sliver of metal. The compression spring is literally a super tightly wound spring shaped in a circle that sits within the rubber inner circle part of the shaft seal. This type of spring is found in most shaft seals (also on my boat trailer bearing/hub seals.)

Seal with o-ring????? The gimble seal is a metal backed ring with rubber middle, and then the spring sits around the inner rubber to try and hold snug against the drive shaft. There shouldn't be a separate o-ring related to the gimble seal.
In any case the manual states use a 3-jawed puller to remove the bearing and then the seal. Both are damaged when pulled and must be replaced (per manual).

On install the manual calls for a light coating of gasket seal, but then it is PRESSED into place (with a special OMC tool 912279 or my home made piece). Again, like the bearing, do NOT put your pressing tool or hammering tool directly on the seal (unless you have 912279) , but put some perfect fit flat piece between the seal and press/hammer to push it in. And again, like the bearing, it should be very snug or tight within the gimble housing. (it won't or shouldn't pull out with your fingers)

My gasket seal is an OMC spray can type of seal. Spray on, let soak in and tack up, and then put in place.

Not sure if I was writing to you or another guy (sorry if I am repeating myself here), but my first set of u-joints that were so badly rusted still had good pin bearings inside and I could have reused them. I chose to replace them so that I knew when they were new. (now mine will be surface rusted again due to bellows hole/leak)

Tools....Harbor freight cheap pulley puller kit slightly modified....I'll try to get a picture of it, but right now I'm not really sure where I have it stored. Get creative brother! Pulling the seal really sucks as it just bends with the puller, and then you have to manhandle it out.

I too am waiting until Fall for tear down and rebuild. Patch sealing until then. Kids are back to school anyway, so season will be mostly over due to sports and school. Only a couple runs left until Fall.

Offrddrver
 

pantaloonz

Petty Officer 1st Class
Joined
Nov 28, 2014
Messages
237
Hi Offd,

It would appear that bearing and seal combination on my boat has been compromised, .. when I pulled the bearing out it does appear the seal behind it was impacted. (sliver of metal, exposed o ring) the actual seating of the seal looks so nice I'm woe to go about pulling it out with fear I'm going to just find something else broken right behind it!!! (though it's some real hardware behind that sucker huh?)

I am able to reach behind the seal with my fingers so I could get a puller of some kind in there to attempt to get it out.

More to come in the next few days, still waiting on parts. Thanks for the tip on harbor freight, I'll check them out.

-Pantz
 

bruceb58

Supreme Mariner
Joined
Mar 5, 2006
Messages
30,480
If you decide to not replace that seal, you aren't going to miss much. It's only purpose in life is keep dirt out from the boat side.
 

Offrddrver

Petty Officer 3rd Class
Joined
Sep 19, 2009
Messages
95
No Title

Pantz,

I went out and collected my spare parts. Here is a picture of the Gimble Seal.
Shows the metal outer ring that presses into the gimble housing.
Shows the ONE PIECE molded rubber inner.
Shows the SPRING that helps compress the inner rubber seal around the spinning shaft.
 

Attachments

  • photo227877.jpg
    photo227877.jpg
    78.3 KB · Views: 0
  • photo227878.jpg
    photo227878.jpg
    60.5 KB · Views: 0
Top