Dillon Laker 14/16.5 Wooden Tunnel Hull Build/Mod Project

archbuilder

Vice Admiral
Joined
Sep 12, 2009
Messages
5,697
Glad your ok, table saw accidents can get really nasty. Remember the push sticks! I always have to tell myself that....but it only takes once! Shop towel and masking tape is a perfectly acceptable band-aid :D
 

gm280

Supreme Mariner
Joined
Jun 26, 2011
Messages
14,593
WOW, so easy for things like that to happen instantly. I hope you are up to date with tetanus shots and such. I know I am not, and probably will not get the boosters any time soon either. Just make sure it doesn't get infected. Then you have a real problem on your hand, pun certainly not intended, but it does fit perfectly well doesn't it?

I was always told to be really careful around any shop especially if the shop teacher didn't have all his fingers. :facepalm:

Be careful and keep up the SAFE work.
 

gomopar440

Petty Officer 1st Class
Joined
Nov 27, 2007
Messages
281
glad you are ok could have been worse we'd had to change ya name on forums to 9fingers.
Nah, I'd rather go with "Stubbs" instead. Sounds like it runs off the tip of yer tongue better to me.;)

The irony of this whole situation is that just the day before I was reading about a friend on FB who almost lost half of his hand working on a lathe. It was bad enough he's selling off all his shop equipment and getting out of the buggy fabrication business. He says he can't work on it anymore with how messed up his hand is now, but the fear of machinery is also playing a big factor in that decision as well. So I posted a comment telling him how I've seen quite a few close calls in the Navy machine shops I've worked in and it could have been a LOT worse and I wished him to get well soon. Then this happens to me the very next day... I think Mr Murphy must have peeking over my shoulder when I was working on the band saw. It definitely got me thinking about all those workplace safety lectures we used to get. Maybe now I'll pay a bit more attention to the possible consequences of my actions. This would have never happened if I had just turned the saw off before trying to remove that stuck piece of wood.

As far as pics, there really wasn't any quick fix. The saw took the end completely off, so I didn't have a slice or a cut to close back up. Just a flat dime sized stub where my fingerprint used to be. I just used my thumb to cover that area and put pressure on it. The pressure was held until I was able to get the band aids, gauze and antiseptic ready to clean and dress the wound. I also put a wrap of medical tape on it to keep the band aid in place. It took quite a while to stop bleeding so I ended up with a bit of my blood all over the table project as a result. At least the tape held the band aid in place and kept the dirt out. That finger tip does look a bit weird now though. The tip is angled, rather than rounded over like it used to be.

BTW: The missing chunk of flesh with my fingerprint on it was found inside the band saw housing. Maybe I could sell it on ebay as an identity quick change kit? :lol:

EDIT: On second thought, nevermind that ID change kit idea. If I did that, anything stupid the buyer did would come back to me. Guess I'll have to nix that whole idea. Dang, coulda made this mishap into a revenue generator for the boat build budget.:D
 
Last edited:

gomopar440

Petty Officer 1st Class
Joined
Nov 27, 2007
Messages
281
must post pics of electrical tape and napkin field dressing for man points!:)
the bloodier the higher the points ... just saying:).
Hows this? If I had taken a pic yesterday of my first bandage attempt, it would have still looked pretty gory. This bandage was still leaking/squirting a little blood out occasionally while I was working on the boat today.:mad-new: Believe me, I knew it IMMEDIATELY every time I bumped my finger today.
B04bZQ.jpg

g928hA.jpg


Speaking of working on the boat, today I was making the long top deck stringers and the bottom sponson keels. The 3/4" x 3/4" and 3/4" x 1" pieces I have are only 8' long, so I had to butt them together to get them long enough for the 16' hull. I placed 3/4" x 1" x 6" doubler blocks on the joints and glued and clamped them together, as well as clamped them to the table. I put wax paper under the joints so they won't become part of the table.

Since I now have a full 16" long work table, I went ahead and permanently attached the sponson tip extensions. I put more wax paper under the joint and screwed and glued them together.


Here's a better look at the new table before I started working on it today. I found the lowest saw horse and first leveled it. Then I leveled the others to match that one. The saw at the back of the tent was the farthest off and it ended up with about 6" deep holes dug under the saw horse legs.


EDIT: For some reason the links to the last five pics on ImageShack weren't showing up. I re-saved the last five pics in Photobucket this time and changed the links to point them to the PB folder to try to get them to show up.

This is my 3rd edit attempt to fix the pics. If this doesn't fix it, I'm not sure what to try next.
 
Last edited:

gm280

Supreme Mariner
Joined
Jun 26, 2011
Messages
14,593
Okay gomopar440, a couple of things I have to say. First, seem you now have a built in 45 degree angle at your fingertips. Oh that is so very wrong! :sorry:

My son actually did something very similar to his thumb decades ago. A too long of a story for now. But I picked up the severed part and met the surgeon at the ER and they sewn it back on. It turned totally black and didn't look like it would ever take, but it did take and he has a full thumb now. Too late for your "Uh Oh" now. But if you did go to the ER they could have sewn it back and would eventually taken and all would have been well. But that is water under the bridge now.

Looks like you made a nice building table with all those components and leveling it was a good thing. Working on level surfaces makes everything so much easier. Your construction is coming along nicely. Keep up the progression, but without removing any more body parts. You will need them to drive the boat. I am sure your finger will be very sore for a few days. So be careful. It will let you know if you aren't careful for sure.

Sincerely sorry for your accident, but your continuing work looks great. :thumb:
 

gomopar440

Petty Officer 1st Class
Joined
Nov 27, 2007
Messages
281
I pulled the broken strap off of the boat winch on the trailer so I could fix it. The paint was bubbled up from rust all over the drum so I had to remove that first. I used a file to knock the worst of it off and then painted it with a rust neutralizer to kill the rust. After that had dried I taped off the stand and then spray painted the winch satin black. After it dried I readied the new strap. I'm not going with the same lightweight seat belt material. Instead I'm using a 20' tow strap with hooks on each end. The fabric is the same width, but is about twice as thick and is rated for 5K lbs. The winch itself is only rated for 3K, so I doubt I'll have any more problems with this winch anytime soon. To get the strap onto the drum, I first had to cut the threads free that were holding the hook on one end. Then I folded the strap end in thirds lengthwise so I could thread it through the holes in the drum like the original was. I used a long straight screwdriver to help push the strap through the holes on the other side of the drum. All that was left was to hook it to the boat and wind it up. I made sure the strap went under the bow rest so the boat can't jump over the winch tower in an emergency stop or an accident. This winch tower is set too far forward for this particular boat, but it's only going to be on there for a few more days until I can haul it off to the dump. I have a pair of heavy duty straps to hold the transom, and a few more regular straps over the sides on the cleats, so it won't be going anywhere unless I want it to.

 
Last edited:

gomopar440

Petty Officer 1st Class
Joined
Nov 27, 2007
Messages
281
Let's see... Today I started off by removing the screws that were holding the sponson tip extensions in place while the glue dried. Next I finished shaping the tip on the starboard tip extension, which I forgot to do before gluing it to the sponson. Doh! Then I notched the sponson tips for the inner deck stringer and the sponson keels. The tips were then glued and screwed to the sponsons. After that, I took the long deck stringers and sponson keels and set them into place in the bulkhead notches. I placed a screw near each bulkhead and one at each halfway point between the bulkheads as well. The ends of the deck stringer and the sponson keels were trimmed to length with a multi-tool.


So, that's where I stopped at for today. I'll glue those long pieces in place next time I'm out in the tent.
 

gm280

Supreme Mariner
Joined
Jun 26, 2011
Messages
14,593
Nice progress. What is the temps presently in the tent?
 

gomopar440

Petty Officer 1st Class
Joined
Nov 27, 2007
Messages
281
40's to 50's(F) during the days and getting down to around freezing at night. The Weather Channel says it's 47*F right now. I'm usually good to go with the kerosene heater during the day, but the night time lows are the big problem. I can't glue stuff right before I shut it down for the day. If I do, the glue won't have time to cure before it gets below the working temp it needs to cure properly.

EDIT: It's payday today, so I'm heading out to pick up a little material for the boat. I need to remake the port and starboard #5 bulkheads before I can do any more with the sponsons.
 
Last edited:

gomopar440

Petty Officer 1st Class
Joined
Nov 27, 2007
Messages
281
I picked up a 4'x8' sheet of 1/4" AC ply so I can remake the two bulkheads for station #5. I also got six sticks of 1"x4"x16' Radiata pine (straight grain and no knots) while I was there. The 16' long sticks were cheaper by a few cents for the same amount of material than in 1"x4"x8' form. Another plus is I won't have to join them in the middle like I would with the 8' sticks. Those will get ripped into 3/4"x3/4"x16' pieces to make the stringers and battens for the sponsons.

The sponsons are still screwed in place right now, so I can't work on the table top until it's cleared off. I took the AC ply into the house so I can work on drawing up the bulkheads inside. I'll have to work on the kitchen floor, but it's still way better than trying to work outside in a cold tent.
 

gomopar440

Petty Officer 1st Class
Joined
Nov 27, 2007
Messages
281
I have a boat project related question for you electrical savvy guys here for when I get to the point where I'm ready to wire up this boat. I'm thinking of using Klixon aircraft type push/pull circuit breakers for a few reasons. One is they can also be used as a switch, as well as a circuit breaker. Second reason is they are pretty durable (they have waterproof switches as well) in my experience. Lastly, they would go well with the Tiger Shark theme if I go that route with the boat. I'd also be looking at aircraft styled gauges (Moal bomber series gauges or similar) to match the aircraft theme as well. Here's a link to an ebay auction (already ended) for the type of breaker I'm talking about. http://www.ebay.com/itm/131984819407...%3AMEBIDX%3AIT

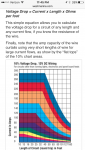
My two main questions for you guys are this: What breaker ratings (Amps) would I need for a typical complete ground up wiring job on a single outboard boat? Also can someone post a list of the types of circuits (with the amp ratings noted) that would usually be needed as well.

I know I won't use all the types of circuits on this boat, but I'd like to know what is typically in use these days on modern boats. Since I don't have much prior boating experience, I'm not sure what systems and circuits are being used regularly in boat electrical systems these days. I'm planning on this being a recreational boat more than a dedicated fishing boat, so trolling motors and live wells might not be on board. I can't say 100% for sure at this point though, so if anyone has data on those systems, they're welcome to post it here as well. I tried looking though the electrical section of this forum, but all the threads I came across were just about fixing existing circuits and systems. Not a full ground up build like I'll need to do.

I have to get an idea how many circuits I'll need first before I can choose a fuse box for the boat. I'd like to get one that can handle all of the circuits in one place so I don't have a bunch of smaller boxes all over the place. I'd like to keep a few extra circuits open for future expansion later on as a "just in case" precaution. It also makes troubleshooting a lot easier to keep all the circuits coming to one central location. Something like this one, http://www.iboats.com/Screw-Terminal...view_id.163741, except I want to get the one with two separate circuit sections. One section for power always on and the other for power only on with the key on.

Here's a basic list of the items I think I might like/need to have.
Nav lights (keyed)
Anchor lights (constant)
Docking lights (keyed)
Cockpit/Cabin lights (constant)
Gauge/Dash lights (keyed)
Bilge pumps (off/on/auto) (? Maybe on= keyed and auto=constant?)
Blower fans (keyed)
Power port (12v DC / 5v USB socket) (constant)
Radio (constant)
GPS (keyed)
Horn (keyed)
Fish Finder (maybe?) (keyed)

So I'm looking at a minimum of a 12 circuit fuse box based on this list. However, that won't leave any room for expansion in the fuse box later on. Anything else that gets added to the boat will necessitate either a larger two section fuse box, or two separate single section boxes. One box for keyed power circuits, and the other for constant power circuits. With the aircraft breakers being used as switches, the fuse box(s) will be redundant circuit protection. I know this and I'm ok with that.
 
Last edited:

archbuilder

Vice Admiral
Joined
Sep 12, 2009
Messages
5,697
Gomopar, I don't have a chart or anything, I just crunched the numbers and added up what I have on each circuit on Miss Morgan, then upped it to the next size fuse. I also did a wiring diagram, which was very helpf and useful when you are trying to remember what you did 3 years ago. Your boat is small, but you still need to look at length of wire runs and voltage loss for large drawing items with long runs. I was surprised at the drop for 12v dc, but the only thing that was a concern on her was the main wire for the fuse block (under the dash, opposite end of the boat from the battery.) I ended up with a pretty hefty wire, but it works great. You might think about a battery cut off switch and a main circuit breaker for the line going to the fuse box at the battery.

I'm not sure that I understand the fuse block and having the circuit breaker switches. That seems kind of redundant.....just trying to wrap my head around that. But I can kind of see where you would need a fuse going to each branch circuit in case it grounded out before it hit the circuit breaker switch.

The gauges are cool, but do they have a marine line? When I googled it I just saw some set up for automotive use. You will most likely want a water pressure gauge for the outboard, and a tilt trim gauge. I used Faria gauges and have been very happy. They have a matching depth finder gauge that also matches their various lines. My speedo is set up for a pedo right now, but they have come out with a GPS gauge that I am planning on upgrading too.
 

gomopar440

Petty Officer 1st Class
Joined
Nov 27, 2007
Messages
281
Yea, with the fuse box AND the circuit breaker/switches, it will be a redundant system. I'm fine with that as it's just more protection from electrical faults, not less. I don't have any of the equipment for these systems yet, so I don't know where to start guessing for the Amps for each of the circuit breakers.

As far as the Moal Bomber series gauges I mentioned, you are correct that they are for land based vehicles. However, they sell those bezels separately and they will fit on most standard size gauges. That's what I would most likely do to get the look I'm after, and still be able to get the marine specific info needed for an outboard boat application.

Today I took a look at the sheet I wrote the dimensions on for Bulkhead #5. I found one dimension that did not have the corrected dimension on it. That was enough to throw the entire piece off by about two inches along the edge that butts up against the inside edge of the sponson. I corrected the dimension and annotated it on the print so I could remake the bulkhead. I laid the 1/4" ply on the kitchen floor and drew the bulkhead again. This time with ALL the corrected dimensions. I'll cut it out tomorrow and then use it to make the bulkhead for the other side. The weather is supposed to be clear and in the high 50's tomorrow, so I should be able to get them glued in place if all goes well. Here's the pics of the new #5 bulkhead, not cut out yet obviously.


In this pic I laid the incorrectly made #5 BH over the newly drawn one. You can see the one on top is about an inch too narrow on the top and bottom edges.
 
Last edited:

mickyryan

Rear Admiral
Joined
Apr 18, 2016
Messages
4,210
use 16 gauge wire , its rated at 15 amps if I recall and that will handle anything you will need to throw at it
lights use led so you will draw at max if you lit it up like Christmas only about 4 amps
ignition id say go 15 to be safe
gauges 10 amps
radios 10 amps
 

gm280

Supreme Mariner
Joined
Jun 26, 2011
Messages
14,593
gomopar440. I am using Klixon Aircraft Circuit Breaker myself. They are very good circuit breakers. And I am using a few different sizes depending on where I am using them.
Plates - (17).JPG
You can see the Klixon CBs above the switches on the right hand size of this panel.
And on this panel.
Plates - (13).JPG
So once you decide what you want for your wiring setup, then design your panel and install.

Hope that helps some.
 

gomopar440

Petty Officer 1st Class
Joined
Nov 27, 2007
Messages
281
GM,
I've made panels similar to those with the laser engraver we had in the last machine shop I worked in. I wish I still had access to one, as well as the water jet we used to use as well. I could do a lot of the nice detail work like you're doing on your Tom Boy boat.

Anyway, I brought the sheet of ply out to the tent today and rough cut the port bulkhead out. Then I screwed it down, back side to back side, onto the sheet of ply. I cut both the port and starboard #5 bulkheads out at the same time. I glued 3/4" x 1" cleats to the back of the bulkheads next and then set them aside to dry. After the glue had set up enough for me to work with it, I marked the locations for the top and bottom notches where the deck stringers and sponson keels go. I used the multi tool to buzz the notches out and then glued and screwed the bulkheads to the sponsons, aligning them with their station lines.

About this time I tried to take some pictures of my progress for the day, but I kept getting an error message from the camera. It was saying the memory card had a problem and it couldn't read it. So, no pics for today. I'll have to pick up a new memory card tomorrow when I go to town.
 

Baylinerchuck

Commander
Joined
Jul 29, 2016
Messages
2,726
use 16 gauge wire , its rated at 15 amps if I recall and that will handle anything you will need to throw at it
lights use led so you will draw at max if you lit it up like Christmas only about 4 amps
ignition id say go 15 to be safe
gauges 10 amps
radios 10 amps

I remember that when using DC circuits you need to up size the wire based on distance. Though a small boat, so distance probably won't be a factor, I found this marine DC conductor ampacity chart. I thought it was interesting since it's a bit different than the NEC ampacity chart I'm familiar with.
 
Last edited:

Baylinerchuck

Commander
Joined
Jul 29, 2016
Messages
2,726
No Title

DC conductor ampacity charts, distance factor. Particularly could be useful for figuring your home run from battery to distribution block, (circuit breaker buss).
 

Attachments

  • photo254989.PNG
    photo254989.PNG
    640.5 KB · Views: 0
  • photo254990.PNG
    photo254990.PNG
    795 KB · Views: 0

gomopar440

Petty Officer 1st Class
Joined
Nov 27, 2007
Messages
281
Chuck,
Thanks for those charts. I downloaded them to my project folder so I can refer to them as I figure out the specs for each circuit. The biggest issue I have now is not having hardly any of the equipment for those systems yet. Without the actual items I'll be using, it's pretty hard to piece together a plan for the boat's electrical system. I do plan on using LEDs wherever possible, so that should keep the lighting loads to a minimum.

With the mods I'm making to the hull, most of the original specs are going to be scaled up. This hull is going to be right around 16' 6", from the sponson tip bulkhead to the motor board. The sponson tips will probably add another 6" to that. The outboard is not included in that figure either. The motor board sticks out a little over a foot past the ends of the sponsons on an extension behind the transom beam. From the dash to the motor board is right around 10' 6". The face of the dash falls about halfway between bulkhead stations #2 and #3. The cockpit area will be just over 4' wide from the dash all the way to the motor board. The beam of the modded hull should be right at 7' 8", with the widest area being at bulkhead #3.
BjndVP.jpg

EDIT: Those figures should give a better idea of the space I'll have available for running my wires through. The majority of the wiring will be in the driver's side sponson, but I haven't fully decided if I want to put the helm to port or starboard yet. I'm leaning towards putting the helm in front of the port seat, similar to most normal land based vehicles in North America. I'll be using a foot throttle and a separate gear shift on that old single cable control box. Putting the drivers seat to port will let me fit the gear shifter in between the front seats. Can anyone give me a good reason why I should, or shouldn't, do it this way?

OBTW: I forgot to mention in my previous post that I also got the windshield from the green Larson disassembled today. It's taking up a LOT less space with it broken down now. I saved the piece of the green hull that it mounted to, so I can use that as a pattern when I get ready to mount it up to the Laker hull.
 
Last edited:
Top