DECK, AND STRINGERS, AND TRANSOM? OH MY!

Daniel1947

Petty Officer 1st Class
Joined
Sep 22, 2010
Messages
267
Wood, your drawing is 100% accurate. The transom was only physically attached/bonded in the center as I described. There was absolutely nothing attached to the transom except for the engine. The tow eyes did not go through the transom. See photo...yellow circle. I removed the tow eyes already, and have not sanded or ground the area where they came through the hull, I am assuming :facepalm:, that there is some additional support (lumber or heavy cloth and resin) against the hull where they came through. I really believe your idea will work.


Woodonglass

Supreme Mariner
Joined
Dec 29, 2009
Messages
25,924
Yeah, I really see no reason for a full span wood transom in that configuration. Other than the Foam adding some structural support to the outer sides of the stern. Hmmm, I'm gunna have to think about this a bit a do a bit more research.
 

Daniel1947

Petty Officer 1st Class
Joined
Sep 22, 2010
Messages
267
Don't strain the brain Wood. :D Actually I do appreciate your effort. Here is an idea I just had. A piece of 3/4' or 1" thick - 30" top, 32" bottom and 17" high, laminated to the hull as well as laminated to an additional piece of 3/4" or 1/2" thick (to obtain the necessary 1-1/2" thickness, but make the second piece the full width of the hull and PB and tab it to the inner sides of the hull. MY thinking is this would also allow some additional support and strength as well as additional room between the larger piece and the rear of the hull for flotation foam. Just this Old dumb Tennesseans opinion.
 

Woodonglass

Supreme Mariner
Joined
Dec 29, 2009
Messages
25,924
Yup, That's a winner!!! Make the center section out of 2- 1/2" pieces and wrap and tab it to the hull then glue and tab the full width section out of another 1/2" piece. Then fill the wings back up with foam I'd prolly make some kind of backer plates for the Tow Eyes to beef them up a bit too before repouring the foam.
 

Daniel1947

Petty Officer 1st Class
Joined
Sep 22, 2010
Messages
267
You know, that is even a better idea. Use 1/2" instead of the other combinations. Since I am going to use 1/2" for the deck, I should be able to lay out a pattern with a plan to keep from wasting too much lumber. I know the general feelings about Marine grade plywood expense, but I have a local supplier that carries 1/2", 3/4" and 1"; I know it is significantly higher than Arauco, but that is what I have decided to use. Call it over kill, but Arauco is not available anywhere close to Memphis. I will need to finish grinding down the rear hull and finding out what type of support is there for the tow eyes. As always Wood, I appreciate your input. I saw something previously on the forum about letting the wood dry; not sure what that is all about since I would figure that if it is sitting in a warehouse it should have dried out by now.
 

Woodonglass

Supreme Mariner
Joined
Dec 29, 2009
Messages
25,924
You should always get your wood in the garage and let it acclimate for about a week. Marine Grade is Not as bad as others since it uses 100% waterproof glue but still not a bad idea.
 

Daniel1947

Petty Officer 1st Class
Joined
Sep 22, 2010
Messages
267
The main stringers, at least the two that ran from the transom forward for approximately 12 feet, were made up of a 3/4" wide piece of wood, not plywood, and were 4" high. There was an additional strip, what I would call a cleat, also 3/4" wide, attached to the side even with the top of the main stringers.


The center stringers "yellow" were just there I believe to outline/support the area for the ski locker and maybe support the deck slightly. The deck was attached to the main stringers "red" with staples. Actually all the wood was attached to other wood with staples and most of the staples were rusted and had deteriorated.


Here it all is with the deck removed. Not a very pretty sight.


The center stringers were I believe 1/2" thick plywood and about 7" high.


However they were so rotten, I am actually guessing at the thickness.


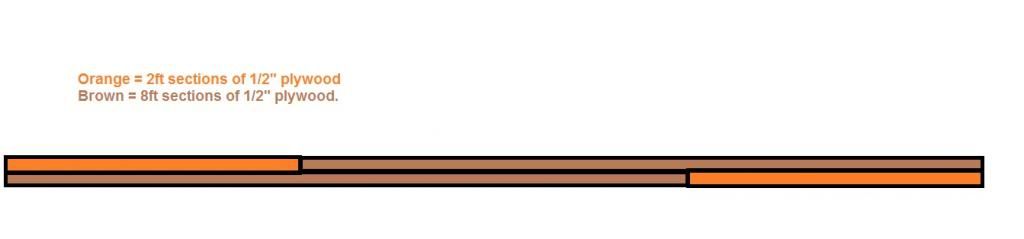
What I am considering is making the main stringers a total of 1" thick, using two 1/2" thick pieces of plywood approximately 4" high, joined with Titebond III or PB, and of course offsetting the joints. I believe the new main stringers will be stronger than the originals. Also, making the center stringers 3/4" thick instead of the 1/2" thick of the originals.

Anyone care to share their thoughts, knowledge, experience etc., Thanks for any and all input.
 

Daniel1947

Petty Officer 1st Class
Joined
Sep 22, 2010
Messages
267
Once again, thanks WOG, I have read and re-read your info contained in the link, and have found it very informative.
 

Woodonglass

Supreme Mariner
Joined
Dec 29, 2009
Messages
25,924
Here's a drawing on how to make the stringers using lap joints.

StringerLayups.jpg


Personally I'd make em all 1" thick
 
Last edited:

Daniel1947

Petty Officer 1st Class
Joined
Sep 22, 2010
Messages
267
Sounds like a plan. It will be closer to an 8 foot and a 4 foot for the mains, use 2 6'6" for each center. And, do we agree about using PB instead of Titebond III to join them together? Thanks
 

GT1000000

Rear Admiral
Joined
Jul 13, 2011
Messages
4,916
You might be confusing PL with PB...:noidea:...forgive me if I am wrong...

Either way, I think Titebond 3 will be easier and more forgiving for gluing up laminations...in about 24 hours it'll be dry and waterproof...
 

Daniel1947

Petty Officer 1st Class
Joined
Sep 22, 2010
Messages
267
Thanks guys....but no GT1000000, wasn't confusing PL with PB. You will have to discuss "forgiveness" with a priest, :rolleyes: :) that is out of my hands. Titebond III it will be. Thanks again
 

GT1000000

Rear Admiral
Joined
Jul 13, 2011
Messages
4,916
Thanks guys....but no GT1000000, wasn't confusing PL with PB. You will have to discuss "forgiveness" with a priest, :rolleyes: :) that is out of my hands. Titebond III it will be. Thanks again

Well then, good thing I don't believe in priests...;)...only in the Man upstairs...:D...and I definitely don't mean the the fool in the White House...:laugh:...
Happy Friday!
 

Daniel1947

Petty Officer 1st Class
Joined
Sep 22, 2010
Messages
267
OH NUTS! Gentlemen you know that this sight is being monitored by the NSA, the FBI, the DOJ, and the IRS. (Probably my ex-wife and Howdy Doody as well.) We are all having too much fun and the Feds just can't stand that. All of us will be getting a notice for an IRS audit now and it is all Gus's fault. Have a good and safe weekend you guys.

Dan
 

GT1000000

Rear Admiral
Joined
Jul 13, 2011
Messages
4,916
OH NUTS! Gentlemen you know that this sight is being monitored by the NSA, the FBI, the DOJ, and the IRS. (Probably my ex-wife and Howdy Doody as well.) We are all having too much fun and the Feds just can't stand that. All of us will be getting a notice for an IRS audit now and it is all Gus's fault. Have a good and safe weekend you guys.

Dan

:laugh::lol::pound::madgrin:

Brother, if I am not already on every watch list the Feds can dream up, then I am doing something wrong...
Have an AWESOME weekend!
God Bless!
 

Daniel1947

Petty Officer 1st Class
Joined
Sep 22, 2010
Messages
267
Well after all the sanding and grinding, I have come up with some additional ideas about the replacement of the transom. I have reinstalled the old transom for discussion purposes using the 4 bolt holes, so it is in the original position. As was previously discussed and can be seen in the first photo, the old transom was not in contact with any portion of the outer hull.

It wasn't in contact with the rear outer portion of the hull.

And it also wasn't in contact with the deck.


The area between the rear hull and the transom was originally filled with foam.
 

Daniel1947

Petty Officer 1st Class
Joined
Sep 22, 2010
Messages
267
There were large blocks of foam in the two corners. These blocks of foam may have offered some support between the transom and the outer hulls.


The old transom was not attached in the area shown in green. The reason was that in the original manufacture, there was additional supports of 3/4" ply placed against the rear of the hull, with one piece laying alongside the area shown in red.


The piece that was laid (in red) on the port side, was not completely flush with the face of the hull which caused the transom to not be in contact with the area in green.

Woodonglass and I had discussed making the new transom out of 3 layers of 1/2" ply, and I had 99.9% decided to go with his suggestion. Actually I am only making one change and that is because I was at a lumber yard purchasing some 1/2" MDO and found a deal on a couple sheets of 3/4" marine ply.
My idea: Use a 3/4" piece of marine ply along the edges, just like the original manufacture; only insuring that they are both flush with the inner face of the hull. Then wrap a complete layer of 1708 over the rear hull (area in red)


Follow this with a piece of 3/4" ply, cut to the size shown in "Green."


PB the first piece to the hull, wrap with another layer of 1708. Then attach (using PB) a piece of 3/4" ply, cut to match the original transom height, but extend it in size so that it will be just about in complete contact with the outer hull sides and bottom. Using PB to fill the small gaps and tabbing the transom to the hull with 1708. I am not 100% sure, but hopefully I can also lay in some tabbing on the inside of the transom between the hull. Plan is to fill the void with floatation foam similar to what was original.

As they say...is this "OVERKILL?"
 
Top