1999 Celebrity 190 - Engine Mount and Stringer Repair

Woodonglass

Supreme Mariner
Joined
Dec 29, 2009
Messages
25,924
Re: 1999 Celebrity 190 - Engine Mount and Stringer Repair

So far it's all sounding good. I PRAY you are using a GOOD respirator for all this grinding and NOT just a dust mask!!!:eek: Goggles too!!! A Full Cover Hooded Tyvek Suit with a full Face Respirator is HIGHLY Recommended!!! You're a Lucky Man that your transom is all good to go. Let us know when you have further questions.
 

bvetter

Petty Officer 1st Class
Joined
Jun 2, 2013
Messages
263
Re: 1999 Celebrity 190 - Engine Mount and Stringer Repair

Absolutely, using a North half mask respirator with P100 particulate and vapour cartridges. Safety goggles, definitely. I've been using knock off Tyvek suits because they cost about a third the price, unfortunately they tear easier but no biggie. One thing I've been meaning to pick up are pre-filters for the cartridges so they don't plug up as fast.
 

glnbnz

Chief Petty Officer
Joined
Oct 4, 2011
Messages
458
Re: 1999 Celebrity 190 - Engine Mount and Stringer Repair

Signing on to watch the restro!!!
 

bvetter

Petty Officer 1st Class
Joined
Jun 2, 2013
Messages
263
Re: 1999 Celebrity 190 - Engine Mount and Stringer Repair

I am in the horns of a dilemma and hoping I can get some......clarification. Based on the threads I've read and videos I've watched, I got the impression unwaxed resin was the way to go for ease of working with. Today I was talking to a distributor trying to finalize my pricing, the guy on the other end of the line said he had 20 years experience doing marine fiberglass repairs as a career, and recommended using waxed resin. He said, unless doing a project where many layups were required spanning over a few days of work, waxed resin would be the way to go. When we talked about gelcoat application, it was highly recommended that a light sanding take place just before, in order to scuff up the surface, and if the resin was unwaxed he said it would immediately gum up the sanding discs.

I'm thinking I may still order the unwaxed resin, and just buy the Airdry additive to "wax" the resin for final layers.

Suggestions?
 

jbcurt00

Moderator
Staff member
Joined
Oct 25, 2011
Messages
24,871
Re: 1999 Celebrity 190 - Engine Mount and Stringer Repair

If wax is 'really only' needed in the final layer, why buy resin that has resin in it. In my mind, it's the same as buying pre-mixed resin filler products. Why buy a filler that is for a specific type of filling, when you can mix resin w/ whatever filler media you need to for the job at hand and make 50 different types of filler w/ the supplies you already have on hand to do poly/glass work.

If you use waxed resin you will HAVE to sand between cured layers. If you use un-waxed resin, wipe it down w/ acetone & apply the next layer of resin/glass.
 

bvetter

Petty Officer 1st Class
Joined
Jun 2, 2013
Messages
263
Re: 1999 Celebrity 190 - Engine Mount and Stringer Repair

Thanks for the quick reply. What you're saying makes sense to me. In your experience, will I get a good bond between gelcoat and unwaxed resin without sanding, or is sanding still a must? Either way, a wipe down with acetone will be required but I'm curious about the sanding. Let's assume the surface is smooth and there aren't any nubs or high spots which need to be shaved down.
 

jbcurt00

Moderator
Staff member
Joined
Oct 25, 2011
Messages
24,871
Re: 1999 Celebrity 190 - Engine Mount and Stringer Repair

will I get a good bond between gelcoat and unwaxed resin without sanding, or is sanding still a must?

Where are you applying polyester RESIN to GELCOAT? Or are you referring to applying gelcoat over unwaxed resin?

I suspect it's the 2nd ^^^

Anything you can do to promote adhesion is a good idea in my mind. So I'd probably rough & scuff no matter what resin I used.

If you are on a time table & MUST proceed to gelcoat quickly after finishing the poly/glass work, use wax additive in the LAST resin & glass layup. It will cure & be ready for a rough & scuff before applying gelcoat. If you used unwaxed resin & tried to sand it before it cured, yep, clogged sandpaper, very quickly.

If you expect to finish the 'repair' work of resin & glass layups and wait weeks or a month to apply the gelcoat, un-waxed will probably cure, but you'd still want to rough & scuff it before applying the gelcoat.

How are you applying the gelcoat? Roll, brush or spray on? It isn't paint. Most spray gun setups aren't geared toward spraying w/ the large tip that gelcoat requires.
 

bvetter

Petty Officer 1st Class
Joined
Jun 2, 2013
Messages
263
Re: 1999 Celebrity 190 - Engine Mount and Stringer Repair

Yes, gelcoat over resin. Specifically in the ski locker, fuel tank compartment, and bilge (all of the areas will be new glass or ground down to fresh pink). The gelcoat will likely be the last thing I do, so there will be areas where the resin will be relatively fresh (within a week), and some that have sat for a month or so at least (trying to get this work done around a busy schedule with a 2yr old and a newborn on the way).

Either way, I get the impression sanding is recommended, so use wax additive on the last layers (assuming I do decide to buy unwaxed resin).

I will roll the gelcoat, not spray.

On that note, I want to clean up the transom. Not that the gelcoat is chipped or in rough shape, but if I put new gel down in the bilge, I would like it to match the transom. So, do I sand down the gel on the transom rough it up before applying new gelcoat or do I grind down to glass?
 

jbcurt00

Moderator
Staff member
Joined
Oct 25, 2011
Messages
24,871
Re: 1999 Celebrity 190 - Engine Mount and Stringer Repair

For gelcoat over gelcoat, only need to give the old a tooth for the new to grab.
 

bvetter

Petty Officer 1st Class
Joined
Jun 2, 2013
Messages
263
Re: 1999 Celebrity 190 - Engine Mount and Stringer Repair

That's kind of what I figured, thanks.
 

bvetter

Petty Officer 1st Class
Joined
Jun 2, 2013
Messages
263
Re: 1999 Celebrity 190 - Engine Mount and Stringer Repair

This may be a little premature, but looking for some ideas on motor mount designs.

I attached a pic of what was existing, and I believe it is a fairly standard design which uses lag bolts to secure the engine mounts to the stringers/beds.

I figure, if there is a better way of doing it, I may as well incorporate it at this stage. I have seen pictures of upside down u-shaped mounts where through bolts are used instead of lags, also have seen steel angle brackets which lag into the side of the stringers.

Ideas?
 

Attachments

  • IMG_9906.jpg
    IMG_9906.jpg
    133.8 KB · Views: 3

bvetter

Petty Officer 1st Class
Joined
Jun 2, 2013
Messages
263
Re: 1999 Celebrity 190 - Engine Mount and Stringer Repair

So, I got a monumental amount of grinding done today. I removed the last section of deck on the stbd side beside the bilge, and removed the last few ribs and stringers, then started grinding. And.....it's all done! I hope.....

Unfortunately, I got a little aggressive with the grinder inside one of the strakes, and ended up with a small hole through the hull, about the size of a dime. Dammit! I went under the boat to take a look, then I noticed a couple more small pinholes in some places. In fact, based on the light coming through I could see some areas of the hull were quite thinner than others. So I was thinking I should beef up the hull with some woven roving, at least in the areas I ground down.

Thoughts?

No pictures yet, will upload some later this weekend.
 

Woodonglass

Supreme Mariner
Joined
Dec 29, 2009
Messages
25,924
Re: 1999 Celebrity 190 - Engine Mount and Stringer Repair

You're now Official. Holes are NO PROBLEMO!!! 2 layers of CSM and 1708 will be enuf to fix em. Fiberglass is translucent so once the gelcoat is off light will readily shine thru it. If it's real flexy you can put some more glass down if you feel it needs it. Since you've got a hole in it how thick is it now?
 

bvetter

Petty Officer 1st Class
Joined
Jun 2, 2013
Messages
263
Re: 1999 Celebrity 190 - Engine Mount and Stringer Repair

Where the hole is, it's exactly 0 inches thick. :)

But around the hole it's hard to say, it at the very end of one of the strakes, so there's a few curves at play. I was trying to clean it out really good, there was old PB in there from the original stringer, so trying to clear it out with a 5" disk is a little tricky to say the least.

Use painters tape on the outside of the hull then lay some PB on the inside then CSM and some 1708? It's in such an awkward spot I feel like I would need to prefill with PB before trying to stuff CSM in there. I'll grab a pic this weekend and upload.
 

Woodonglass

Supreme Mariner
Joined
Dec 29, 2009
Messages
25,924
Re: 1999 Celebrity 190 - Engine Mount and Stringer Repair

Yup, tape on the OS then fill it with Hairy PB. She'll be good as new. Sand, Fair, and Paint or Gel on the outside. No CSM or 1708 Required. I shoulda READ a little better!!!:eek: Strakes ARE tricky little Devils. Dremels work well in there but are time consuming.
 

bvetter

Petty Officer 1st Class
Joined
Jun 2, 2013
Messages
263
Re: 1999 Celebrity 190 - Engine Mount and Stringer Repair

Thanks!

I was working on getting my materials ordered today, should be finalized Monday. I'm trying to order everything at once and have it put on a pallet, otherwise multiple shipping costs are going to kill me.

Hopefully by the end of next week I should have all of the necessary repair materials.
 

bvetter

Petty Officer 1st Class
Joined
Jun 2, 2013
Messages
263
Re: 1999 Celebrity 190 - Engine Mount and Stringer Repair

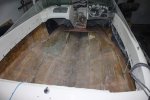
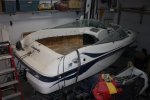
Ok, so tonight I wanted to take a closer look under the hull, specifically to look at the small hole I bored through one of the strakes while grinding the other night. But secondly, to do a survey of potential weak spots and areas which may have been thinned out too much by grinding. I did this by putting a 500W halogen inside the boat, turning the garage lights off, then crawling underneath to the boat. I was fairly surprised at how much light actually made it through the glass and gelcoat overall.

1) I noticed a bunch tiny bright spots, if I took a flashlight and light up the area I was looking at, it was obvious these were just tiny little nicks and chips in the surface gelcoat, nothing more, easy fixes.

2) The other interesting thing I noted were a couple series of stress cracks in the surface of the gelcoat. Again, with the flashlight pointed at the surface of the hull, you could barely see them, would have to look hard to find them. But in the dark with the light shining through the hull, they were so obvious. Here is a pic of one of them.

Gelcoat Cracks.JPG


Because this only looks to be surface stress cracks in the gelcoat, I imaging this should be a fairly easy fix.


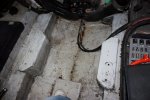
3) Inside the boat, there is an area just forward of where one of the ribs was, that is fairly dark. It looks like the resin they used in that particular area is just darker than the rest, but it's also WAY thicker in this particular area than anywhere else in the boat. I ground down a small area just to see if there was anything in there, but it seemed fine. I ground down to what appeared to be a layer of woven. It didn't look like there was any voids, seemed solid throughout.

Any thoughts on this?

Here is a pic.

Green Spot 3.jpg
 

bvetter

Petty Officer 1st Class
Joined
Jun 2, 2013
Messages
263
Re: 1999 Celebrity 190 - Engine Mount and Stringer Repair

4) Just to the left of the dark spot I mentioned in the last post, I poked away at another dark spot inside the strake, I got to the last layer right before the outer gelcoat, and there seemed to be a weird green layer. This is a really small green area, maybe 4 inches long by 1 inch tall. I poked a hole through the gelcoat to try and get a sense of the thickness of the green stuff. Here are some pics.

Green Spot 4.jpg

Green Spot 2.JPG


5) Here is a couple pics of the first hole I accidentally put in one of the strakes with the grinder.

Strake Hole 1.jpg

Strake Hole 2.JPG
 

Woodonglass

Supreme Mariner
Joined
Dec 29, 2009
Messages
25,924
Re: 1999 Celebrity 190 - Engine Mount and Stringer Repair

Again, Resin, without gel is translucent soooo, anywhere that the color is gone light will shine thru. You should only be worried if the hull seems to be excessively flimsy in certain areas. If you will be filling the hull with flotation foam it will really stiffen the hull significantly. That's why I asked you to give an estimate of the thickness of the glass in the hull. If it's 1/8" to 3/16" then it's fine. If you want to lay an extra layer of CSM or 1708 then you can, but IMHO it's not necessary or required. The GREEN stuff is Polyester resin. Looks as if they might have applied an extra layer of cloth in that area for some reason.
 
Last edited:

bvetter

Petty Officer 1st Class
Joined
Jun 2, 2013
Messages
263
Re: 1999 Celebrity 190 - Engine Mount and Stringer Repair

6) And here are some overall pics of the progress so far. I pulled down the temporary dust tent now that I'm done most, if not all of the hardcore grinding.

My plan is to thicken the hull areas where I was grinding. Will first fill in the voids and low spots with PB, then will likely lay a layer of of 1.5oz CSM followed by woven roving, unless someone has a better suggestion. This way I should have a fresh surface to work on, along with a thicker hull than there was originally.
 

Attachments

  • Overall 1.jpg
    Overall 1.jpg
    97.5 KB · Views: 6
  • Overall 2.jpg
    Overall 2.jpg
    111.3 KB · Views: 6
  • Overall 3.jpg
    Overall 3.jpg
    90.4 KB · Views: 6
Top