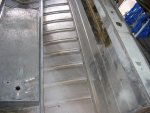
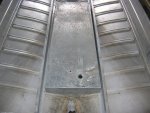
196X Starcraft Holiday-1975 OMC Johnson V4 115 Restoration

greenbush future

Lieutenant Commander
Joined
Aug 28, 2009
Messages
1,814
Re: 196X Starcraft Holiday-1975 OMC Johnson V4 115 Restoration

With all the old rod holder equipment gone, it really does leave some big areas to consider. What I did was just put the rod holder and down rigger plates back in, it was by far the easiest cleanest way to fix the existing holes on my tin boat. I guess you could rivet some patch tin over the big one's, then cover it all but that may show through vinyl. Depends how you will finish that area, paint carpet, vinyl?
 

Grandad

Lieutenant Commander
Joined
Jun 7, 2011
Messages
1,504
Re: 196X Starcraft Holiday-1975 OMC Johnson V4 115 Restoration

Trying to get the Bow cap off. I drilled the 2 rivets underneath the cap but it won't budge. Tried to persuade it with a soft hammer but still no go. What gives??

Hi Minn. Why are you removing it, anyway? Does it really need to come off? - Grandad
 

MinnStarcraft

Seaman
Joined
Oct 16, 2010
Messages
52
Re: 196X Starcraft Holiday-1975 OMC Johnson V4 115 Restoration

The zen art of starcraft rebuilding, my how our threads have similarities. Check out my Chief thread on how to get the bow cap off, I got some great advice from the guys. 2 steel putty knife/scrappers with a wrecking bar in between them got my cap off.

My Chief is also pre-1972 and has no HIN either.

Oh and don't forget to show the bee killing admiral of yours some of my adventures in yellow jacket land.

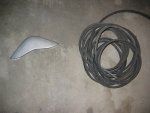
Success!!! Rubrail was in one big continuous piece. Thought I woudl have two.

Bow cap and rub rail trim 002.jpg

You rock Watermann!! Admiral loved your pics of the wasp fogger. The Flying Wasp- Caddyshack...that's real funny right there. :laugh:
 

MinnStarcraft

Seaman
Joined
Oct 16, 2010
Messages
52
Re: 196X Starcraft Holiday-1975 OMC Johnson V4 115 Restoration

Hi Minn. Why are you removing it, anyway? Does it really need to come off? - Grandad

Hi Grandad.
Yes, the rub rail is pretty beat up so I thought I would replace it.
 

MinnStarcraft

Seaman
Joined
Oct 16, 2010
Messages
52
Re: 196X Starcraft Holiday-1975 OMC Johnson V4 115 Restoration

With all the old rod holder equipment gone, it really does leave some big areas to consider. What I did was just put the rod holder and down rigger plates back in, it was by far the easiest cleanest way to fix the existing holes on my tin boat. I guess you could rivet some patch tin over the big one's, then cover it all but that may show through vinyl. Depends how you will finish that area, paint carpet, vinyl?

gb,

Yes, I think I have a plan for those holes. I think the rod holder idea is probably the way to go. Paint on the gunnels like it was.
 

MinnStarcraft

Seaman
Joined
Oct 16, 2010
Messages
52
Re: 196X Starcraft Holiday-1975 OMC Johnson V4 115 Restoration

Ok, on to the Transom build. I have put together "the plan" that most everyone uses here so forgive me if I bore everyone with it. Just want to make sure the bases are covered and would welcome your input.

Here goes:

  • MG Doug Fir 3\4 " sheets (Menards)
  • TITEBOND III waterproof glue
  • Clamp and screw
  • Test Fit (sand, etc)
  • Drill, Fill, and Redrill
  • Epoxy (US Composites 635 Medium 1 Gal. is this enough for transom, floor, side panels, rear panels and dash panel)?
  • Install

With regard to the glue, should I just use Epoxy instead of the TITEBOND III? Everyone seems to use the glue. Probably more economical as well.

When installing the transom, I will be reinforcing the Knee Brace with Aluminum angle. The ears are ok, just a little bent. Also, I was wondering if it makes sense to add a couple more screws to each side of the transom. There are only 4 screws on each side so why not add 3 more per side for a little more beef?
 

jigngrub

Fleet Admiral
Joined
Mar 19, 2011
Messages
8,155
Re: 196X Starcraft Holiday-1975 OMC Johnson V4 115 Restoration

I'd skip the Titebond and just order a quart of Cabosil from USComposites ($3.60) and make my own epoxy adhesive. 3 squirts of resin, one squirt of hardener and enough cabosil to thicken it up and you'll have more than enough epoxy adhesive to laminate your transom. It'll also be a much stronger and waterproof adhesive too. You'll also have some Cabosil leftover to play around with later.

The 1 gallon 635 3:1 medium kit from USC is actually over 5 quarts of mixed epoxy, 1 gallon of resin and 42 oz. of hardener. You should have plenty for everything.

Adding more screws to the transom won't hurt a thing, just be sure to seal them up good.
 

MinnStarcraft

Seaman
Joined
Oct 16, 2010
Messages
52
Re: 196X Starcraft Holiday-1975 OMC Johnson V4 115 Restoration

Well, the brown truck stopped by and I got my epoxy.

What do you all think about using a layer of glass between the plywood sheets when I glue up the transom? The plywood thickness is about a 1\16 off and I thought glass would make it stronger and fill in the space.

Thoughts?
 

Watermann

Starmada Splash of the Year 2014
Joined
Jan 12, 2013
Messages
13,753
Re: 196X Starcraft Holiday-1975 OMC Johnson V4 115 Restoration

I've read about guys doing that but that 1/16th won't be there after you glue and then coat the transom pieces. I think it will be too thick after you added glass between the pieces.
 

MinnStarcraft

Seaman
Joined
Oct 16, 2010
Messages
52
Re: 196X Starcraft Holiday-1975 OMC Johnson V4 115 Restoration

Watermann,
Yeah, I did some more research on that and decided just to go with the epoxy glue route.
 

MinnStarcraft

Seaman
Joined
Oct 16, 2010
Messages
52
Re: 196X Starcraft Holiday-1975 OMC Johnson V4 115 Restoration

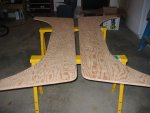
Ok, got my transom pieces cut, test fit and ready for the epoxy. I have done some reading on various posts on what needs to be done. The weather should be sunny in the low 70?s for a few days here. Was thinking maybe I need to glue a test piece first? I don?t want to screw these transom peices up. They are just too beautiful! :rolleyes:


001.jpg
Here is my plan:

  • Sand faces with 80grit for enough ?tooth? for the epoxy.
  • Mix epoxy and coat both pieces to wet it and give the two pieces time to soak up some epoxy. Recoating as needed. Let it start to set up.
  • Mix Epoxy\Cabosil to make a thicker glue\paste and apply using 1\4 notched trowel.
  • Clamp just enough until the epoxy ?glue? starts to ooze.
  • Let dry.
Opinions?
 

jigngrub

Fleet Admiral
Joined
Mar 19, 2011
Messages
8,155
Re: 196X Starcraft Holiday-1975 OMC Johnson V4 115 Restoration

When you clamp the 2 pieces together you want to squeeze the snot out of them, clamp tightly all the way around and in the middle. If you clamp lightly you could leave some air bubbles/voids in between and you don't want that.

Also if you don't clamp it tight enough you could end up with your transom being too thick, like 1-5/8" instead of 1-1/2" and that can cause problems when you go to install it.

You don't have to resin coat the 2 sides to be bonded before gluing, nor do you have to sand... just bare clean dust free new wood is all you need. Just mix up the thickened epoxy and apply it to one of the pieces of wood with a notched trowel then carefully place the second piece on top and clamp or screw... or both. I said carefully place the second piece on top of the first piece because as soon as it touches that thickened epoxy it becomes difficult to move and nearly impossible to seperate the to pieces even without clamping with just the weight of the second piece on top .

There's nothing wrong with doing it your way (except for the clamping lightly), you just use more resin and time than you need to.

Don't leave your epoxied wood outside overnight, bring it inside before sunset. The night time dew and humidity will be bad for uncured epoxy.
 

MinnStarcraft

Seaman
Joined
Oct 16, 2010
Messages
52
Re: 196X Starcraft Holiday-1975 OMC Johnson V4 115 Restoration

When you clamp the 2 pieces together you want to squeeze the snot out of them, clamp tightly all the way around and in the middle. If you clamp lightly you could leave some air bubbles/voids in between and you don't want that.

Also if you don't clamp it tight enough you could end up with your transom being too thick, like 1-5/8" instead of 1-1/2" and that can cause problems when you go to install it.

You don't have to resin coat the 2 sides to be bonded before gluing, nor do you have to sand... just bare clean dust free new wood is all you need. Just mix up the thickened epoxy and apply it to one of the pieces of wood with a notched trowel then carefully place the second piece on top and clamp or screw... or both. I said carefully place the second piece on top of the first piece because as soon as it touches that thickened epoxy it becomes difficult to move and nearly impossible to seperate the to pieces even without clamping with just the weight of the second piece on top .

There's nothing wrong with doing it your way (except for the clamping lightly), you just use more resin and time than you need to.

Don't leave your epoxied wood outside overnight, bring it inside before sunset. The night time dew and humidity will be bad for uncured epoxy.

Thanks Jigngrub,
I already sanded the two pieces so that was already done. That didnt take but all of 5 minutes. I guess it was more of like a piece of mind thing than anything else.
---------------------------------------------------------------------------
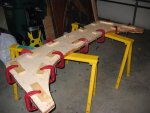
I went ahead and precoated. I wanted to see how much epoxy the wood would soak up. The ply didn't take as much epoxy as I thought it would. I also wanted to see how long it took to start to set and that is when I applied the thickened epoxy using the trowel and got it spread fairly evenly. I spaced the clamps out as best as I could and went around three times tightening them all as I went. I have a goodly amount of ooze and cleaned that up. It is still oozing.

003.jpg
 

MinnStarcraft

Seaman
Joined
Oct 16, 2010
Messages
52
Re: 196X Starcraft Holiday-1975 OMC Johnson V4 115 Restoration

Transom is done. 2 coats per side. Ready to install.

Ok you fabricators, what is the best way to mount this?
001 (2).jpg002 (2).jpg003 (2).jpg

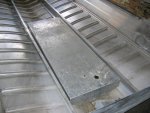
Picked this up off CL for $20. Tank needs to be elevated to just flush wth the floor so the fill and vent attachments clear. Otherwise, would have to drill clearance holes in the stringers. Kind of a drag that the fill hole will be on the right hand side. Figured I could use that big hole in the second pic on the gunnel for the fill. I flipped it around and placed it up as far forward as possible in the bow but the fittings would stick up too much killing the space under the deck. I would need to drill holes in the deck to make it work.

I was thinking maybe making a bed of some furring strips epoxy coated and attached to each rib under the tank? Make some hold downs and rivet to the side of the stringers? What do do for the ends of the tank to keep things from moving?
 

blazin_jason

Seaman Apprentice
Joined
Dec 9, 2012
Messages
47
Re: 196X Starcraft Holiday-1975 OMC Johnson V4 115 Restoration

Wow $20! I paid more than that just for a couple pipe nipples to build mine. I'm planning on using neoprene isolators on the ribs under the tank. I would see about having some angle welded to the tank so it can be mounted to the stringers.
 

jasoutside

Supreme Mariner
Joined
Dec 20, 2009
Messages
13,269
Re: 196X Starcraft Holiday-1975 OMC Johnson V4 115 Restoration

Smokin deal!

I'd prolly use flat stock alum across the top, and at both ends riveted into the stringers. I'd also wedge it in with some foam.

Awesome score!
 

Watermann

Starmada Splash of the Year 2014
Joined
Jan 12, 2013
Messages
13,753
Re: 196X Starcraft Holiday-1975 OMC Johnson V4 115 Restoration

Wow that is one heck of a bottom feeder deal on that tank! Is it a 30 gallon?

I would go with some type of rubber to bed the tank on.
 

jbcurt00

Moderator
Staff member
Joined
Oct 25, 2011
Messages
24,871
Re: 196X Starcraft Holiday-1975 OMC Johnson V4 115 Restoration

Best not to use rubber, it's reactive w/ aluminum, or foam (it can trap water against the tank)

I'd prep the tank, spray a light coat of SE/ZC primer, and paint it before you install it below deck. Then follow the recommended steps here for installing an aluminum tank.

The prep, primer & paint is to protect the aluminum from any water it does come in contact w/, and would be just 1 more way to minimize the chance for water &/or corrosion damage...
 
Top