Aluminum 1977 Crestliner Rebuild Finally Underway

Status
Not open for further replies.

Patfromny

Lieutenant Junior Grade
Joined
Dec 2, 2012
Messages
1,197
Well, I had what I thought was enough time to put it back together and be just a few hours behind my wife. Yeah right. First and foremost was that the paint was still wettish. Everything took twice as long. Even getting in and out of the boat but everything also seemed dead set against going back together. The rub rail was hard as a rock and didn't want to go back in. It came out super easy, move on to the next thing. The console supports needed two people because they have bolts with nuts. My brother left for the lake right after the bow rails. I figured it out. But it took twice as long. The engine had to go back on. I called a friend to help out and had to wait for him. I'll just put the windsheild on. The weatherstripping underneath was shot. And on and on and on. After several trips to Ace (they have a tremendous selection of stainless hardware at mine) for stainless and weatherstripping etc. I was still home at 5 pm. Everyone left at about 9. I did get it mostly together but had some odds and ends to button up and decided to just finish it all the next morning at the lake. Here it is ready for the trip, almost, needed to put the seats in. Fun lifting them in alone over the paint.


I got up there at about 10, started a fire and had a few. Got up early, went for a dip and started fresh on the blue Devil. My Brothers started filing out one by one and together we got her back together and down to the launch. Here are some of my favorite pics of her.


And the best pick to date.


And in the water


Patfromny

Lieutenant Junior Grade
Joined
Dec 2, 2012
Messages
1,197
If you look at that last photo you can see why I want to cut the seat bases down. The windsheild doesn't do much wind sheilding. That's my wife up front with my neice in the boat with her and my brother and sister in-law on the dock next to his pontoon/support vehicle. Here is my attempt at snapping a pic to show off the metal flake.


Those are my other two nieces in the boat and my older brother (2nd oldest) pointing.
My sister in-law is also in both pics. As you can see, the boat was a hit with the fam. That was kind of the goal if you remember. Here is another of her moored at rock island on the lake while the girls picked blueberries.

 
Last edited:

Patfromny

Lieutenant Junior Grade
Joined
Dec 2, 2012
Messages
1,197
So the summer was another huge success. I did put the first scratch on her while installing the engine. And the second one on her because I am Docking Skill Impaired or DSI...how do you think the boat got all those scratches in the first place. To make matters worse, my wife is a natural. I have used the boat for more than 30 yrs and I can't dock it without pushing the bumper up onto the dock and rubbing the side of the boat against the side of the dock.. The first time my wife drove it she came in perfect. She gets a kick out of being better and has a mischievous smile on her face everytime she brings it in.

The strange part about the paint, I didn't feel proud like the year before. It was weird. Worked my tail off and turned in the best job I humanly could and felt nothing. When I scratched the paint during engine install my friend, who is my brothers best friend, just stopped and went white. I just shrugged it off and said it was bound to happen sometime soon. He just laughed and said, "well you sure aren't your brother, he would be bouncing off the walls right now." I often think it was because I didn't paint it. Kinda wimped out. I still think I should have felt something. Just weird. Next time (or next boat) I will paint it. I am going to get some practice in the next few days with some small interior pieces I am prepping. We are almost up to my punch list for this year. One year separates us now, and what a year it was.
 

Patfromny

Lieutenant Junior Grade
Joined
Dec 2, 2012
Messages
1,197
Thanks BWR she has come a long way for sure. Still in construction but it has been nice to be able to use her each year. I made that decision early on. Break it into sections. Easier on the wallet too. Thanks for chiming in. I was beginning to think I scared/bored everyone off.😁
 
Last edited:

oldhaven

Chief Petty Officer
Joined
Aug 30, 2015
Messages
568
That is a beautiful spot to be on the lake. Nice camp. And congratulations on getting the boat done in time to share with the family.

Ron
 

BWR1953

Vice Admiral
Joined
Jan 23, 2009
Messages
5,869
Thanks BWR she has come a long way for sure. Still in construction but it has been nice to be able to use her each year. I made that decision early on. Break it into sections. Easier on the wallet too. Thanks for chiming in. I was beginning to think I scared/bored everyone off.😁
My pleasure! I've been following along but don't always have something to say. Perhaps other folks are the same way.

Again, great job!
 

Patfromny

Lieutenant Junior Grade
Joined
Dec 2, 2012
Messages
1,197
Thanks oldhaven, I get up there maybe 3 times a year and then just for the weekend so it was mainly for the kids, I was happy and lucky enough to finish and present it to all of them at the same time. That is an awesome spot to be on the lake. It is called sunset point and it is actually a peninsula with about 200 degrees of water veiws. Unfortunately, it isn't ours. We rent it for a week each year when we all go up. We have an RV on the lake in an almost as nice a spot. We have had the lot since 76 and i used to spend entire summers up there, with my grandparents, regularly denting and scratching the blue boat. The homes are affordableish split between the four of us but the taxes are insane. With mortgage and taxes combined, it priced us out of the lake house owning thing. We choose weekends each year with the trailer and it works well but we can't all be up at the same time. Would love to own that house though. Here is a pic of it.


And the reason it's called sunset point.


Thanks for reading BWR. I agree with you regarding commenting. I have done my share of lurking here in the forum. I hope everyone following along has enjoyed my little boat build. It has been a very rewarding challenge. Writing about the build has been a lot more fun than I expected. I guess since all I have written about is water under the hull it doesn't have the suspense of other builds but I tried. I called on all my writing abilities to try and keep it interesting. My writing skills are not what they were in college...hell they were better in jr. High.

The story isn't quite over so i'm still gonna be bugging you guys with alerts in your message boxes saying I have posted on this thread. By tomorrow or thursday I will actually be caught up to what i'm working on this season. So in a day or so, I GO LIVE:eek::faint2: :laugh:. It is my fourth season, I thought I should shake things up.
 
Last edited:

Patfromny

Lieutenant Junior Grade
Joined
Dec 2, 2012
Messages
1,197
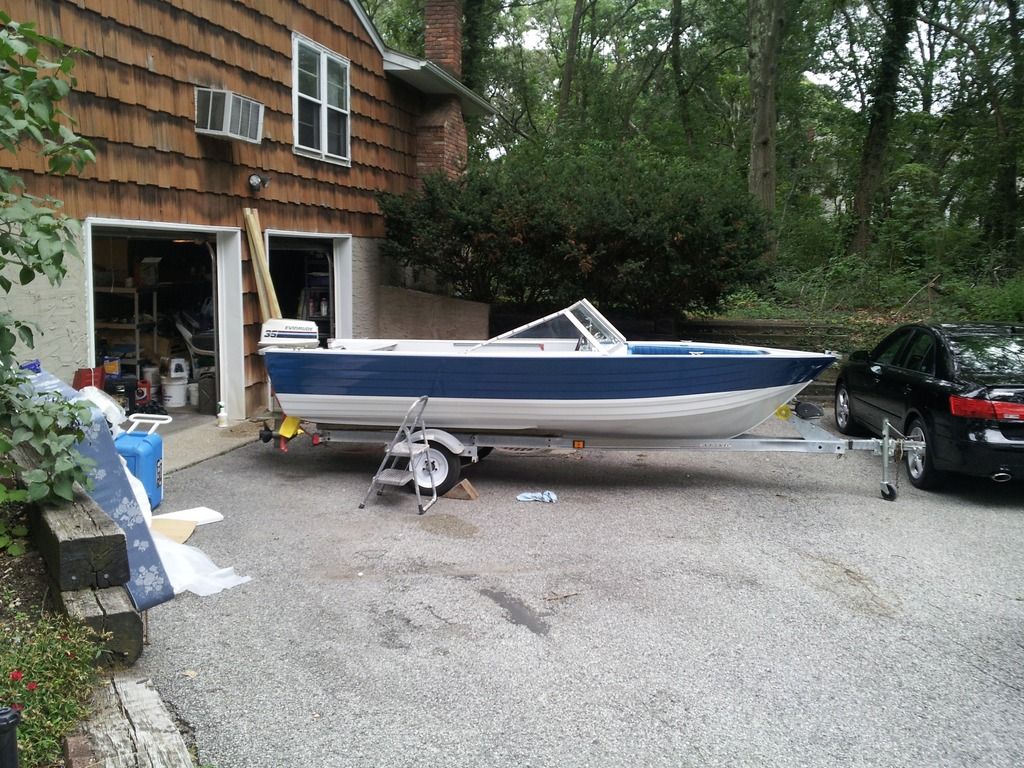
Well, the season ended and I took her home, I only had some cosmetic things to do and I wanted to rewire the boat. Odds and ends really. I didn't put her in the garage because I honestly didn't want to take the engine off. She doesn'the fit in the garage without doing so. I have to pull the engine and lower the trailer jack all the way and she fits with about 6 inches to spare. Instead, I wrapped her up with a tarp and built some wood supports to support the cover when it snowed. I learned a valuable lesson that year. I would guess everyone knows this one but just in case, I will put it out there.

You should drain the lower unit oil in the fall. If you have water in the case it can freeze and Crack the case. I had never had that problem. Even when I first brought the boat home, the oil was clear and no sign of water. Well, not that year. The spring came and I uncovered her, brought her down to the garage and started on the yearly maintenence of boat and trailer. I got to the lower unit oil and took both drain/fill screws out and out came maybe an ounce of oil. Even worse, it was brown and sludgey. I was not happy. I had the boat up on a hill half stuffed in the woods so no looking for oil leakage there. If I had put it in the garage I would have seen the leak sooner, damn. Luckily, there wasn't enough water oil to Crack the case but it could have happened very easily. I got lucky with where the leak was. I decided to at least find the leak. Wasn't sure if the case was junk or anything really. I hoped for the best and filled the case with oil to flush it, and hopefully find the leak. It wasn't too long at all when I started seeing oil seeping out from behind the prop. I pulled the prop, and saw an aluminium casting which slipped over the out put shaft and was obviously removable. It wasn'the painted like the rest of the area around it. The oil was coming from the bottom of this piece. If it had leaked from the top, I would probably have a cracked case. I went to my computer and looked up a schematic of my motor to see how it might come out and what parts I would need to fix the leak. I think it was called the output shaft bearing housing. I saw two bolts held it in and it had two seals, two o-rings and there were two bearings pressed in there as well. I ordered everything for the housing and went down to pull it apart.

Two bolts came out and the unit slipped free. It seems the o-rings had failed, I had bought everything so no biggie. I was playing with the unit, cleaning it up and figuring how to get it all apart. I was spinning it on my finger using the needle bearing because I thought it was cool. I'm a pretty simple guy lol. The front bearing spun freely but the back bearing was all but frozen. It would move but not happy and free like the front. I had suspected something was up with the lower unit for the last year. It would make this high pitched noise at a certain rpm while accelerating. It would only do so at about 1500 to 2000 rpm then go away. I had my brother in the boat with me driving while I had my ear on the engine cowl to see if it was the engine but the engine was just humming while the noise was present so I surmised it was the lower unit.

Anyway I was looking at this thing and realized that there was no way I was getting the bearings out. I called on my super hero machinist buddy once again to assist with the boat. Glad I did. He said he had to make a tool on his lathe to extract the bearings and another to repress them. He wasn't happy with me. It seems the bearings are pressed in from one direction and you need to get through one bearing to press out the first. The piece came back shiney and new. He complained about the stench of it and said he had to put it in his engine boil tank. He naturally stuck around for the install to see where this PIA went and how it was supposed to work. We checked as best we could for any scoring or heat blueing on the shaft and gears without pulling it apart and saw nothing unusual so she went back together. I did flush it several times until there was no trace of water. Ran it in a garbage can of water and flushed it again. All good.

I think i was mentally spent from the experience and just called it good for the season. I would rewire it next year (this year). She ran great all year but a new sound appeared. This was a similar sound but only happens when coming off the throttle. I talked to my buddy and he thinks it is probably engine related. I am going to check it out in the next few weeks but don't have high hopes for the old girl.
 

Patfromny

Lieutenant Junior Grade
Joined
Dec 2, 2012
Messages
1,197
Ok, so, maybe I was lazy. Mentally drained over a few seals and bearings? A little overly dramtic, even for me. I brought her up for the summer in late June and she was a joy. I was a little ticked at my self for not doing more but the boat worked and the little things left to do didn't effect that so I figured I could be lazy for a year. I was happy with the way she was turning out and the whole family was thrilled with her so the finishing touches were just that. The summer came and went without incident, I did some small things to her at the lake like windsheild supports. i had needed these since i was a kid. One would always pop out when you hit a wave. It was one of the first things i was going to change when i brought her home the first year but kept forgetting them when ordering parts. It was a running joke with my brother and I.

I also attempted to buy a good cover for her. That was a joke. I searched and searched for a cover for her and couldn't find one that wasn't that same Walmart 14-16' with either a 68 or a 90 " beam. I have a 78" beam. The 68 is too small and the 90 is a full foot to big. I had bought several of the 90" ones over the years and was sick of buying them every two or three years so I started searching. I felt like there had to be someone out there that had one closer in size.
So I'm online at a certain cover company which seemed to have quality covers for a fair price. I couldn't find the size. I was begining to think i was going to have to buy a custom cover and all the money out my pocket that went with it. Then, an angel appeared, actually Sally from the companies Web site. She asked what I was looking for on one of those pop up boxes that are becoming annoyingly too common on these sites. I told her the year and model and, almost immediately, she came back with a link for a 77 Crestliner cover. I am real dumb sometimes...especially when I really want this to be real. A link for a cover for a 1977 AMF Crestliner??? I had already searched the whole site for such a thing. There are no custom parts for a crestliner anywhere. It's even hard finding the Crestliner forum here. Lol My inner voice must have been pissed at me for not listening to him and doing more work on her in the winter because he didn't say a peep at that moment. I bought the cover and had it shipped to the lake.
I put the windsheild supports in without incident and moved to the cover. I had also bought a support pole that has straps that fasten to the transom eyes to keep it upright. These straps also support the cover. I really needed two but bought one to see if it worked. Thank goodness. The straps hooked around the eyes and snapped together. I guess there are a a bunch of saggy covers out there because as soon as you put any kind of tension on them they pop open. I struggled with that for a bit and got increasingly ticked off until I decided to leave it loose and just see how the cover fit. Out comes the cover, wow it has and attached engine cover. It is made great. Looks like it will last a long time. Lift it over the tinker toy support pole and to the bow.....the cover was for a 16', but it was also for a 16' wide boat. I swear, the length was perfect but I could have put velcro on each edge of the sides and had them fasten together at the keel. It would have wrapped the whole boat.

I called customer service and asked them to pick it up at the address they had mailed it to. It was the boathouse at the lake. They sell bait and gas, rent boats, etc. And to call me if there were any problems because I didn't have Internet at the lake. She said no problem she will note it all in my file. I left and went home. A month later I returned to the lake for a weekend and find another "crestliner" cover had been shipped to the boat house and they never picked up the old one. This specially made for my boat cover was really the 14-16 with a 68" beam cover. I was, of course charged for both even though I didn't ask for the second. In fact, their policy is to send a replacement out once the first one is returned. Three months later I had my money back. So the search continues for a cover. Anyone know of one that would fit a 78 beam?
 

Patfromny

Lieutenant Junior Grade
Joined
Dec 2, 2012
Messages
1,197
Ok, so the summer came and went as summers do and we planned on going up in late October to winterize and pick up the boat. I was working one Monday in early October and my phone signals a text. It was a friend of ours who was dropping off some firewood for us. Not the type of Monday morning text anyone would want to get


Our neighbor isn't super nautical and didn't tie his boat close enough to his dock (three feet off the dock). It has happened a few times before and I have taken pics and complained to the lake owners. This guy isn't too friendly and he once screamed at my wife for running over to help him because he had almost fallen off his boat while docking. This is why I complained and didn't just talk to him. I didn't want the confrontation. So now it looks like i'm going to have that confrontation after all. What a drag. His boat had basically hit mine over and over throughout a storm. It was badly dented and the gunwale was gouged up pretty good. The rub rail was also punctured in 5 spots. Here is how his boat should be tied up.


Patfromny

Lieutenant Junior Grade
Joined
Dec 2, 2012
Messages
1,197
I brought her back to the body shop in February and got an estimate. We planned on an early spring painting. He called me a few weeks ago and I brought her down. I then contacted my dock neighbor and informed him of the price. I didn't want to call him until I knew the boat would be painted. He said he had no insurance on his boat and he would call me back because he was at work. I told the body shop to go ahead and paint it as there would be no adjuster coming to check it out. I got the boat back several days later and Called the neighbor again to express my concern about payment. He said he was going to go through his homeowners. Oh boy, my buddy did the job on the side for cash and no reciept. No damage left for the adjuster to look at. Round and round with the adjuster so far. He has been understanding but his company might not be when it is time to write a check. So I am looking for another body shop to write me an estimate off of my pics. Fun fun fun. She did come out nice though.


Patfromny

Lieutenant Junior Grade
Joined
Dec 2, 2012
Messages
1,197
So now I am officially up to date. I planned on rewiring the boat and trailer, painting a few interior pieces and basically tidying up loose ends. I am not sure how much I will get to, life has gotten in the way a bit. I am redoing both my bathrooms and other much needed things around the house and am running low on boat funds. My daughters softball started as well as my own softball schedule (two nights a week for me) and time is also becoming a factor. I am going to squeeze the wallet as much as I can and get as far as possible in the next few weeks though. I started on painting the interior pieces 2 weeks ago. I am only able to work weekends so far which is OK. A few hours here and there still gets it done. Here are the pieces I am prepping for paint. They run along the sides of the boat and act as a transition piece from deck to hull as well as a pocket of sorts for oars and boat stuff.


They were pretty beat up. They seem to get stepped on when entering or exiting the boat and the anchor always seemed to land on them when pulling it out of the water.


I found some pretty major pitting under the wood pieces. Worse than any other part of the boat.


I stripped them, sanded off remaining paint, and wire wheeled the pitting. I then hit them with vinegar, and let them dry


Patfromny

Lieutenant Junior Grade
Joined
Dec 2, 2012
Messages
1,197
After the vinegar was dry I filled the pitting using a two part marine epoxy that said it was good for aluminium. I mixed it and spread it over all the pitting with a 4 inch spackle knife. I also went over the screw holes and plan to knock them out or Redrill where needed. It said to wait 3 hrs. and I had to bowl in my league so I put them away for the night.


Here you can see the mixing sticks I had to make. No big project but really, two part epoxy with the mixing sticks not included? Reminds me of a Steven Wright joke. "The other day I bought batteries, they weren't included, so I bought them again"


It rained all day Sunday and really hasn't stopped since so I am at a stand still. We have my daughters birthday this weekend and a guy is coming over to look at my old Firebird project so I will have to shoehorn some time to sand these guys out and get some primer and color on them.
 

Patfromny

Lieutenant Junior Grade
Joined
Dec 2, 2012
Messages
1,197
Now that I am live or up to date I do have a few questions. I used this epoxy instead of jb weld because I had it in my mind to get something that said it was for aluminium. Well I didn't think too far past the application and am now wondering if I can etch prime over this stuff. It says nothing about painting over it, or even sanding it. Does anyone know if I can etch over this stuff or am I going to have to mask it all?


I also can't seem to find a replacement rub rail. It was damaged during the accident during the storm. I have contacted Taco and it isn't one of their's. I have looked around a fair amount with no success. When you Google rub rails a pic of this stuff comes up so I know it's out there but all the links attached to it don't bear fruit. Anyone have a good source for me to search? Would appreciate any feed back. It is 5/8 " on the track side width by 1/4" tall by 1/2" exposed width. Hope that makes sense.


Patfromny

Lieutenant Junior Grade
Joined
Dec 2, 2012
Messages
1,197
The paint looks super :thumb:

Rub rail inserts, we Starcraft guys get ours at wefco, 0101G. You have to call to order.]

Thanks Watermann, means a lot coming from someone who's trailer is just as nice as my boat. Following along on your threads. You do some great work. I used an automotive paint called Nason. It is like Emron, single stage I think it is called? No clear coat. It was expensive but not like Emron. I had heard clears can yellow in the water. Not sure if that is true but i didn't want to chance it. I leave it in the water from june till October. That is also why i didn't use the tractor paint. I was real happy with the end product. Both times 😊
Thanks for the link. I saw one or two that I will have to call them for dimensions. I have been going crazy looking. I want to send a price to the insurance company and get it put back together.

The worst part was seeing this when I Googled rub rail


It is the exact profile. It even has the little notch down the center. It was Nowhere to be found when you click on the websites it shows though. It made me believe that it has to still be out there. There is one on the site you sent that looks very similar, now I have to call and hope it is the same size as mine. Thanks again. Any idea about the etch prime over the epoxy?
 
Last edited:

Patfromny

Lieutenant Junior Grade
Joined
Dec 2, 2012
Messages
1,197


Thanks for the link oldhaven, I think i would consider gray. Unfortunately they seem to be too large. They both say 11/8". I'm guessing that that is the bottom (track) side dimension. Here is a pic. of a rail that is close but not right. It will also help me explain my dimensions better.


The track side is the right size at 5/8", my height is 1/4" where that one's is 5/16" and my exposed width is 1/2" where that one's is 7/16". The reason I didn't buy this one is that the track for this one is different than mine. My track is a C shape but all bends are 90 degree bends. The RR above fits into a track who's side profile looks like a D with the center cut out. I hope you can follow my horrible description. It seems like the Starcraft RR has a similar track to mine but larger.
 

Watermann

Starmada Splash of the Year 2014
Joined
Jan 12, 2013
Messages
13,753
Thanks Watermann, means a lot coming from someone who's trailer is just as nice as my boat. Following along on your threads. You do some great work. I used an automotive paint called Nason. It is like Emron, single stage I think it is called? No clear coat. It was expensive but not like Emron. I had heard clears can yellow in the water. Not sure if that is true but i didn't want to chance it. I leave it in the water from june till October. That is also why i didn't use the tractor paint. I was real happy with the end product. Both times 😊 Thanks for the link. I saw one or two that I will have to call them for dimensions. I have been going crazy looking. I want to send a price to the insurance company and get it put back together.

Thanks again. Any idea about the etch prime over the epoxy?

You're welcome and I do appreciate your kind words. It was smart to use a paint made to be moored, my current build I'm just leaving the bottom below the water line bare aluminum even though it'll be a trailer boat for the most part.

Are you asking about epoxy resin that's on wood?
 
Status
Not open for further replies.
Top