Aluminum 1977 Crestliner Rebuild Finally Underway

Status
Not open for further replies.

Patfromny

Lieutenant Junior Grade
Joined
Dec 2, 2012
Messages
1,197
That's weird, does anyone know why those pics are smaller than the rest? He took them with his phone but half the ones I have posted were taken with mine.
 

oldhaven

Chief Petty Officer
Joined
Aug 30, 2015
Messages
568
Thanks for the trip in the time machine, and we know the story has a happy ending after the appropriate plot twists, so carry on.

Ron
 

Patfromny

Lieutenant Junior Grade
Joined
Dec 2, 2012
Messages
1,197
Thanks for stopping by oldhaven. Yeah, sorta different than most threads knowing it is done. It has been super fun for me stepping back in time to tell this story too. This project started as a simple act of necessity. We needed a boat to fish out of and for the kids in the family to learn boating. I originally was looking through craigslist for a used boat and thought that $2500 or so was too much to spend if I already had a boat. Well, almost $6000 later, I should have spent the $2500. Lol. The story isn't all sunshine and roses though, last season didn't end well. Cliff hanger? No peeking at my photo bucket library. That's cheating. I should write for one of these HBO shows. 😆
It did seem like a Batman episode at times throughout this build. Will Pat get the interior put back together in time for his triip? Will the engine run well or at all when they get to the lake? Will Batman get to the community center in time???
 

Patfromny

Lieutenant Junior Grade
Joined
Dec 2, 2012
Messages
1,197
Wow that pic of the whole floor sure looks a lot brighter than I remeber. Here are some of my brothers pics of the interior in various stages of reassembly. This first one shows the bow seats back together and in. I had to make new bases for them and re-staple the padding and vinyl back on. It also shows the first seat going in at the helm if you want to call it that in such a small boat. Also in this pic you can see the bow anchor locker bulk head? That I made new and re-upholstered with new nautilux. The only reason I made this piece was that I had some left over nautilux, epoxy, and marine ply.


That bow piece turned out to be the toughest to cut, cover with the vinyl, and install. It had a slight bend to it and I had to get longer screws to go thru the board and metal brackets to tighten. I must have dropped 10 of the #10 nuts and endless washers into the hull trying to get them on the end of the screw through that tiny door hole. Thank goodness they were stainless. Nothing rusting under the deck. Here is a shot from the front. Here you can see how nice the bow seats came out. The vinyl was in good shape and I didn't want to learn to sew anyway.


I replaced the wood backings on the back rests there too. They were also made of particle board with a wood screw through them. It seemed to be a favorite channel for water to pass behind so they had rotted off the screw. More like fell apart then rotted. You can also see the console braces in both pics. I reused the vinyl and piping there too. I might try to replace them down the line. They were serviceable but not perfect.
 

Patfromny

Lieutenant Junior Grade
Joined
Dec 2, 2012
Messages
1,197
I do have a question for you guys, up in the last post you can see the back to back seat. They were replaced the last year she was in the water. I think the old bases were made of the particle board and fell apart. The problem with these new seats is they are too tall.when sitting in the seat my whole upper body is over the windshield. I was thinking of cutting the bases (injection mold plastic) down on my table saw. If memory serves, they are about 5 inches too tall. The top of the seat originally just poked out over the gunwale. Has anyone done something like this? I think it will work but don't know how nice the cut would come out. Would the blade melt more than cut? Should I use a blade for trex or is there a better option? Also, I would have to shorten the u shaped leg on each seat that holds the back portion up when the seats are layed down. Wondering if anyone might have a better idea on how to go about this. I plan on putting it through the table saw four times. Basically I have to cut each side of the box. Was going to cut off the bottom but the top might be the better way to go. Any feed back would be appreciated. Would snap a pic but the boat is not here this week (cliff hanger).
 

Patfromny

Lieutenant Junior Grade
Joined
Dec 2, 2012
Messages
1,197
While I wait for all your responses I will end the first season of this boat story since I am out of pics. So the work continued on the put back right up until the final hour before we were leaving for the lake. And then it went on for a few more hours, and then a couple more for good measure. There were so many little last minute things to do...like put the engine on, oh and paint and install the engine plate/outer transom piece. I could see the light at the end of the tunnel though. We wound up leaving that night at about 11 pm. It is a four hour ride so no one was real happy about the impending trip but we made it and even had an adult beverage or two before passing out. We (i) got up early to go through the boat and make sure things were where they should be and did a saftey check. Put the plug in with the Teflon tape of course and waited for everyone else to awake. It was like lying in bed Christmas day waiting for my parents to get up. My stomach was also turning because I was sure she would float, but that was the only thing I knew. I tried briefly to get the engine running with no success, that was the one last small thing I planned on doing at home but never got to it. I had got it to fire but not stay running. As I mentioned earlier, my buddy who came up with his family is a machinist and a real smart guy. He has a mind for most anything mechanical and electrical so I figured we would figure the engine out between the two of us. It might involve more parts but before the weekend, one way or another, she will run.
So everyone gets up and gets ready, my brother takes his pontoon with the wives and our kids to the launch and my buddy(Scott) and I trailer my boat down to the launch. We put her in, I park the van, come back and turn the key....wait for it....she fires off and runs better than when she was new. Scott looks at me, I look at Scott, Mike (bro) looks at me, I look at him, you get the point.. I swear, it was the funniest moment of my life. We all just doubled over laughing. Scott was sure he was going to have to tinker with this thing all weekend. I would have bet my life savings, both dollars, that she wouldn't start first time.
I warmed her up, and took her for a blast. She went as fast as 26 with me alone in the boat after Scott recommended I richer the fuel mixture. The fastest she had ever gone was 21. SUCCESS!!!
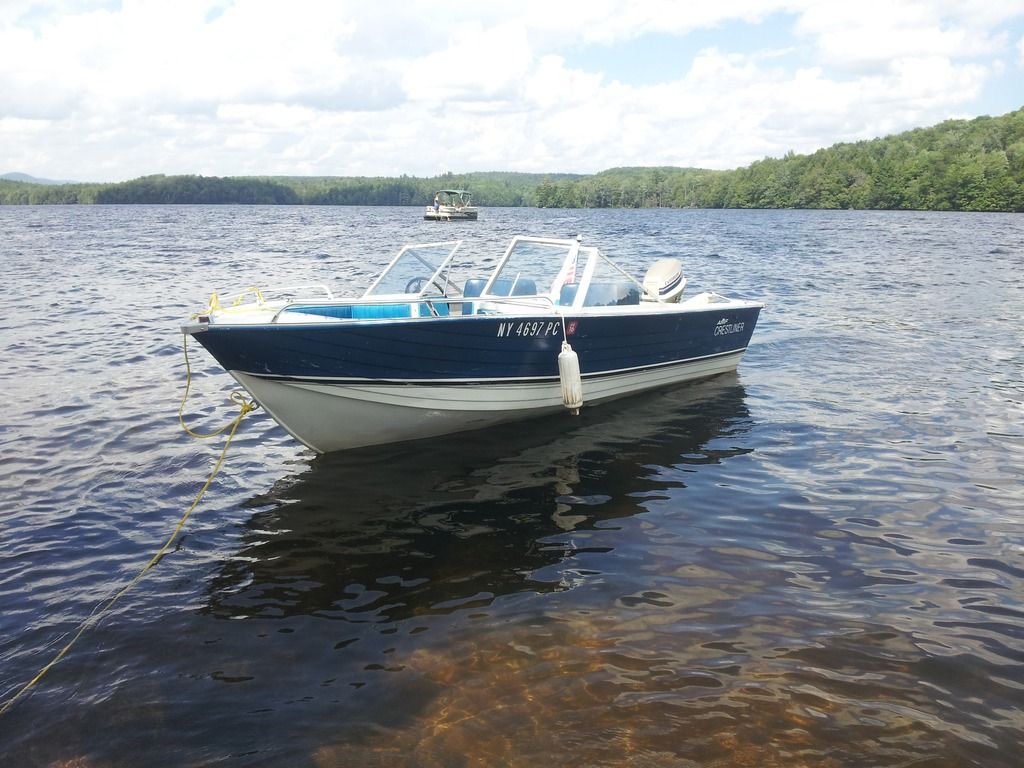
Here she is that weekend, first time in the water in 4 years I think.


Patfromny

Lieutenant Junior Grade
Joined
Dec 2, 2012
Messages
1,197
She is sitting a few inches higher in the water without the soaked flotation. We had a great weekend of fun and sun. Scott's son fell in love with the lake and the boat especially. Here he is with my daughter riding shotgun.


I love this photo. Scott's son drove the boat all weekend. It was all he wanted to do. I also love the pic because I wanted them to seem like they were driving it alone. That red thing in the back of the boat is Scott. He hunched over and he ends up looking like a flotation cushion or something. We had a great weekend and I smiled with pride the whole time.
 

Patfromny

Lieutenant Junior Grade
Joined
Dec 2, 2012
Messages
1,197

Patfromny

Lieutenant Junior Grade
Joined
Dec 2, 2012
Messages
1,197
That pontoon gives my boat an inferiority complex. Man does it look tiny next to it huh?
 

Patfromny

Lieutenant Junior Grade
Joined
Dec 2, 2012
Messages
1,197
Ok, the season was a huge success. My whole family got together for a week that year, first time in 30 yrs. That we were all at the lake at the same time. The boat was a hit and it seemed to be perfect timing. I brought all the kids down to the boat and explained things. I told them that although I have been busting my butt on it, it was their boat. I asked them to respect it and take care of it but if it broke I would fix it and if they messed it up, they were only messing up there own boat. My oldest brother thanked me for the speach, he and his kids like to fish and the pontoon isn't for fishing with the light carpet. He was renting a row boat whenever they went up. The boat ran great all year and everyone was pretty happy with her. I had a list of things for the winter so I trailered her home and stuffed her in the garage.
The main project on the list was paint. The second largest project was the top seal on the engine. We started noticing an oil slick around the engine whenever it was docked. Pulled the cover and the engine is covered in oil. She ran well, but can't be polluting our little pristine lake. I took the flywheel and throttle plate thingy off and was greeted with this.


I had done some reading on removing a seal with the crank still installed but most of the videos and advice were for generator or lawn mower engines. If you look at that picture you can see that evinrude thought it would be a good idea to recess the seal real far down in that hole. I couldn't get a drill bit into the recess to drill a hole to put a screw in and I couldn't get any tool I had down into the recess. After looking online I found a tool made just for this purpose and it was sold in a store that I have right in town. Bought the tool, inserted the bit in and snap, the bit broke off immediately. I don't think it would have opened a can of beer. The screwdriver handle was also of lesser than kids toy tool quality. I think i honestly could bend it with my hands alone. Big bummer. I went searching for something I could modify. I bought several different pick assortments and any odd trim tool I could find. The trim tool and my grinder turned out to be the ticket.


I had to cut off the hook or whatever it had and then grind into it to make a pry tool. This stamped, tempered steel was perfect because it would break rather than bend. It did break a few times until I got the thickness of the bottom jaw right. It had to be thick enough to not break and thin enough to fit under the seal but now hit the main journal bearing for the crank. It wasn't fun, lots of finiking but once I broke it free from it's landing spot, it did come out easily.
 

Patfromny

Lieutenant Junior Grade
Joined
Dec 2, 2012
Messages
1,197
So I pulled the old one and install the new one.


I installed it the same way as it was. It was in with the metal side shown in the pic down. I have built my share of engines in my time and I had never seen this. I questioned it at the time but figured evinrude knows better than me and installed it that way. I'm an idiot. It still leaks. Not as much but enough to make me break out that fun tool this year and have another go at it. Oh, and I Indian headed it in so it should be fun. You've heard that house chores are never done...boat engine work is never done.
 

Patfromny

Lieutenant Junior Grade
Joined
Dec 2, 2012
Messages
1,197
So this season was really all about the paint anyway. The paint was in rough shape. It had nearly 30 years of beach and dock rash as well as a thousand nicks and scratches. The bottom and top sides were chalky one from sun, one from submersion I guess.


It also had plenty of holes from old cover snaps all over it. She was rough. I used jb weld to fill the holes and sanded them down when sanding the boat. I decided to feather out all the scratches as best I could and completely sand off the chalky stuff. I went overboard but it is the paint. I would hate to paint over a scratch. It just isn't me. I am a painter by trade and I spackle and spackle and spackle. I am ocd that way. I had to go the extra mile for my stuff. I started with 220 grit on my Palm sander to cut the paint. I then switched to 220 by hand to get rid of the swirls created by the palm sander. I finished with 320 wet to smooth out the 220. I did this for top and sides only. I think i left the bottom good at smoothed scratches with the palm sander. Neither the fish nor my trailer will mind. If you see the bottom of my boat, the last thing you will be thinking about is the paint job. Pics of the prep coming up
 

Patfromny

Lieutenant Junior Grade
Joined
Dec 2, 2012
Messages
1,197


There is my poor little palm sander in the pic down below. I was sure I would burn it out. She is still working to this day. I had to buy a new velcro pad for her though. I guess I melted it from using it so long. It wouldn'the hold the finer grit paper anymore.


I took the stickers and pinstripping off with my heat gun. The pinstripping didn't appear to have any glue at all. The sticker glue was a bear. Sanded, acetone several times and it was still there. I thought it was gone but you can still barely read it if you look down the side at the right angle. I'm going to put new ones on in the same spots so no problem.
 
Last edited:

Patfromny

Lieutenant Junior Grade
Joined
Dec 2, 2012
Messages
1,197
Here is a pic of the finished prep. Sorry about the lack of focus. My phone sometimes takes super shots like the ones of the top seal, and sometimes it doesn't seem to focus on anything. Just to the left side of the pic on the gunnel you can see a brown dot. That is some of that liquid menace PL that I used to glue the flotation. The stuff was everywhere.


Here is the jb weld before and after. A tip for anyone using the stuff in the future. Mushroom the back side of the fill when filling screw holes. I just pressed the stuff into the hole and smoothed it a bit on the outside. I had a quarter inch extrusion on the underside of the splash well that I hit with the gas tank after it was painted. The filler just popped right out😤. I did save the old snap buttons so I guess if it keeps happening I can just put them back in.


after I finished the sides and top I had to address the bottom. It was scratched and chalky throughout. I think i stole this idea from another thread, maybe nursemans? I just know I'm not this clever so it didn't come from this noggin.

Look ma, no hands!!!


Patfromny

Lieutenant Junior Grade
Joined
Dec 2, 2012
Messages
1,197
Here are some pics from my brother of the prep work. I make a few cameos which I'm never too comfortable with. Don't know why, just never liked pics. These will do. Here is am wondering around aimlessly. Maybe looking for my coffee or following the extension cord to find where I left the sander this time.


Here is my better side. Lol. I was probably looking for my coffee because it is right in front of my face here.


Patfromny

Lieutenant Junior Grade
Joined
Dec 2, 2012
Messages
1,197
The bottom was the last to do and by far the most extensive damage. I decided to hang her from the ceiling joists. The boat is only 800 pounds I think and I took everything out of the boat except the consoles ect. I figure the ceiling supports the living room and we have had well over 800 pounds standing in that room with no problem. I used come along straps to lift her and didn't even hear a creek from the ceiling. I used straps and eye bolts that were rated for double and triple the weight of the boat. That doesn't mean I was getting under it.☺ I was painting a Lincoln dealership showroom and offices at the time and dumpster dove for this carpet ripped out of one of the offices. It served well as a boat/cement barrier when I layed the boat down to work as well as a damn nice thing to lay on while sanding. It also caught a lot of the dust from sanding.


It was so nice with the carpet in there. I almost wanted to go get all the carpet out of the dumpster and leave it in the garage permanently. The dust ruined this piece and I didn'the want to deal with the mold under a carpet after a winter in my garage. The garage is below grade on three sides and it gets super humid. I had a dehumidifier present throughout the build.
Here is how I decided to sand the sides


Patfromny

Lieutenant Junior Grade
Joined
Dec 2, 2012
Messages
1,197
Here are some shots of the bottom pregress.


I then did the otherside but i'missed sure you get the point. Here she is back on the trailer for the night


So I wiped it all down with acetone and put her away for the night. Next up was another cleaning and priming.
 

Patfromny

Lieutenant Junior Grade
Joined
Dec 2, 2012
Messages
1,197
I just read the last post and am upset with the spell check on this tablet. It puts words onto the letter after an apostrophe like the "i'missed" up there where it should say "i'm" but it let's "pregress" go without a problem. I fight this thing each post. After each apostrophe I have to hit a check mark on the spell check bar. Like going back to 98 with this thing. I know it'sounds off topic but it has become a bump in the build. Technically this is part of the build.

Anyway, I had planned on priming and painting her myself and had bought all supplies and paint to do so. Wow was that a lot more than the paint I buy daily. It still hurts to think about. It explains the majority of you guys using Rustoleum. That, unfortunately, wasn't an option since I leave her in the lake from June until October. I bought Nason single stage enamel on the advice of a former Softball buddy and sponser. He managed a dealership auto body shop and I contacted him several times during the process for advice. He thought (knew) I was nuts for trying this by myself but was amused and wanted me to keep him informed...he seemed to like hearing about my mistakes the most. He probably told all my screw up stories to his guys during breaks. Fair enough for free advice. I prepped my garage for the primer job by using plastic to cover my tool box and shelving on one side and 3 million plastic on the other, taped to the ceiling, the length of the garage. This was to protect the Firebird and the rest of my junk in the second bay. I hosed down the floor and misted the ceiling with the hose to keep the dust down and pushed the boat back into the garage. As soon as it was set up I realized it was too small for my comfort.


That is a pic of the garage right before I primed. No room. I planned on reproducing the original scheme but I bought a lighter blue. I realized that I would never get the job as nice as I wanted. I called my buddy and told him I was charging him for my stories unless he painted the boat. Actually it went more like my daughter asking to sleep over a friend's house when she was little,"please, please, please, please Paint my boat". He agreed to help me out and take only what I had left in the boat budget for that year. Which wasn't much. We set a date for a few days later and I shot the etching primer and Called it a night. The epoxy primer needs to be painted over within 24 hrs or you have to sand it and reprime.

So the night before he was taking the boat I put her back up on the ceiling and got to it.


The above shots were taken at about 4 am. Just the way this whole boat was built. Oh, I had to get the boat to him by 6. That was a fun sleep. I've yawned longer than that nights sleep. I woke up and the movie I fell asleep to was still on.
 

Patfromny

Lieutenant Junior Grade
Joined
Dec 2, 2012
Messages
1,197
I got her all saddled to the trailer the night before and just had to move some cars and push her out.


And hook her up for the ride the body shop.


And away she goes. I haven't mentioned this but as with the year before and the nature of this build I had two days until we were going to the lake for a week with the whole family again. The winter was another cold one and I just don't have it in me to get down to the garage and work in the freezing cold anymore. To be honest, I was also very intimidated by this part of the build. I was deathly afraid of screwing up at one point or another and this stuff was expensive. So I put it off hoping the painting fairies would break into the garage and just throw color on her.
The guys at the body shop were great. They knew all about my trials and tribulations while getting to this point and some money was exchanged among a few of them. Sort of like a birth date pool, they bet on how far I would get before I brought her to them. I had played ball with a few of them so I wasn't offended. They started on the paint as soon as I left and even sent me a pic of her in the spray booth


I had the last laugh when I saw they copied my hanging technique. This was painted in a Cadillac dealership and I think it was on the sly so the boat was hidden in the back booth the whole time. They painted the white first I think that morning and came back with the blue that night late. I picked it up early the next morning before the boss got there I suspect. I had left my plastic that covered the interior in place from when I primed and they left it in for me to take off when I got home. Well....
 

Patfromny

Lieutenant Junior Grade
Joined
Dec 2, 2012
Messages
1,197
The paint was still wet when I picked her up. Post it note sticky really. The plastic in there is painters plastic that I use to cover all furniture and cabinets, etc. It is called high density plastic which is what they call it when it's super thin. I like it for what I do because it comes in 400 foot sheets and it clings to stuff. No taping required on cabinets. Well, i guess you could say i learned a few things, things i didn't wish to learn, but i learned them anyway. The plastic as I said is super thin and, I found out on the trip home, cured Paint doesn't like to stick to it when it's flapping around like a flag. I got home, backed her down the driveway and got out to admire. Pure and utter terror. There were thousands of white flakes stuck to the sides and back of the boat. Now what do I do? I called my buddy and stammered through my problem. He recommended I use blue painters tape. I pulled a 6 inch piece off the roll and attached it to itself. I put it over my hand brass knuckle style and went to work dabbing the white paint off. Whew...that was several minutes of panic I surely didn't need. Once finished I started off putting the boat back together. Seats, rub rails, speedo and depth pick ups, windsheild, bownrails, bow seats, you get the gist. BTW, we were due to leave that morning for the lake. My wife was taking her car too so I was given a few hrs extra to complete. Here she is post tape job I believe


I was pleased with the job. I took these pics to text to my brother Mike who had stepped in and helped during the build. The pics worked and he ran over to see...sucker, I enlisted him in the bow rail install. By far the worst part of this whole boat build.


Looking at the pics I realize I did take out all the console supports so they could paint the metal portion of them. So add that to the list of put backs before the four hour drive.
 
Status
Not open for further replies.
Top