Winterizing - Three Point Manual Drain Plug not Accessible

PigInAPoke

Cadet
Joined
Apr 27, 2012
Messages
24
2010 Tahoe 228 w/ MerCruiser 350 MPI and Bravo 1. Three-point Manual Drain System.

Got tired of standing in line for 3 weeks at the end of the season waiting for an appointment to get the boat winterized (with fingers crossed that it was not going to freeze). Last year had a heat lamp in the engine compartment for a week while it dropped to 22F...

So this year it is do it ​myself time. I watched a couple videos, read the owners manual, got some goodies. Started by trying to pull all the drain plugs as per manual. Plug at distribution housing is piece of cake. Upper plug on seawater pickup pump took some contortions, but came out fine. Lower plug on seawater pick up pump seems to be jammed against the fiberglass cross-member. Can't see it, just feel it.

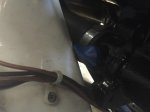
So I held my phone back behind the fuel filter to snap picture -- see below. Apparently when taking it to Bass Pro Shops for the last 3 winterizations (where I bought the boat new), they couldn't figure out how to get the plug out either and managed to break one of the ears of the plug off trying...

So I guess I could leave the others open, turn it over a few times, and then hope that the worst is the seawater pump bursts with ice? Or does the lower plug drain something else?

Or should I muff it with some antifreeze? Or muff it with anti-freeze and then drain it with the two plugs that are accessible?

Dave
 

Attachments

  • photo233141.jpg
    photo233141.jpg
    259.6 KB · Views: 2
Last edited:

alldodge

Moderator
Staff member
Joined
Mar 8, 2009
Messages
42,288
The lower side of the hose is the one which goes thru the power steering cooler, and should be removed. My guess is other pplugs were removed and then they pumped antifreeze through.

The good and bad of the 3 point drain system is (good), less plugs to pull, but (bad) less plugs to pull allow for clogs to form and water being trapped in the engine.

If it was mine I would figure out a way to get the plug out or loosen the hose clamp and remove the hose to drain. Next remove the hoses from the exhaust manifolds and from the block. Also check for a plug in the thermostat housing
 

PigInAPoke

Cadet
Joined
Apr 27, 2012
Messages
24
If it was mine I would figure out a way to get the plug out or loosen the hose clamp and remove the hose to drain. Next remove the hoses from the exhaust manifolds and from the block. Also check for a plug in the thermostat housing

Thanks for the info on what that lower hose goes to. Also, I did not specifically mention the thermostat plug, but did pull. There is no way short of pulling the engine to get that lower plug out -- perhaps I could pull the engine mount and try to jack it up a quarter inch to clear, but that would probably cause a bigger problem. The 350 is just too tight a squeeze. Same issue with trying to pull the hose itself -- there is not really enough room to get my mitts back there without some serious disassembly -- I might get the hose off, but come Spring, I think I would be challenged to get it re-attached.

So I ran 4 gallons of antifreeze through the muffs. Then I released all the accessible plugs again. Mostly pink antifreeze came out. Still worried...

Dave
 

airshot

Vice Admiral
Joined
Jul 22, 2008
Messages
5,167
Yep....I would be worried as well. Many of the dealers use a pump to pump antifreeze thru the block and never remove those drain plugs. Just something you may want to consider is to remove the t stat and pump your own antifreeze thru until you force all the water out. Yep....I am one of those that use antifreeze in my block, however I drain as much water out as I can before adding the antifreeze, even use a compressor to help. I also use the green glycol antifreeze but DO drain and flush the system before going out the first time in the spring, can't put that stuff in our water system!! I feel better with the anti-rust qualities of the green stuff...just my preference. Air don't freeze is correct as long as you can get all the water out..
 

PigInAPoke

Cadet
Joined
Apr 27, 2012
Messages
24
Many of the dealers use a pump to pump antifreeze thru the block and never remove those drain plugs. Just something you may want to consider is to remove the t stat and pump your own antifreeze thru until you force all the water out.

I am not sure that I am worried about the block -- meaning I might be, but I just don't know enough. I need to study a coolant circulation system diagram. AllDodge definitely has me concerned about the power steering cooler...
 
Last edited:

PigInAPoke

Cadet
Joined
Apr 27, 2012
Messages
24
So, it looks like the newest Boatinfo has is manual #31 (Oct 2001), but the diagram on page 6B-7 is a little confusing. Can someone confirm that the seawater pump has a single outlet that flows into the power steering cooler, through a check valve, then into the distribution system, circulation pump, then into the block. Am I reading this correctly? There is no parallel feed from the seawater pump into the distribution system? No bypass in case the power steering cooler gets clogged?
 
Last edited:

alldodge

Moderator
Staff member
Joined
Mar 8, 2009
Messages
42,288
Am I reading this correctly? There is no parallel feed from the seawater pump into the distribution system? No bypass in case the power steering cooler gets clogged?

Yes, there is only one feed into the engine which goes thru the PS cooler. Pumping 4 gallons of antifreeze thru muffs would give me comfort enough to be sure the pump and up thru the cooler will be protected.
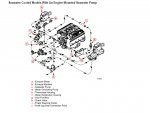
3 point sys Manual 31.jpg

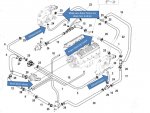
The 3 point drain has been out for years, but we are just now starting to see issues. The problems I'm seeing is all the hoses and inner connections can build up crud which can clog. The person pulls the plugs but cannot verify that they have drained. With separate plugs they are pulled and a wire is pushed up thru to clear any possible clogs. Only way to help verify the block has drained is to blow some air up each hose. If you choose to do it here are the locations I suggest.

3 point drain.jpg

This one is slightly different then yours but still the same setup.

On a follow up note, when was the last time the impeller was changed?
 

PigInAPoke

Cadet
Joined
Apr 27, 2012
Messages
24
Yes, there is only one feed into the engine which goes thru the PS cooler. Pumping 4 gallons of antifreeze thru muffs would give me comfort enough to be sure the pump and up thru the cooler will be protected.

That makes me feel a little better. Thanks.

The 3 point drain has been out for years, but we are just now starting to see issues. The problems I'm seeing is all the hoses and inner connections can build up crud which can clog. The person pulls the plugs but cannot verify that they have drained. With separate plugs they are pulled and a wire is pushed up thru to clear any possible clogs. Only way to help verify the block has drained is to blow some air up each hose. If you choose to do it here are the locations I suggest.

Makes sense. Even in the fresh water in Colorado, the minerals in the water build up on the outdrive and gel coat, so of course it is going to "paint" the inside of the cooling system.

If I understand your suggestion in the diagram, pull the hoses from the riser elbows (both sides at #25), put them low, and blow air through the other 4 locations identified, correct?

On a follow up note, when was the last time the impeller was changed?

The boat is 2010, but sat on the lot for 2 years before I got it, and then I have put ~50 hours on the motor. Never been in for anything other than winterization/summerization services. Looking through the invoices, I see filters, oil and lube, but no impeller. It is probably time.

So If I read between the lines, I think what you are getting at is that an impeller change would probably be a prudent thing to do, and is going to require pulling the pump (thus disconnecting the PS supply hose) anyway, right?

Dave
 

alldodge

Moderator
Staff member
Joined
Mar 8, 2009
Messages
42,288
If I understand your suggestion in the diagram, pull the hoses from the riser elbows (both sides at #25), put them low, and blow air through the other 4 locations identified, correct?

Yes, 25 just needs to hoses low to make sure they have drained. If they are already low I think your good. The ones at 24 on the bottom of the manifolds should be pulled along with the block drain hoses. Those hoses are the ones which if clog up will cause you pain it the spring.

So If I read between the lines, I think what you are getting at is that an impeller change would probably be a prudent thing to do, and is going to require pulling the pump (thus disconnecting the PS supply hose) anyway, right?

I recommend the impeller on your engine to be replaced every 2 years. This is a cheap item and is hard to replace, but can damage your engine real fast if it goes out
 

PigInAPoke

Cadet
Joined
Apr 27, 2012
Messages
24
Just a follow-up and thanks for all the advice. Pulled the seawater pump so I can change the impeller. What a PITA! Is it really necessary to pull the fuel pump and alternator to get to it? Or did I do something wrong? Or are my hands just larger than the average Joe? (As many problems as I had with my dead OMC-powered boat [RIP], the impeller replacement was a 5 minute job...)

Also discovered for future years that if I just pull the two mount bolts on the block, I can pull the pump about a half inch without disassembling anything else -- which is enough to get the third drain plug around the fiberglass...

Finally, when I pulled the fuel pump, it seems as though the rear pump bracket cannot be removed without removing the motor mount. Is this correct? (I started wrenching lefty loosey on the mounts not thinking and then realized that it could end very badly if I did not stop :) )

Again, thanks everyone for the help.

Dave​
 
Last edited:

alldodge

Moderator
Staff member
Joined
Mar 8, 2009
Messages
42,288
Just a follow-up and thanks for all the advice. Pulled the seawater pump so I can change the impeller. What a PITA! Is it really necessary to pull the fuel pump and alternator to get to it? Or did I do something wrong? Or are my hands just larger than the average Joe? (As many problems as I had with my dead OMC-powered boat [RIP], the impeller replacement was a 5 minute job...)
Pulling other things off to get at what you want to do is part of being a mechanic. I have to hang upside down to get to mine before I had the motor repowered, now I have to remove stuff and then hang upside down. The joyous world of working on boats. Kind of brings a tear to my eye, no... that's sweat dripping in it and it burns :mad:

Also discovered for future years that if I just pull the two mount bolts on the block, I can pull the pump about a half inch without disassembling anything else -- which is enough to get the third drain plug around the fiberglass...

Finally, when I pulled the fuel pump, it seems as though the rear pump bracket cannot be removed without removing the motor mount. Is this correct? (I started wrenching lefty loosey on the mounts not thinking and then realized that it could end very badly if I did not stop :) )

Again, thanks everyone for the help.

Dave​
Not sure Dave but in most cases the mount is installed and then the pump is installed. If your seeing nuts and not bolts then removing nuts should not be an issue. To verify give us your serial number and we can look up your configuration.
 

PigInAPoke

Cadet
Joined
Apr 27, 2012
Messages
24
Pulling other things off to get at what you want to do is part of being a mechanic. I have to hang upside down to get to mine before I had the motor repowered, now I have to remove stuff and then hang upside down.

After pulling the fuel lines, the hanging upside down part made me feel just a little lightheaded... :D

Not sure Dave but in most cases the mount is installed and then the pump is installed. If your seeing nuts and not bolts then removing nuts should not be an issue. To verify give us your serial number and we can look up your configuration.

The serial number is 1A611447.

Daylight was fading and I can't get my head in on that side to actually see, so was going more by feel. I will hang my phone down there and take a pic to see if there is anything that I missed in my gas fume stupor... There are 2x smaller 10mm bolts on the aft side of the cooler/pump/filter housing that hold it to the mounting plate/arm that seems to come from the motor mount area. I blindly removed these two smaller bolts to get the unit out of there, but was hoping to preinstall the unit on the arm with these 2 bolts as the fasteners on the block side of the arm seemed easier to get to -- and given that I am completely blind to the aft side of the cooler/pump, I am not looking forward to putting them back in as I have a feeling I will be repeatedly fishing them out of the bilge...

Dave
 

alldodge

Moderator
Staff member
Joined
Mar 8, 2009
Messages
42,288
Looks like your not removing engine mount bolts so you should be fine
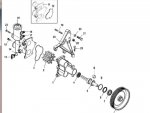
Gen VI water pump.jpg
 
Top