That stinking O-ring

rolmops

Vice Admiral
Joined
Feb 24, 2002
Messages
5,419
Yes it's the big one that goes into the gimbal housing when you put the lower end back into the Alpha one.
It has happened more than once that after carefully cleaning the area and gluing it in place and waiting for over an hour before putting the lower end back on, that the dang ring still popped loose after having caused trouble getting the lower end in place. Is there a magic trick other than lots of cursing and prayer?Of course I only find out when I take the lower end off again.
 

Fun Times

Moderator
Staff member
Joined
May 16, 2009
Messages
9,046
Was the U-joint bellows full of water when you removed the drive?
 

rolmops

Vice Admiral
Joined
Feb 24, 2002
Messages
5,419
Actually,there was a bit of water in there,but the gimbal bearing was fried and it had come out the housing and froze around the drive shaft. I had to cut it off and replace it.
Then I figured that while I got the thing apart,I might as well replace the bellows,the water hose and the shift cable and shift cable bellows. So I did all of that ,but the only thing that pees me off is the big o-ring
 

kramerpage

Chief Petty Officer
Joined
Jul 26, 2010
Messages
447
Try cleaning it back up with lacquer thinner. Coating both surfaces with bellows adhesive and then let dry for 30 minutes or longer. Then assemble. That's how I did mine. I had the same issue. I Probly waited an hour actually. You'll get it. Good luck.
 

thumpar

Admiral
Joined
Jun 21, 2007
Messages
6,138
Are you letting the glue setup before putting it in? It needs time before you put the ring in.
 
Joined
Jul 6, 2015
Messages
19
I use a piece of wood to bring the drive even with the bell housing. When you put the drive on you must keep the two surfaces parallel. If they are not you kink the gasket.There is a small hole above the driveshaft from the bellows inside the boat. If water comes through you have water in the bellows. I look behind my motor everyday for a week after I reinstall my drive. That's what the hole is there for.
 

rolmops

Vice Admiral
Joined
Feb 24, 2002
Messages
5,419
So now you guys got me toying with ideas about how to keep the drive shaft housing parallel with the gimbal housing. Would it help if I glue not only one o-ring where it belongs ,but also another one or maybe 2 interspaced on the drive shaft housing ,spray them with silicone spray and utilize them to guide the drive shaft housing into the gimbal housing? Or would it get ripped off by the shift shaft hole? What do you think?
 
Last edited:

thumpar

Admiral
Joined
Jun 21, 2007
Messages
6,138
You can't put more than one in there or the drive won't go on and if you force it it would just crush them causing more problems.
 

Bt Doctur

Supreme Mariner
Joined
Aug 29, 2004
Messages
19,291
when you install a drive correctly, the large ring stays inplace. clean the housing , apply bellows adhesive or 3M weatherstrip adhesive to the ring surface. install the ring until its seated. let dry a few minutes.
lubricate inpeller with soapy water, K-Y liquid, etc. no petroleum products.
space drive so the inputshaft is even with the gimbal.
turn prop CCW until locked in fwd gear, start inputshaft, rotate prop CCW about an inch to line the splines up and it will pop right on to within an 1/8 inch.
 

bspeth

Senior Chief Petty Officer
Joined
Aug 30, 2013
Messages
756
I built my outdrive stand the exact height for removal and installation.I don't have to lift it at all getting it on, just roll it into place and bolt it up.You are not putting it in straight most likely.
 

Fun Times

Moderator
Staff member
Joined
May 16, 2009
Messages
9,046
Once you get the technique of installing the Alpha drive like mentioned above down, The big O-ring will usually stay in the proper place for you. If you have to keep moving/sliding the drive in and out plus side to side a little bit before the drive is fully inserted onto the bell housing studs... then yes, you stand a really good chance of disturbing the big O-ring again with the entire U-joint/shaft and/or drive housing assembly. You want to try and install it one forward straight shot.

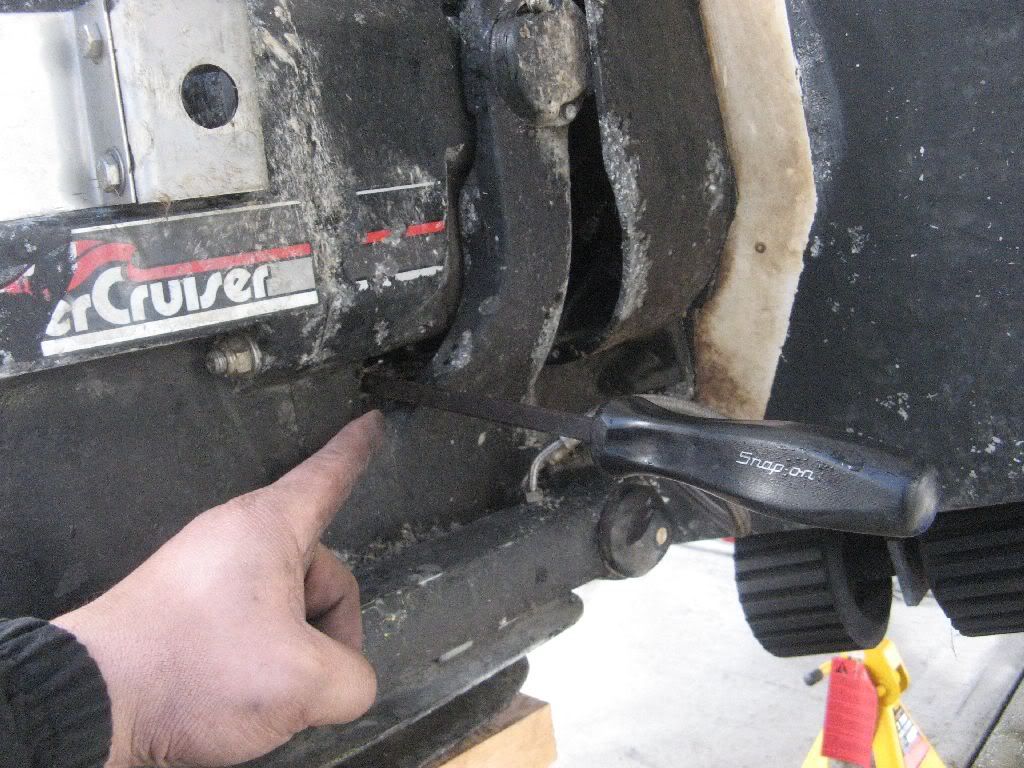
One trick is to get the bell housing leveled/supported so it don't move on you during installation. I use the trim pin where you see the pry bar in the photo below for the added support. Also try raising or lower the front trailer jack to help line up the rear of the boat/transom assembly so the U-joint shaft will line right up to the bell housing/gimbal bearing hole for a smoother install.

http://www.ebay.com/sch/i.html?_from...53A01&_sacat=0
bravo42.jpg
 

airshot

Vice Admiral
Joined
Jul 22, 2008
Messages
5,080
Not sure I understand this fully, but I am assuming we are talking about the large rubber ring mabey 3" in dia that goes inside the housing before installing the OD?
If I am correct in my thinking, I used to install the OD with this big ring attatched to the OD itself and was a problem. Now I install the big ring inside the housing and hold it there with some silicone valve lubricant ( made for o rings) and have never had another issue. Not sure if that is textbook or not but it works perfectly for me, however I still have to be carefull of that darned little oring for the water intake, while that can give me fits on occasion the same valve lubricant normally holds that also.
 

rolmops

Vice Admiral
Joined
Feb 24, 2002
Messages
5,419
All this O-ring trouble made me analyze the problem in a more rational and less angry way. I came to the conclusion that my main problem is the weight and in order to be more effective I took the lower unit off and with the much lighter outer housing and silicone spray it went very easy.
Sometimes it pays to step away and think about it.
Thank you all for your help.
As for that little o-ring for the water intake,there is that very goopy evinrude stuff that is made for sealing rubber spaghetti seals. It is goopy enough to make the o-ring stick long enough to get the thing together.
 
Last edited:

crazy charlie

Vice Admiral
Joined
May 22, 2003
Messages
5,499
You have some good advice so far.I have installed my drives no less than 50 times and have not run into that problem.I clean and sand the gimbal area that the drive seal will push against.Acetone wiping it then sanding it and then acetone again.Make sure to do both the flat surface and the lip that the seal presses against.Use contact cement or bellows adhesive.Coat the seal and the housing surfaces.Wait till tacky then press and hold the seal in firmly.Continually press the entire seal all around to make sure the entire seal is glued in.Once the glue has dried the seal is nearly permanently attached.I usually need 2 long nose priers and some strength to remove the seal.Once the seal is glued in ,I usually coat EVERYTHING with marine grease and i mean everything !! The grease will make everything slide together without the Ujoints catching the edge of the seal and the grease will fill any voids where there may be some water intrusion.As long as it is marine grease it will not affect the rubber or glue.Like i said,I have done this no less than 50 times and never any issues at all.Charlie
 
Top