Take off bottom cowl to replace internal wiring harness?

Neil26

Cadet
Joined
Mar 28, 2016
Messages
10
I am trying to replace my old internal wiring harness on my 1977 500 Thunderbolt 50hp. engine. The wires' insulation just fell off and crumbled. The motor only has about 15 hours on it and was kept all these years double covered in a garage and never used. Excess heat and sun had absolutely no effect on the deterioration of the insulation so it must have been faulty in the first place. Anyway. I bought a new harness from iboats (CDI). My question is, do I need to remove the bottom cowling(and engine block?) from the motor just to to get to all the wire connections I need to replace? If that's the case, I don't think I have the know-how to do all of that.
 

merc850

Commander
Joined
Jul 7, 2010
Messages
2,046
Some motors have had their wiring decay and some haven't, covering it up so that it has no ventilation can destroy wiring and rust internal parts; the wiring harness should be held in by a clamp that has 2 vertical bolts holding it. Remove the bolts and lift the clamp.
 

GA_Boater

Honorary Moderator Emeritus
Joined
May 24, 2011
Messages
49,038
Welcome aboard.

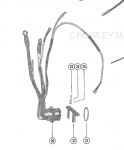
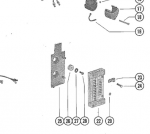
Item 22 is the clamp merc850 is referring to. The replacement should be straight forward. Orient the new plug through the cowl the same as the old one and swap over one wire at a time. Did you get instructions with the CDI harness?
harness.PNG
 

Neil26

Cadet
Joined
Mar 28, 2016
Messages
10
I did get CDI instructions on what color wires go where.I just was afraid that I had to take the Botton Cowl off to get to the wiring harness. Thanks so much you guys for the info. If I have any problems I will contact you again. :eek:) Neil
 

Neil26

Cadet
Joined
Mar 28, 2016
Messages
10
:eek:( Thanks for your help so far. Thankfully I have taken photos at every step.I am not in any way a mechanic and no pretty much nothing about wiring. I am trying to do this myself as I don't have the money to take it to an engine mechanic. I am on a fixed disabled veteran income. The engine is practically brand new except for all of the insulation falling off the wires. :eek:)

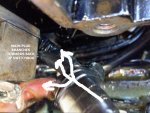
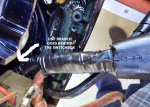
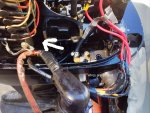
I removed the starter motor to give me more room to replace the harness plug which was easy. Then when I tried to follow the wires coming out of the plug of course I saw a big red one, a big black one and a few wires going to the area upper right hand outside corner of the engine. What I didn't expect though was a taped bundle of wires going from the plug to the back of the switchbox. It looks like I have to remove that too for access. If so, how do I do that without screwing everything else up? I can't find anything on the internet showing that process or witch bolts/screws to remove. Did I get myself into a big mess with this supposedly 'easy' project? :eek:)

Another question I have is how do you recommend cleaning up the engine inside without messing up the new paint? When I first ran it I found that a fuel line had deteriorated and gas and oil covered the whole inside cowl area. I would like to clean the oil off before taking it out again. :eek:)

Thank you guys for helping a novice out. IMG_1531.JPG IMG_1533.JPG IMG_1535.jpg
 

merc850

Commander
Joined
Jul 7, 2010
Messages
2,046
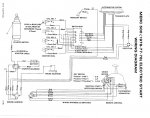
Here's a wiring diagram - the paint is very tough so you could use soap and water or an engine cleaner (Mercury PowerTune) and rinse it with a hose - there are drain holes in the cowling. The only wires I see going behind the switchbox are RED BROWN and ORANGE
1977Merc50.jpg
 

Neil26

Cadet
Joined
Mar 28, 2016
Messages
10
What do I need to remove to get to the back of the switchbox to replace the wire going there?
 

Neil26

Cadet
Joined
Mar 28, 2016
Messages
10
Awesome!!! Thanks for this information. I will bookmark the parts schematic file. :eek:) Neil
 

Neil26

Cadet
Joined
Mar 28, 2016
Messages
10
Boy. . . This is getting frustrating. . . I removed three bolts from the switch box assembly but the lower left hand side bolt can't come out due to hitting the lower cowl assembly.Any suggestions? Neil
 

Neil26

Cadet
Joined
Mar 28, 2016
Messages
10
Still can't get to back of switch box without being able to remove lower left hand bolt on the switch box. Help !!!! :eek:)
 

GA_Boater

Honorary Moderator Emeritus
Joined
May 24, 2011
Messages
49,038
What tool are you using, Neil? Socket and ratchet? Has the bolt loosened?
 

Neil26

Cadet
Joined
Mar 28, 2016
Messages
10
After all this I think I can replace the harness WITHOUT removing the switch box. LOL After tracing the wires coming from the harness, it looks like the two wires go BEHIND the switch box and not into it. That's a blessing since I can't remove the switch box anyway. I also see lots more wires that have no insulation on them that have to be replaced. I will let you know how I'm doing. Thanks for sticking with me. :eek:) Neil
 

GA_Boater

Honorary Moderator Emeritus
Joined
May 24, 2011
Messages
49,038
All the connections are on the outer side of the box. The routing is behind, that's all.
 

Neil26

Cadet
Joined
Mar 28, 2016
Messages
10
Thanks go to you guys for all your help! I took my time and crossed my fingers and turned the start key. Started up and ran perfectly! By doing what you said I also found a leaking fuel line hidden by the starter. It was spraying fuel over the entire inside of the engine compartment. I also found several hidden wires that were completely bare! I am so fortunate that the engine didn't go up in flames in the middle of the lake. Now it is all cleaned up with brand new wires and fuel lines! The engine now looks like it just came off the assembly line. Thanks again for helping guys like me! :eek:)

Neil
 
Top