Wills.WindowsAndWheels
Seaman Apprentice
- Joined
- Aug 14, 2011
- Messages
- 30
So to those of you who have read my other posts, i had a nice over heating problem after having a mechanic friend of mine replace the impeller and water pump on our VIP Vindicator.
After having it replaced and taking it out...it over heated like crazy...we shut it off, no major problems that we have found, but our buddy put the 2 impeller hoses in backwards...THUS no water was being pulled in to cool the motor.
Lesson 1:
JUST because someone says they've worked on boats, doesn't mean they know what they're doing. No love lost for the guy...but sometimes you lose money trying to save it!
SO, we went in ourselves, pulled the impeller housing and took it to the marine shop.
Lesson 2:
Finding a good marine shop with people NOT just looking to do all the work for you, but will sit down with you, explain things in DETAIL, even pull up diagrams to show you what to look for, is priceless. To anyone in Az reading this, Phil from Bergeron Marine was a lifesaver and can't thank him enough for his willing assistance.
We went there, and Phil told us right away that the housing was obviously bad because it had a slight 'bulge' on the flat side. He the offered to put together the new housing and impeller (put impeller in and put on bolts) and to also mark what one the hardline hose goes to and what one the soft hose goes to.
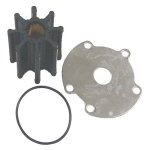
He came back with it all assembled as well as the old 'impeller'...for those of you who are newbies like me, this is what the impeller looks like:

When we got our OLD one back, ALL the fins had burned off..it was just the center core left.
He went on to explain we now had to go through all the cooling lines and the oil cooler to find all the impeller pieces that were in there.
Next he pulled up a diagram of the cooling system and printed it off and marked all the lines that needed to be flushed out.
SO, we went to the boat and got to work.
Lesson 3:
PATIENCE is a virtue and necessity when doing anything.
We first found the thermostat (easy to find, dead center right in front of the motor up top) and disconnected the hoses from it. Then traced the hose
to the oil cooler. THIS is where the fun began. The hoses got hot enough to where the melted just a little to the oil cooler fittings. Here is a photo, again for the newbies like myself

Kinda is shaped like a shock for a car. The hose fits over the ends anddddddd they are metal....andddddd when it got hot it melted the hose to the metal...and when it cooled...well...lets just say super glue aint got s*** on this!
The hose on the top of the oil cooler alone took about 2 hours to remove...just slowly working around it trying NOT to damage the oil cooler itself...in short, it paid off and it CAME off.
The hose on the BOTTOM of the oil cooler was all done by feel. I couldn't even see the hose when trying to remove it..i could just see enough of it to loosen the clamp...an hour and a half later it got it...I think God just was lookin at us and thinking 'You fools aren't going to quit are you? Ok here let me help you out' lol.
Next we traced the 2 hoses that run from the impeller, the hard hose that connects to the outdrive was a pain, it was almost impossible to see, i had to lay ontop of the motor while my pops was on the side of it putting in the screw driver in to ease the hose off...i was helping to guide it in because he couldn't see it from his angle..this one was a bit faster, about 20 minutes and it was remove.
We took it out completely and flushed it out, lots of smaller pieces and grit came out..same thing with the soft hoses, small pieces came out.
But the BIG stuff was in the bottom of the oil cooler.
Lesson 4:
Sometimes you have to make a tool.
The impeller pieces were REALLY wedged up into the oil cooler...and since the cooler has a little 'grate' sort of shaped like a honey comb that serves as a filter, you couldn't just put a screw driver through it to push out the pieces. SO, it was time to pull out a wire hanger! Used it to feed through the top of the oil cooler and push the pieces out while i pulledon them from the bottom. All the big pieces from the old impeller were wedged up in there. We then flushed it otu with water also.
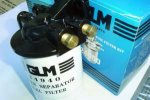
Finally we put the impeller housing back in ....for the record, moving the alternator out of the way, as well as the fuel filter (fuel filter or fuel cooler? cant remember off hand..i think it was fuel filter water separator) makes it MUCH easier to get up under the motor and work with the impeller. Dont actually disconnect the lines from the fuel filter, just take the 2 nut off that hold it into place and move it out of the way. Also loosening the 'idler' pulley made it possible to take the belt on and off while we were working on installing the sea water pump (impeller pulley/housing). I believe this is it:

We took the boat out on the lake tonight...first started it up and let it set for a minute...it was good...then backed it out into the water and just took it slow about a 1/4 mile or so...pulled up the engine cover...saw one hose that needed to be tightened but was easy to get to (hose running to engine on right hand side)...tightened it up and then looked, and looked and looked...and NO water was leaking. Constantly checked the temp gauge and it stayed dead center.

Was HOPING for it to be a little lower, but this is where the gauge set at before when we first bought it a year ago and it had just been serviced...so it seems for this boat thats about right.
Ran the boat on idle for a good 15 minutes and had no issues, then ran it back n fourth between the piers with no problems...didn't take it OUT cause it got dark and wanted to just be on the safe side 'just incase' BUT...it seems we were successful.
Lesson 5:
PHOTOS HELP! I appreciate the link to the proper manual for this engine as well as the other very useful tips from the users here. Manuals are kinda hard to sort through sometimes but if you do enough work you'll figure it out. Thats why i included some photos on here to give a little bit of an idea of what to look for if anyone else here is in the situation i was in. Clueless lol
Thanks all
After having it replaced and taking it out...it over heated like crazy...we shut it off, no major problems that we have found, but our buddy put the 2 impeller hoses in backwards...THUS no water was being pulled in to cool the motor.
Lesson 1:
JUST because someone says they've worked on boats, doesn't mean they know what they're doing. No love lost for the guy...but sometimes you lose money trying to save it!
SO, we went in ourselves, pulled the impeller housing and took it to the marine shop.
Lesson 2:
Finding a good marine shop with people NOT just looking to do all the work for you, but will sit down with you, explain things in DETAIL, even pull up diagrams to show you what to look for, is priceless. To anyone in Az reading this, Phil from Bergeron Marine was a lifesaver and can't thank him enough for his willing assistance.
We went there, and Phil told us right away that the housing was obviously bad because it had a slight 'bulge' on the flat side. He the offered to put together the new housing and impeller (put impeller in and put on bolts) and to also mark what one the hardline hose goes to and what one the soft hose goes to.
He came back with it all assembled as well as the old 'impeller'...for those of you who are newbies like me, this is what the impeller looks like:

When we got our OLD one back, ALL the fins had burned off..it was just the center core left.
He went on to explain we now had to go through all the cooling lines and the oil cooler to find all the impeller pieces that were in there.
Next he pulled up a diagram of the cooling system and printed it off and marked all the lines that needed to be flushed out.
SO, we went to the boat and got to work.
Lesson 3:
PATIENCE is a virtue and necessity when doing anything.
We first found the thermostat (easy to find, dead center right in front of the motor up top) and disconnected the hoses from it. Then traced the hose
to the oil cooler. THIS is where the fun began. The hoses got hot enough to where the melted just a little to the oil cooler fittings. Here is a photo, again for the newbies like myself

Kinda is shaped like a shock for a car. The hose fits over the ends anddddddd they are metal....andddddd when it got hot it melted the hose to the metal...and when it cooled...well...lets just say super glue aint got s*** on this!
The hose on the top of the oil cooler alone took about 2 hours to remove...just slowly working around it trying NOT to damage the oil cooler itself...in short, it paid off and it CAME off.
The hose on the BOTTOM of the oil cooler was all done by feel. I couldn't even see the hose when trying to remove it..i could just see enough of it to loosen the clamp...an hour and a half later it got it...I think God just was lookin at us and thinking 'You fools aren't going to quit are you? Ok here let me help you out' lol.
Next we traced the 2 hoses that run from the impeller, the hard hose that connects to the outdrive was a pain, it was almost impossible to see, i had to lay ontop of the motor while my pops was on the side of it putting in the screw driver in to ease the hose off...i was helping to guide it in because he couldn't see it from his angle..this one was a bit faster, about 20 minutes and it was remove.
We took it out completely and flushed it out, lots of smaller pieces and grit came out..same thing with the soft hoses, small pieces came out.
But the BIG stuff was in the bottom of the oil cooler.
Lesson 4:
Sometimes you have to make a tool.
The impeller pieces were REALLY wedged up into the oil cooler...and since the cooler has a little 'grate' sort of shaped like a honey comb that serves as a filter, you couldn't just put a screw driver through it to push out the pieces. SO, it was time to pull out a wire hanger! Used it to feed through the top of the oil cooler and push the pieces out while i pulledon them from the bottom. All the big pieces from the old impeller were wedged up in there. We then flushed it otu with water also.
Finally we put the impeller housing back in ....for the record, moving the alternator out of the way, as well as the fuel filter (fuel filter or fuel cooler? cant remember off hand..i think it was fuel filter water separator) makes it MUCH easier to get up under the motor and work with the impeller. Dont actually disconnect the lines from the fuel filter, just take the 2 nut off that hold it into place and move it out of the way. Also loosening the 'idler' pulley made it possible to take the belt on and off while we were working on installing the sea water pump (impeller pulley/housing). I believe this is it:

We took the boat out on the lake tonight...first started it up and let it set for a minute...it was good...then backed it out into the water and just took it slow about a 1/4 mile or so...pulled up the engine cover...saw one hose that needed to be tightened but was easy to get to (hose running to engine on right hand side)...tightened it up and then looked, and looked and looked...and NO water was leaking. Constantly checked the temp gauge and it stayed dead center.

Was HOPING for it to be a little lower, but this is where the gauge set at before when we first bought it a year ago and it had just been serviced...so it seems for this boat thats about right.
Ran the boat on idle for a good 15 minutes and had no issues, then ran it back n fourth between the piers with no problems...didn't take it OUT cause it got dark and wanted to just be on the safe side 'just incase' BUT...it seems we were successful.
Lesson 5:
PHOTOS HELP! I appreciate the link to the proper manual for this engine as well as the other very useful tips from the users here. Manuals are kinda hard to sort through sometimes but if you do enough work you'll figure it out. Thats why i included some photos on here to give a little bit of an idea of what to look for if anyone else here is in the situation i was in. Clueless lol
Thanks all


