Starter for V8-300-C-A

Donald0039

Chief Petty Officer
Joined
Jun 11, 2022
Messages
401
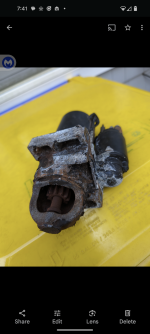
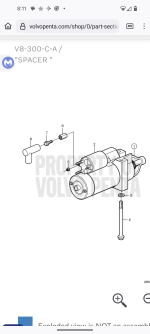
I have a new VP #3885317 starter but cannot get the bolts off the old starter. With a 6 pt socket and ratchet wrench handle. At 70 maybe just not strong enough.

I will spray PB Blaster on the bolt head but still concerned about snapping a bolt if it's corroded at the threads. The bolts is 4" or so long.

Considering buying a compact cordless impact as I think a better chance of getting the bolts out without snapping than a breaker bar.
 

Fun Times

Moderator
Staff member
Joined
May 16, 2009
Messages
8,964
You might be fighting some paint from the manufacturer as well as the bolt torque too.

Is the area clean down there?
How is the access to the starter bolts and wiring on your boat model?
Are you able to take a few photos to help see what it looks like down there? as sometimes a visual may help some to get started on work.
 

stresspoint

Lieutenant Junior Grade
Joined
Sep 19, 2022
Messages
1,034
if the correct bolts were used then snapping off is a non issue, some vice grips and penetrant on the remaining studs will break them free.
however if some hardware store bolts were used and a thread snaps in the hole , it is going to be an engine out job to get the remands out.

i would avoid using an impact on those bolts unless the motor was on a stand for easy direct access ,( round a head and you will see my point).

patience is the key here : you can get some penetrant in from the top to the outer bolt and sometimes the inner if it was drilled through from the factory, ( exhaust may need to be removed )let some sit and have another crack at it ,once that outer bolt is out you can maneuver the starter to free up the other bolt.

as posted you are most likely dealing with rust and paint so the bolts can be tough to break free m use common sense and they will come loose..

ha ha , a quick edit :: make sure you are loosening not tightening , working upside down can get confusing "" don't ask how i know this :).
 
Last edited:

ESGWheel

Petty Officer 1st Class
Joined
Aug 29, 2015
Messages
346
“Shocking” the area where it threads into the block as well as the starter housing around the bolt head by using a ball peen hammer and whacking it can help loosen it. If you have a pneumatic hammer with an anvil end, use that.
And agree an impact wrench is much better for breaking loose bolts like this vs. an increasing amount of constant torque which can snap off bolt heads. Use a 6 point impact socket more for its weight then strength. Impact wrenches work better with a heaver socket.
Another avenue is heat. It’s probably a little tricky getting a torch down there for several reasons. So, investigate this as well: an induction heater. Here is a link to one to give you an idea. And a video of someone using it link.
Sucks getting old, doesn’t it? They say youth is wasted on the young and boy do I see that every day! :)
 

stresspoint

Lieutenant Junior Grade
Joined
Sep 19, 2022
Messages
1,034
“Shocking” the area where it threads into the block as well as the starter housing around the bolt head by using a ball peen hammer and whacking it can help loosen it. If you have a pneumatic hammer with an anvil end, use that.
And agree an impact wrench is much better for breaking loose bolts like this vs. an increasing amount of constant torque which can snap off bolt heads. Use a 6 point impact socket more for its weight then strength. Impact wrenches work better with a heaver socket.
Another avenue is heat. It’s probably a little tricky getting a torch down there for several reasons. So, investigate this as well: an induction heater. Here is a link to one to give you an idea. And a video of someone using it link.
Sucks getting old, doesn’t it? They say youth is wasted on the young and boy do I see that every day! :)
how true ! a lot of the young these days are oxygen thieves , they wont lift a finger to help us older guys out. they would rater stand and watch us struggle with a task than chip in with some help.
 

Donald0039

Chief Petty Officer
Joined
Jun 11, 2022
Messages
401
You might be fighting some paint from the manufacturer as well as the bolt torque too.

Is the area clean down there?
How is the access to the starter bolts and wiring on your boat model?
Are you able to take a few photos to help see what it looks like down there? as sometimes a visual may help some to get started on work.
The access is pretty good. I can see the outside bolt but not the inside one. The paint in that area is flaking off and the bolt head looks corroded.

But the 6pt socket fit tight but I was not strong enough to loosen the bolt.

I can only get to the boat once or twice a week. It's not in my drive which would make it easy.
 
Last edited:

Donald0039

Chief Petty Officer
Joined
Jun 11, 2022
Messages
401
if the correct bolts were used then snapping off is a non issue, some vice grips and penetrant on the remaining studs will break them free.
however if some hardware store bolts were used and a thread snaps in the hole , it is going to be an engine out job to get the remands out.

i would avoid using an impact on those bolts unless the motor was on a stand for easy direct access ,( round a head and you will see my point).

patience is the key here : you can get some penetrant in from the top to the outer bolt and sometimes the inner if it was drilled through from the factory, ( exhaust may need to be removed )let some sit and have another crack at it ,once that outer bolt is out you can maneuver the starter to free up the other bolt.

as posted you are most likely dealing with rust and paint so the bolts can be tough to break free m use common sense and they will come loose..

ha ha , a quick edit :: make sure you are loosening not tightening , working upside down can get confusing "" don't ask how i know this :).
I set the ratchet direction with the ratchet in my hand.
 

Donald0039

Chief Petty Officer
Joined
Jun 11, 2022
Messages
401
My old started looks like it has seen better days. I ended up buying a Milwaukee M18 mid-torque impact wrench to get the starter bolts off. It took the impact wrench about 10 seconds per bolt. But neither bolt snapped..
 

Attachments

  • Screenshot_20240531-194113.png
    Screenshot_20240531-194113.png
    1.5 MB · Views: 8

Lou C

Supreme Mariner
Joined
Nov 10, 2002
Messages
12,320
Got a leaky exhaust manifold above it? Somehow water is getting to it…might want to correct that or else the same thing could happen to the new one….
 

ESGWheel

Petty Officer 1st Class
Joined
Aug 29, 2015
Messages
346
I ended up buying a Milwaukee M18 mid-torque impact wrench to get the starter bolts off.
Excellent news! I expect to be tackling this job as a PM next year. I will have to measure the length of that tool compared to access in the bilge so good to know that tool did the job and now have an excuse to buy one!
 

Lou C

Supreme Mariner
Joined
Nov 10, 2002
Messages
12,320
I have one, it's an excellent tool.
On my boat I can get in there with a long (18") 3/8"s drive ratchet, with that I have enough leverage to get the bolts loose. I just remove the rear seat on that side, the wood dividers and slide the battery back. Lay an old seat cushion on the deck and have at it.
If not buying OEM starters I like ARCO starters and alternators.
 

Donald0039

Chief Petty Officer
Joined
Jun 11, 2022
Messages
401
So I found something odd with old and new starter. The battery cable lug is not on a stud on the solenoid held by a nut.

Rather a metal spacer is screwed to the stud and the battery cable lug is held tight to the spacer with a bolt. The spacer and the bolt are grabbed by a magnet so steel. The spacer looks a little rusty on the outside the inside threads looked yellow tinge.

So 100% of the starting current goes through the spacer which is steel and not a great conductor of electricity.

This spacer appears in the Volvo Penta parts list. It's possible the VP spacer that was screwed to the starter when it shipped from the factory could have been different. Maybe copper or copper plated? #6 in diagram.
 

Attachments

  • Screenshot_20240602-201151.png
    Screenshot_20240602-201151.png
    228.4 KB · Views: 10

Lou C

Supreme Mariner
Joined
Nov 10, 2002
Messages
12,320
I could be wrong but it almost looks like you can use the spacer or use the more typical nut (pn#5) that goes on the stud. Maybe some of the newer engines have a different wiring harness that requires extra clearance?
 

Donald0039

Chief Petty Officer
Joined
Jun 11, 2022
Messages
401
I could be wrong but it almost looks like you can use the spacer or use the more typical nut (pn#5) that goes on the stud. Maybe some of the newer engines have a different wiring harness that requires extra clearance?
I think #5 is a small nut to hold a small gauge wire ring connector from the key switch into a smaller stud.

I am still trying to figure things out with the old starter. The old starter solenoid had the stud for the battery cable broken off with less than 1/4" of thread sticking out of the solenoid housing. I think someone tried to remove the spacer and it snapped the stud. So they went to a hardware store and got a threaded steel spacer. It just fit the 1/4" of the thread that was left.

I will bet the Volvo Penta ORM spacer is copper and not steel. I have a steel spacer because the previous owner bought it at a hardware store.
 
Last edited:

Lou C

Supreme Mariner
Joined
Nov 10, 2002
Messages
12,320
Yep you’re right I didn’t look closely enough.
 

Donald0039

Chief Petty Officer
Joined
Jun 11, 2022
Messages
401
So I got a VP OEM part #5 online and it sticks to a magnet so it steel. So 100% of the starter current is going through a steel spacer. Does not seem proper.
 

Lou C

Supreme Mariner
Joined
Nov 10, 2002
Messages
12,320
Could you just use the normal nut on the starter solenoid stud? Not seeing why there is a need for a spacer unless something is mounted on the engine that interferes with the normal mounting.
 

Donald0039

Chief Petty Officer
Joined
Jun 11, 2022
Messages
401
Could you just use the normal nut on the starter solenoid stud? Not seeing why there is a need for a spacer unless something is mounted on the engine that interferes with the normal mounting.
I am not sure. But it's in the VP parts diagram. VP does not cut corners from what I can see.
 
Top