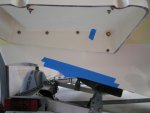
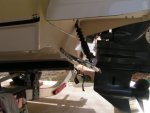
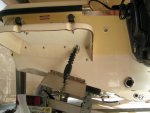
There are a lot of posts about Smart Tabs installations on this forum, but after some extensive searching I couldn?t find any that addressed the exact situation I had on my boat. So I thought I?d post about the ST1290-60 Smart Tab install on my boat since this style platform is used on other brands of dual console boats, too. Because of the swim platform I only had about 8.5 inches of clearance from the bottom of the hull to the underside of the swim platform. Normally, the smart tabs want to see about 10 inches from the bottom of the hull to the top of the transom bracket (I don?t know the exact number). I called John and Nauticus and he was very helpful. They recommended moving the bracket mounted on the trim tab out closer to the aft edge by using the hole farthest aft on the trim tab for the hole on the bracket nearest the transom then drilling a new in the trim tab for the bracket hole farthest from the transom. This would increase the angle of the air spring and decrease the overall height required to mount the tabs. I was able to use the ?leftover? hole to mount a zinc, which I needed anyway since I run in salt water. The installation of the trim tabs themselves went well and I could see that in a normal situation it would take only a couple of hours for a cautious DIY installer. The only other deviation from the normal install instructions was the use of 3M 4000uv (4200 equivalent with UV protection to keep from yellowing) in the drilled holes in addition to the sealant tape supplied with the trim tab kit.
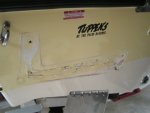
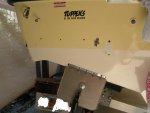
The swim platform complicated things for my install. The goal was to have the tabs as far outboard on each side as possible, while still being able to fit under the swim platform. Prior to taking off the swim platform to make a through hole for the upper bracket, I took measurements and ?dry fitted? the tab assemblies to ensure I wasn?t going to have to gouge out the bottom of the swim platform deck. I then installed the trim tab hinge/trim tab on the transom and located and marked on the swim platform where the upper bracket needed to be located. Next I had to remove the swim platform to make a through hole for the upper bracket. As it turned out, removing the platform was the hardest part. The platform had never been removed before and I wasn?t sure what to expect. On this platform, two of the attaching fasteners are through bolts and the others are screws that go into the transom. One of the through bolts I was able to get to from the inside of the bilge well, the other I had to use a hole saw to create an access port in the aft battery locker. I used a 1.5 inch hole saw and created an oval so I could get my fingers in to attach the nut during the re-installation of the platform. After the install was completed I sacrificed a plastic lid from a white bucket and made a cover for the access hole, then bonded that in place with 3m 4000uv. Actually, it came out looking pretty clean and unnoticeable. The hard part was removing the platform. The factory used adhesive in addition to the fasteners so even after removing them the platform was still firmly attached. I used a de-burred flexible putty knife to break the bonds around the edges, and plastic putty knifes to create a gap as I went around the platform. I then used music wire?a Fender Telecaster sacrificed the high E and B strings for this?to break the bond beyond what the putty knife could reach. I still had a real hard spot that I couldn?t get through, and ended up taking a small patch of gel coat off the transom when the platform finally broke free. It was an easy fix with Marine-tex and a thin coat of Suncure Ultra Clear resin (a UV cured polyester resin used mainly for surfboards). The spot is totally hidden by the swim platform, but still kind of a bummer. In hind sight, after breaking all of the edges free, I think I would have poured some mineral spirits in the gap to soften the adhesive as while cleaning the transom/swim platform I found that mineral spirits removed the old adhesive easily. After creating a through hole for the upper trim tab bracket, the re-installation of the platform was easy. I used the 4000uv for the caulking and adhesive, but used a little less than the factory did.
After getting everything back together I let it sit for a few days to give the adhesive a chance to cure. I took her out for a trial run yesterday and found that even with the 60 pound air springs in the lowest pressure setting (moved all the way towards the transom on the trim tab bracket) I am getting too much stern lift. I attribute this to the increased angle of the air spring in my installation (you can do the trigonometry/second class lever calculations to get an idea of the increase in force required to move the tabs with the air spring at a more acute angle to the trim tabs). Basically, the boat lost a few mph at WOT, in medium hard turns the prop ventilates (it shouldn?t), and in general there is a sense that the boat is dragging at speed. On the plus side, the already good hole shot (it only took about 2-3 seconds before) was like no hole shot at all?just instantly on plane. It reminded me of my brother?s old Master Craft ski boat the way it took off. Anyway, I'll reserve any further comments about the smart tab performance on the boat until they get tuned for the boat. I emailed John about getting a set of lower pressure air springs and after I get a chance to use/adjust them I?ll follow up in this thread.
Ok, I know this was long?but maybe it will help someone else out who has a clearance issue with a bolt on swim platform and wants to use trim tabs.
The attached pics are of the KW 186dc install. I have more if anyone needs.