Re: Question on Setting Points 1975 9.9Hp Evinrude
In response to your question & my plea on the above mentioned thread (of which I got little response). This is what I came up with.
SETTING POINTS:* Setting the timing just at .020" point gap only gets you in the ball park, enough for the engine to start and run, You may luck out & get it to perform quite well by just setting the points, but it may have to be perfectly synchronized for peak rpm and performance. This will be discussed in the "Timing" section below.
It appears that on just setting the points, it makes little difference the placement/rotation of the throttle/timing cam.
The word TOP on the timing cam is only for the mechanic to install it right side up. There is a SET mark on the timing cam that is the location you should have the points rub bar at when initially setting the points.
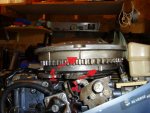
The marks on the flywheel are 180 degrees apart from each other, one for cylinder #1 (top), and #2(bottom). Since these motors are 2 cycle, there's two sparks per revolution of flywheel, one at each of the flywheel marks lining up with the one mark on the armature plate. There is only one timing mark on the armature plate, and 2 (or 4) marks on flywheel. If there's 4, there will be 2 'E' and 2 'R' for electric or rope start. Now to confuse the issue I have a 1974 that apparently has a unusual flywheel that has the 3 magnet inserts for the electric charging, (as compared to the 2 magnets for the rope start version). It does not have the electric start ring gear (but is lathe turned for it), but the emergency rope start notches are for a rope start flywheel. In timing this motor, the points open on the "E" settings.
You may find new points have a coating of lacquer and so you may need to clean the contacts with lacquer thinner before you can get consistent readings and spark.
SETTING TIMING USING A CONTINUITY TESTER :* This is called Static Timing. When you want to use a continuity tester (multi-meter), proceed as follows:
When fine tuning the points adjustment, advance the twist grip throttle to FAST as far as it will go.
Using this method, you are rotating the flywheel & essentially adjusting the points (using the tester) to where the timing is so that each spark plug fires at the proper time when the piston is coming up compressing the fuel to fire at the precise time for best performance.
My method in using the tester is to drill a 1/4" hole in the timing plate rearward of the center & in a location where with this hole thru, you can feed a test wire out & connect to the multi-meter while having the flywheel installed. There is another stationary plate below, so you need to drill thru both. This location so that you can connect a short wire (12") to the points screw, then feed this wire down thru & connect it your tester so you can rotate the flywheel all & watch the tester needle at the same time. This with the throttle wide open as mentioned above.
In operation, it may be best to remove the spark plugs to make it easier to rotate the flywheel precisely.
Remove all the wires from the points so you are not getting any feedback from the condenser or driver coil. Set your multi-tester to the Resistance or Ohm setting. You can check to see if it is functioning properly by touching both probe contacts as the meter needle then should move to the right. Attach the red meter testing wire to your new jumper wire coming from the points. Attach the black wire to any ground location on the motor. If the points are closed, the meter needle will read high against the peg.
Install the flywheel aligned on the crankshaft key, but there is really no need to secure it with the bolt as you will be needing to remove it possibly (many times before you are finished). Rotate the flywheel clockwise (best so you do not disturb the water pump impeller vanes if moving them backwards).
When you rotate the flywheel, watch the meter & at the instant that the points open, the meter needle will drop back to zero. This is what you are looking for. The timing mark on the flywheel should be aligned with the timing plate protrusion. This protrusion has 2 points about 3/8" apart. If your flywheel mark is between them, you should be good. If not, then rotate the flywheel until the marks are lined up. Carefully remove the flywheel without disturbing the crankshaft rotation. Slightly loosen the point securing screw & with a larger bladed screwdriver insert it into the point adjustment slot & slightly open the points to where the meter needle moves to zero. Replace the flywheel & check the marks again with the meter to verify. If you are not right, do it again.
The RH set of points (looking forward) are for the top (#1) spark plug. To verify this, with the #1 points just opening, the #1 piston should be at Top Dead Center. This can be verified by pulling #1 (TOP) spark plug & by using a flashlight, rotate the crankshaft clockwise until you can see the piston come up, go slowly & backtrack just after it starts down.
Fine tuning, use the points adjustment notch, using LARGE screwdriver for leverage to adjust points.
Now one bit of advise, in making the final point setting, there is no real need to have the points tightening screw very tight, but just good & snug. In making the final adjustment, if you have this securing screw snug, you do not really have to retighten it, but can move the point adjustment very slightly, slipping it for final infinite adjustment.
When you get one set of points set at this timing mark, move over to the other set & repeat the process. You may now want to purchase a small 1/4" plastic plug & insert it in the hole you drilled in the timing plate.
When satisfied, then re-install all the wires to the ignition coil, condenser & out to the individual coils. Replace the flywheel & tighten the nut.
With new points, set the flywheel mark to fire in the middle of the large fixed magneto plate mark, which is a tad on the retarded side, because as the point faces break in, that will advance the timing. You can re-check the timing and set it again once the engine has about 10 hours running time, as the points will be broken in by then and the timing will have stabilized.