Proper Castle Nut Installation

aleone

Cadet
Joined
Jun 15, 2019
Messages
7
Hi, First, apologies for the lack of proper terminology.
I just replaced the hubs on my sailboat trailer (of which I just purchased earlier this summer). The one hub was completely destroyed, I'm just glad I was only towing it a few times from the dry storage to the ramp. I measured the spindle up and determined that it's a 3500# hub. I ordered two new hubs and installed them, all went fine.
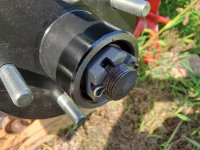
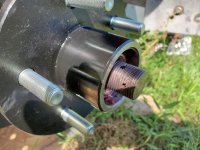
The castle nuts that were on the hubs originally did not have a washer with them. I ordered new nuts which came with a washer. There are two holes for the cotter pins to go through (one is maybe 1/4" in further out the spindle than the other (didn't measure, just rough guess).
It seems that if I use the washer, it puts the nut too far out for the inner hole but not far enough for the outer hole for the cotter pin.
The question is this: Should I not use the washer and just use the inner hole? This seems a bit weird because the cotter pin is set back within the hub cylinder slightly. Or, the other option I guess would be to add several washers and use the outer hole. One of the pictures shows the nut with the washer and using the outer hole but the pin doesn't line up nicely with the nut.
I'm trying to do this the correct way and not the hacky way. Thanks in advance for any advise.
 

Attachments

  • 20220802_090802.jpg
    20220802_090802.jpg
    2.9 MB · Views: 27
  • 20220802_090553.jpg
    20220802_090553.jpg
    3 MB · Views: 27

Grub54891

Admiral
Joined
Jun 17, 2012
Messages
6,077
Interesting. never saw offset holes myself. Are you sure the bearing races are set all the way in? Looks like someone may have added an extra hole at some point to address the same issue.
 

Horigan

Senior Chief Petty Officer
Joined
Jun 12, 2016
Messages
673
If the bearings are correct, I would install another washer or two.
 

Drcoffee

Petty Officer 1st Class
Joined
Aug 26, 2021
Messages
220
adding washers would work. You can also bend the cotter pin down into the castle nut, which is what I would do. But certainly use the washer so the hub doesnt spin the nut off.
 

aleone

Cadet
Joined
Jun 15, 2019
Messages
7
Thanks all.
I'm pretty sure the bearing races are set but now that you mention it, I'm going to verify that the grease seal is not hitting the back of the spindle just to be sure.
I'll pack it out with one or two more washers.
 

Lou C

Supreme Mariner
Joined
Nov 10, 2002
Messages
12,674
I'm thinking the spindle might be drilled like that because some trailer companies used a long vs a short hub.
I do think that for sure there should be a washer between the outer bearing race and the castle nut, to spread the preload out evenly. I've worked on a few trailers and even some old school rear drive cars with re-packable bearings and there was always a washer between the outer bearing and spindle nut.
 

Silvertip

Supreme Mariner
Joined
Sep 22, 2003
Messages
28,771
The cotter pin should be inserted 90 degrees from shown. In other words, remove it, and install it so you are looking at the edge of the pin, not the eye. This places more of the pin in the groove in the nut. Some nuts are thicker than others so that may have been an issue as well.
 

aleone

Cadet
Joined
Jun 15, 2019
Messages
7
I'm thinking the spindle might be drilled like that because some trailer companies used a long vs a short hub.
I do think that for sure there should be a washer between the outer bearing race and the castle nut, to spread the preload out evenly. I've worked on a few trailers and even some old school rear drive cars with re-packable bearings and there was always a washer between the outer bearing and spindle nut.
Yeah, a washer makes sense to me. Thanks
 

aleone

Cadet
Joined
Jun 15, 2019
Messages
7
The cotter pin should be inserted 90 degrees from shown. In other words, remove it, and install it so you are looking at the edge of the pin, not the eye. This places more of the pin in the groove in the nut. Some nuts are thicker than others so that may have been an issue as well.
I see what you are saying about rotating it. The eye of the pin will fit into the groove. I wasn't able to find a thicker nut but I think the washers will bump it out enough. Thanks for the input.
 

airshot

Vice Admiral
Joined
Jul 22, 2008
Messages
5,084
I have saw where cotter pins have sheared off from not being deep into that castle nut....by all means add a washer or spacer to get the cotter pin into the grooves on that nut
 

harringtondav

Commander
Joined
May 26, 2018
Messages
2,439
I've not seen this set up. All trailer and rear wheel bearings I've worked on have a standard nut with a castle locking cap that goes over the nut with multiple cotter pin slots. The locking cap is like a 12 point socket. This allows fine location of the cotter pin.
Correct bearing setting requires a light rolling preload to set the cones, followed by loosening the nut to just contact. The locking cap allows cotter pin location that matches this setting.
The set up shown allows for only six positions. ....likely a little too tight or too loose. ....not good.
 

Lou C

Supreme Mariner
Joined
Nov 10, 2002
Messages
12,674
They also make spindle nuts with more slots to give more accurate pre load adjustment.
 

jhande

Chief Petty Officer
Joined
Jun 26, 2010
Messages
442
In the first photo I can see the other spindle hole peeking through the next higher castle nut groove. Verify that everything is seated properly and correct torque is applied to the nut (I've just used feel and rotation for many, many years).
 

Silvertip

Supreme Mariner
Joined
Sep 22, 2003
Messages
28,771
Actually, the term "pre-load" is used frequently on the forum and a tapered roller bearing for a free rolling assembly like a trailer wheel is not pre-loaded. In case of bearing replacement, pre-load can be used to ensure the bearing races are seated, but one major bearing producer indicates the nut is tightened by hand while spinning the wheel until slight resistance is felt. That slight resistance is technically pre-load, but that's not where the nut is positioned. The nut shoud be positioned so there is no drag to rotation, as well no axial play or end play being felt in the bearing with wheel installed. Then loosen the nut 1/6 to 1/4 turn so there is very slight in-out clearance as well as very slight axial clearance. In other words, the bearing wants some clearance (.004 - .006"). The point of no drag and no play can be considered like "zero lash" when adjusting rockers in an engine (no play - no pre-load). Bearings adjused with pre-load will wear prematurely due to lack of lubrication, expansion and heat.
 

airshot

Vice Admiral
Joined
Jul 22, 2008
Messages
5,084
Actually, the term "pre-load" is used frequently on the forum and a tapered roller bearing for a free rolling assembly like a trailer wheel is not pre-loaded. In case of bearing replacement, pre-load can be used to ensure the bearing races are seated, but one major bearing producer indicates the nut is tightened by hand while spinning the wheel until slight resistance is felt. That slight resistance is technically pre-load, but that's not where the nut is positioned. The nut shoud be positioned so there is no drag to rotation, as well no axial play or end play being felt in the bearing with wheel installed. Then loosen the nut 1/6 to 1/4 turn so there is very slight in-out clearance as well as very slight axial clearance. In other words, the bearing wants some clearance (.004 - .006"). The point of no drag and no play can be considered like "zero lash" when adjusting rockers in an engine (no play - no pre-load). Bearings adjused with pre-load will wear prematurely due to lack of lubrication, expansion and heat.
Sounds about right...in simplier terms I have tightened the nut with pliers while spinning the wheel/ tire until there was slight resistance then backed off the nut to the next hole for the cotter pin. This proceedure has served me well in over 50 years of trailering. Bearings will get warm and expand, slight amount of room is needed for that expansion, thus backing off the nut to the next hole back.
 
Top