justchecking
Petty Officer 2nd Class
- Joined
- Oct 1, 2010
- Messages
- 152
The throttle only button in my Quicksilver control started sticking in and the control just wasn't working as smooth as it should. So I decided to buy a new one. Maybe a new Mercury control or a Teleflex CH1751P Osprey. YIKES! $300! So I next decided to tear into the old one to see what was up. I found a link on this site to the internal parts of my control:
http://www.mercruiserparts.com/Show...ng&inbr=1989&bnbr=40&bdesc=MODULAR+COMPONENTS
A little daunting with 50 numbered parts to say the least. But what the heck, it was already broke.
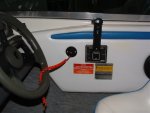
The only disassembly/assembly instructions I could find that fit my control were in one of the SELOC manuals I have (I have the Mercury motor repair manual also), but the SELOC manual had pretty good step-by-step instructions. This is the control:

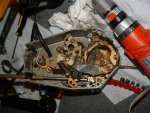
This is a picture of it out laying on the floor of the boat. Here I am trying to find the access hole to loosen the nut that holds the shift cable. I tried several things, couldn't find it so I removed the throttle spring and got to the nut that way.

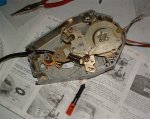
I then disassembled the unit taking my time and several digital pictures. I tried to understand what each part did as I took it apart so I would have a better chance of getting it back together. I had a tough time getting several of the cover plate screws out and the three bearing plate screws so I drilled off the heads to disassemble the unit. Then I used a mototool to slot them and with a flat tip screw driver was able to get them out. After I completely disassembled the unit I cleaned off the grease with brake cleaner. There was way more grease than needed. Here is the reassembled unit:

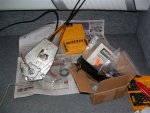
Notice the old throttle only shaft sitting on the manual. The red plastic part had started to deteriorate and flake apart. Also the grease was drying out and caking in several spots. I ordered a new shaft assembly 817253A1 for $10. I did not need the $20 control repair kit. I used an acid brush cut to 1/4" dabbed in light grease to coat the contact points as I assembled the unit. The manual and pictures came in handy, since the reassembly was about a week after I took it apart. Also notice the access hole for the shift cable nut. I couldn't find it earlier because it was full of grease!
Here it is ready to go back in the boat:

It works smooth as silk now and has nice crisp detents.
http://www.mercruiserparts.com/Show...ng&inbr=1989&bnbr=40&bdesc=MODULAR+COMPONENTS
A little daunting with 50 numbered parts to say the least. But what the heck, it was already broke.
The only disassembly/assembly instructions I could find that fit my control were in one of the SELOC manuals I have (I have the Mercury motor repair manual also), but the SELOC manual had pretty good step-by-step instructions. This is the control:

This is a picture of it out laying on the floor of the boat. Here I am trying to find the access hole to loosen the nut that holds the shift cable. I tried several things, couldn't find it so I removed the throttle spring and got to the nut that way.

I then disassembled the unit taking my time and several digital pictures. I tried to understand what each part did as I took it apart so I would have a better chance of getting it back together. I had a tough time getting several of the cover plate screws out and the three bearing plate screws so I drilled off the heads to disassemble the unit. Then I used a mototool to slot them and with a flat tip screw driver was able to get them out. After I completely disassembled the unit I cleaned off the grease with brake cleaner. There was way more grease than needed. Here is the reassembled unit:

Notice the old throttle only shaft sitting on the manual. The red plastic part had started to deteriorate and flake apart. Also the grease was drying out and caking in several spots. I ordered a new shaft assembly 817253A1 for $10. I did not need the $20 control repair kit. I used an acid brush cut to 1/4" dabbed in light grease to coat the contact points as I assembled the unit. The manual and pictures came in handy, since the reassembly was about a week after I took it apart.
Here it is ready to go back in the boat:

It works smooth as silk now and has nice crisp detents.


