jbjennings
Captain
- Joined
- Jul 18, 2007
- Messages
- 3,903
Here's a quick how-to for folks who are interested in tuning up their old OMC outboards from 3 to about 25 horsepower with the universal magneto which is common on '50's on up into the '70s OMC outboards (johnson, evinrude, gale):
First, you'll need to remove the flywheel.
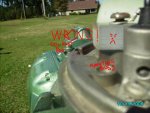
In order to do this, you'll need a $10 harmonic balancer puller from the local auto parts store, and GRADE 8 hardened bolts that are 1/4-20. (that's 1/4 inch by 20 threads per inch). They'll need to be about 3 or 4 inches long.
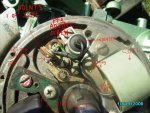
Remove the flywheel nut. You'll usually need a 3/4 socket and breaker bar. The nut is right-hand (normal)threads so lefty-loosey as usual. Leave it on the crankshaft a few turns so when the flywheel pops off the crankshaft, it doesn't go flying off and bloody your nose!
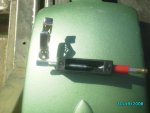
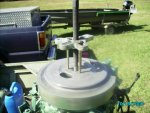
Make sure your flywheel puller (in this case a harmonic balancer puller) is mounted with the flat side up.
You'll screw the 3 grade 8 bolts into the holes that are revealed when taking the ring off the flywheel that the pull starter pawls grab onto when starting.
Thread the bolts in about a 1/2 inch, being careful not to go so deep that you screw the bolt into the coils underneath the flywheel.
Now, slightly tighten up the puller bolt and make sure each bolt is screwed in equally so that the puller is pulling evenly on the flywheel.
Then, tighten the puller bolt good and tight. It should pop off. Sometimes it helps to give the puller bolt a slight rap with a hammer. If it still doesn't come off, tighten the puller bolt a little more and be patient. Never beat on the flywheel or it will warp and be useless.
When the flywheel is off, clean the crankshaft taper and the flywheel tapers. They must be clean and dry when reinstalling the flywheel---NO GREASE or ANYTHING on the tapers! And remember that you MUST use a torque wrench to reinstall the flywheel later or it will either ruin the crankshaft by overtightening, or let the flywheel key shear due to undertightening. If you don't know the torque specs., ASK!
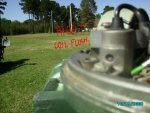
Here are some pics of the tools that are needed:
First, you'll need to remove the flywheel.
In order to do this, you'll need a $10 harmonic balancer puller from the local auto parts store, and GRADE 8 hardened bolts that are 1/4-20. (that's 1/4 inch by 20 threads per inch). They'll need to be about 3 or 4 inches long.
Remove the flywheel nut. You'll usually need a 3/4 socket and breaker bar. The nut is right-hand (normal)threads so lefty-loosey as usual. Leave it on the crankshaft a few turns so when the flywheel pops off the crankshaft, it doesn't go flying off and bloody your nose!
Make sure your flywheel puller (in this case a harmonic balancer puller) is mounted with the flat side up.
You'll screw the 3 grade 8 bolts into the holes that are revealed when taking the ring off the flywheel that the pull starter pawls grab onto when starting.
Thread the bolts in about a 1/2 inch, being careful not to go so deep that you screw the bolt into the coils underneath the flywheel.
Now, slightly tighten up the puller bolt and make sure each bolt is screwed in equally so that the puller is pulling evenly on the flywheel.
Then, tighten the puller bolt good and tight. It should pop off. Sometimes it helps to give the puller bolt a slight rap with a hammer. If it still doesn't come off, tighten the puller bolt a little more and be patient. Never beat on the flywheel or it will warp and be useless.
When the flywheel is off, clean the crankshaft taper and the flywheel tapers. They must be clean and dry when reinstalling the flywheel---NO GREASE or ANYTHING on the tapers! And remember that you MUST use a torque wrench to reinstall the flywheel later or it will either ruin the crankshaft by overtightening, or let the flywheel key shear due to undertightening. If you don't know the torque specs., ASK!
Here are some pics of the tools that are needed:
Attachments

Last edited: