How hard to seperate crank bottom cover to weld starter mount hole?

OttawaPhil

Petty Officer 3rd Class
Joined
Aug 20, 2015
Messages
85
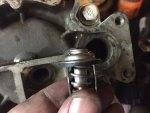
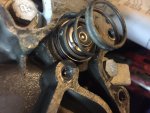
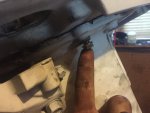
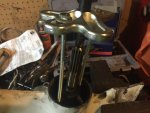
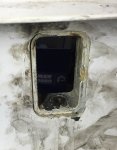
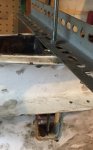
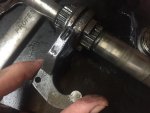
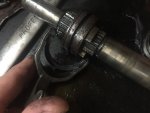
I have a Johnson CJ30ELCED The starter bolt that goes into the crankcase bottom broke off. In my trying to remove it I made it worse. Now I want to take it to a machine shop and have them weld it and make new threads. Should I take the bottom off the motor? I'm sure the shop would like that best, but I don't wanted to get into too much work that I don't need to do if it is too difficult. What do you guys think? Is taking the crank bottom off relatively easy? Or not? The screwed up threaded hole is the one i am pointing at in the pic. Thanks very much for your help gentlemen. Phil
 

Attachments

  • photo245868.jpeg
    photo245868.jpeg
    131.2 KB · Views: 0
Last edited:

interalian

Commander
Joined
Jul 23, 2009
Messages
2,105
To take off the powerhead you're looking at a bunch of bolts and you'll be into gaskets too.
 

F_R

Supreme Mariner
Joined
Jul 7, 2006
Messages
28,226
You are already half way there. You already have the magneto and carburetor off. There are bolts behind the reed plate. The powerhead has to come off next. Be sure to knock the taper pins out before trying to separate the case. They are tapered, so drive on the small end and they will pop right out.
 

OttawaPhil

Petty Officer 3rd Class
Joined
Aug 20, 2015
Messages
85
You were right, another half hour easy work and it was off. Came off easy too with no trouble.
Thanks!
Now while I have the motor apart what should I replace for maintenance?
Water impeller, gaskets, prop and shaft seals, anything else? Electronics parts? I would rather spend a few bucks more on this old motor now for reliability later. Don't like fixing on the lake ;-)
 
Last edited:

OttawaPhil

Petty Officer 3rd Class
Joined
Aug 20, 2015
Messages
85
No Title

Putting it back together now. Question to confirm. For putting the thermostat back, the gasket goes on the thermostat then it goes in the hole in the head, then the spring on top, then the cover? Like in these pictures? Is that right, just want to make sure because the parts diagram shows different and doesn't seem to make sense.
 

Attachments

  • photo246770.jpg
    photo246770.jpg
    54.7 KB · Views: 0
  • photo246771.jpg
    photo246771.jpg
    62 KB · Views: 0

AlTn

Commander
Joined
Mar 9, 2010
Messages
2,813
pics are correct...use some sort of gasket sealer on both sides of the water cover gasket as well
 

OttawaPhil

Petty Officer 3rd Class
Joined
Aug 20, 2015
Messages
85
I allready put that gasket back dry. It was a brand new gasket and the parts were nice and clean. Still need gasket sealer? I can take it back off and put some if it is necessary. If it is where do I get gasket sealer. Auto parts store has around 10 kinds of gasket maker, but no gasket sealer.
 

AlTn

Commander
Joined
Mar 9, 2010
Messages
2,813
I use the evinrude/johnson gasket sealer...I believe permatex makes an equivalent, but don't know the name of it...it'll have an application brush or ball inside the container...do you need it?...if water doesn't leak around the gasket, no..
 

OttawaPhil

Petty Officer 3rd Class
Joined
Aug 20, 2015
Messages
85
No Title

Got some permatex equivalent thanks. More went together then this.
Seems like the bolts that hold the power head on are pretty
Short. Is that normal? Or something that the previous owner swapped? They have only about 2 threads before they start compressing the gasket. I took it back off and confirmed. Is that normal or should I just get
4 more bolts in the next longer size? The pic shows just holding it in without turning it yet.

Thanks for all your help, you guys are great, I really appreciate it.
 

Attachments

  • photo246899.jpg
    photo246899.jpg
    50.3 KB · Views: 0

OttawaPhil

Petty Officer 3rd Class
Joined
Aug 20, 2015
Messages
85
Now I am trying to rebuild the gearcase. Having trouble getting it apart. Man I wish I could buy a real manual for my engine, instead of this stupid manual that covers all models from one horsepower to 100 or whatever
 

OttawaPhil

Petty Officer 3rd Class
Joined
Aug 20, 2015
Messages
85
Got gear case pulled with the steering wheel puller and some really long 1/4x6" bolts.
Now a giant snap ring. Will have to get bigger snap ring pliers tomorrow, that's it for today.
 

OttawaPhil

Petty Officer 3rd Class
Joined
Aug 20, 2015
Messages
85
No Title

Just got the whole bottom gear case apart except this one area left. Not sure how to take it out. Does anyone know. Asking About the seals on this where the shift rod goes through.
 

Attachments

  • photo247214.jpg
    photo247214.jpg
    93.3 KB · Views: 0

OttawaPhil

Petty Officer 3rd Class
Joined
Aug 20, 2015
Messages
85
No Title

Never mind figured it out;
 

Attachments

  • photo247216.jpg
    photo247216.jpg
    95.7 KB · Views: 0

OttawaPhil

Petty Officer 3rd Class
Joined
Aug 20, 2015
Messages
85
Cancel that doesn't work. Aluminum hole inside is smaller than 1/4" nut that I had on there
 

OttawaPhil

Petty Officer 3rd Class
Joined
Aug 20, 2015
Messages
85
If anyone has a tip or suggestion please let me know. Not sure how to get the last seals out. Then can start rebuild .
Thanks!
 

AlTn

Commander
Joined
Mar 9, 2010
Messages
2,813
book shows this...an adapter is positioned under the bushing and a threaded rod is threaded into the adapter from above, then a slap hammer is threaded onto the other end of the rod and hammered upward and out...this adapter looks like a small seal installer and must be threaded in its center...< small diameter rod with a nut and a few washers you can screw into, maybe clamp some vice grips onto the upper part of the rod and hammer upward to pull it out? >..anyway..examine the bushing and replace if necessary..replace the orings and washer per the manual
 

OttawaPhil

Petty Officer 3rd Class
Joined
Aug 20, 2015
Messages
85
No Title

Thanks, that worked. Bought a slide hammer kit and was impressed how well that worked. Replaced all the seals no problem. Now trying to put the gear case back together. Wow the shift linkage is hard to get together. Can't seem to get the linkage in. Been trying to put the middle gear on with the spring and two balls then insert it while holding the shift lever up with a screw driver. Tried that for a while and gave up for the night. Is that the right way? Balls and spring first? Or maybe the gear and shift bracket go together first, then the shaft with spring and balls gets Inserted last? Any tips? Here is a couple pics to show the type of linkage I have. Thank you!
 

Attachments

  • photo247696.jpg
    photo247696.jpg
    61.1 KB · Views: 0
  • photo247697.jpg
    photo247697.jpg
    62.6 KB · Views: 0
Last edited:

OttawaPhil

Petty Officer 3rd Class
Joined
Aug 20, 2015
Messages
85
Just found this great video. Exact same bottom end as mine. He made a special tool then inserted shaft after shift linkage. So I will do that too. Thanks
Here's the link in case it helps others:
http://youtu.be/AJQ3lfTDu48
 
Top