How hard is it to replace a broken water tube?

Jim Hawkins

Chief Petty Officer
Joined
Mar 11, 2013
Messages
503
Yamaha F6SMHA, when replacing the impeller I found the water tube was badly corroded and appears to be broken at the top and 3 inches from the pump. Do you have to pull the power head to replace that tube?
 

99yam40

Fleet Admiral
Joined
Sep 7, 2008
Messages
9,097
I will bite,
but I have never replaced one or needed to before.
I would think that the power head would need to come off to get to that tube on the upper end.
should be a rubber seal up there that the tube slides into.
probably good idea to replace that also
look at a parts break down to get some idea
 

Jim Hawkins

Chief Petty Officer
Joined
Mar 11, 2013
Messages
503
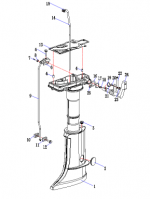
This is the best part diagram I saw and it sure looks like I need to pull the powerhead. OK, looks like all I need to do is remove 6 bolts, the fuel line and the throttle cable and then hope I don't snap any bolts.
1631120286337.png
 

Jim Hawkins

Chief Petty Officer
Joined
Mar 11, 2013
Messages
503
OK, so through a mix of research and ciphering I got this figured out and in an effort to close this thread and help some other poor soul I'll document my adventures...

I am going to post this in several posts rather than one big one to make sure the dog does not eat my homework before I hit the final POST button.

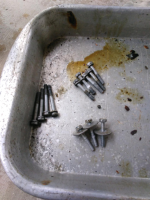
First of all the motor is a 2014 Yamaha Outboard 6hp F6SMHA. When changing the impellor the water tube broke. This was no doubt due to corrosion on the copper tube from leaving the bottom end of the motor in salt water as is required at the Key West dingy dock. The water tube part is #6EE-G4360-00-00 and includes the rubber bushing that holds the tube in place just under the power head. To replace this tube you must pull the powerhead. The manual will have you disconnect a lot of parts but I chose to remove only as much as I saw was needed, mainly the fuel line and fuel tank as well as the pull-start. Other than that, there are nine bolts, 4 long and five shorter. Note which bolts go where.
.1631723835961.png
The three bolts with the large washers are from the lower cowling and did not need to be removed so I replaced them before replacing the powerhead. With the bolts removed the powerhead was stuck fairly tight to the gasket. Gentle persuasion with a block of wood under the flywheel and taps from a hammer eventually freed the powerhead after which I simply tilted it to one side and secured it as seen in the picture.
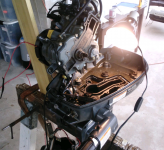
1631724280546.png

Continued....
 

Jim Hawkins

Chief Petty Officer
Joined
Mar 11, 2013
Messages
503
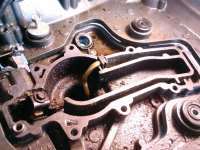
so, next using a razor blade and super fine sandpaper I cleaned the areas for the new gasket, part #6EE-45113-00-00. I have placed the new water tube and rubber bushing approximately where it will be installed but did not yet slide the bushing into the slot as I am waiting on a new gasket.
1631725114005.png

So, from here I assume I just put everything back the way I took it apart otherwise if I need to I will update after I get the new gasket.
 

Sea Rider

Supreme Mariner
Joined
Sep 20, 2008
Messages
12,345
Grease all bolts with marine grease before assembly including the drive shaft's upper splines. Which material is the new pan's gasket made of, is it carbdoad, alum sheet ? Do you plan to seal it with a sealer at both mating sides ? Torque it to specs after install and make a final re torque after first 5 run hours, will last longer...

Happy Boating
 

Jim Hawkins

Chief Petty Officer
Joined
Mar 11, 2013
Messages
503
Grease all bolts with marine grease before assembly including the drive shaft's upper splines. Which material is the new pan's gasket made of, is it carbdoad, alum sheet ? Do you plan to seal it with a sealer at both mating sides ? Torque it to specs after install and make a final re torque after first 5 run hours, will last longer...

Happy Boating
Yes SeaRider, I didn't mention 2 of the bolts were hard to get out. I would only give them about a 1/32 of a turn at a time between slowly removing the other bolts until they all came out without snapping and you can see the corrosion on them in the pic. I will surely clean and grease them with anti-seize. I get the gasket today and don't know the material but the old one appears to be impregnated cardboard. I was ready to reuse the old gasket which I was able to remove intact, with gasket sealer on each side if getting a new one was a problem but the gasket comes today. On studying the motor around the gasket it looks like the most pressure on the gasket will be from the exhaust. I have access to the manual and plan to follow what it recommends for the gasket unless there is a better way.
 

99yam40

Fleet Admiral
Joined
Sep 7, 2008
Messages
9,097
never use an anti-seize that contains copper on aluminum.

follow the recommendations in the Yamaha service manual for all of the procedures
 

Jim Hawkins

Chief Petty Officer
Joined
Mar 11, 2013
Messages
503
follow the recommendations in the Yamaha service manual for all of the procedures
I think I'll just put the gasket in as is, no schmutz, clean and grease the bolts without anti seize but as to following the manual, well, it would have had me do a ridiculous amount of unnecessary work, completely removing the power head just to change this gasket. Sometimes I just don't go "by the book":)
 

99yam40

Fleet Admiral
Joined
Sep 7, 2008
Messages
9,097
follow the recommendations on lube, gasket sealer, etc when putting it back together. it does tell you what to use, but you do what you want to
 

Jim Hawkins

Chief Petty Officer
Joined
Mar 11, 2013
Messages
503
follow the recommendations on lube, gasket sealer, etc when putting it back together. it does tell you what to use, but you do what you want to
ok, I just had an urge to be a rebel without a clue.
 

Jim Hawkins

Chief Petty Officer
Joined
Mar 11, 2013
Messages
503
follow the recommendations on lube, gasket sealer, etc when putting it back together. it does tell you what to use, but you do what you want to
The manual I have simply says to use a new gasket. If your manual says different I'd be interested to hear what to do.

1631968559556.png
 

99yam40

Fleet Admiral
Joined
Sep 7, 2008
Messages
9,097
well that sounds like they do not recommend using anything on the gasket.
if they wanted people to use something they would list what to use
 

Jim Hawkins

Chief Petty Officer
Joined
Mar 11, 2013
Messages
503
So, tested the motor and heard a very loud "open headers exhaust" sound. I feared I screwed up on the gasket but realized it was just the exhaust coming out the hole by the shift linkage where I removed a rubber access plug. Plugged the hole and all is well. Will run the motor some more to heat it up and the re-torque the bolts. This isn't even my motor, another favor I got sucked into and will be glad to see it go. I did expand my knowledge though and for that I'm glad.
 

Sea Rider

Supreme Mariner
Joined
Sep 20, 2008
Messages
12,345
Will run the motor some more to heat it up and the re-torque the bolts. This isn't even my motor, another favor I got sucked into and will be glad to see it go. I did expand my knowledge though and for that I'm glad.
This experience is something you learn on the way, better use any high quality marine grease on all removed bolts after cleaned to mint cond. If using again the removed pan gaskte provided that was removed 100% intact better is to seal it back with a light coat of mega grey heat silicone at both sides to sit even at both mating surfaces and avoid water, exhaust fumes and noise increase onto the pan area.

With new carboard type gaskets usually apply a thick coat of grease at both sides, torque the pan gaskets to specs. Will surely be able to remove it intact when pulling the head for a second time. Pan gaskets usually gets shot around the exhaust area if are not well re torqued back to factory specs...

Happy Boating

 
Top