First timer - 76’ SS rebuild - thoughts?

SpartySteve

Cadet
Joined
Apr 28, 2020
Messages
24
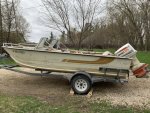
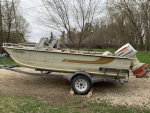
First timer, picked up this little gem yesterday with trailer an 85hp Johnson for $800. Motor fires right up! Trailer ran great.

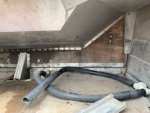
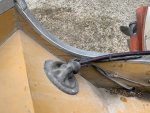
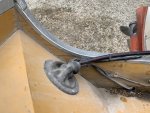
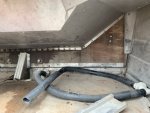
Planning to do an interior rebuild after I gut it, rebuck rivets, least test, new foam etc... would like to do a casting deck on front and back. Will require a splash well mod. Brings me to my transom question. Mine seems to be all wood in the inside. Shockingly the wood is solid and not spongy at all. Looks to be original as the paint matches but maybe not? Any thoughts on rolling with the transom as is or should I add the interior aluminum face to the transom?
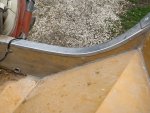
687796DE-8483-4BCA-84F1-D4B55803545B.jpeg
2F64842D-B3A5-4C55-9845-DEE0F82634F5.jpeg

0CDBE775-E33E-471D-8725-FDD92FBB104A.jpeg

92F70C36-4E2E-4673-9091-2B6F9A8EA65D.jpeg
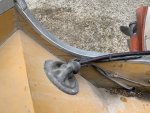
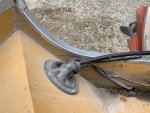
Dark spot is fuel. Slow leak from the motor when trimmed up.
 

Attachments

  • 687796DE-8483-4BCA-84F1-D4B55803545B.jpeg
    687796DE-8483-4BCA-84F1-D4B55803545B.jpeg
    164.3 KB · Views: 0
  • 0CDBE775-E33E-471D-8725-FDD92FBB104A.jpeg
    0CDBE775-E33E-471D-8725-FDD92FBB104A.jpeg
    119.7 KB · Views: 0
  • 0CDBE775-E33E-471D-8725-FDD92FBB104A.jpeg
    0CDBE775-E33E-471D-8725-FDD92FBB104A.jpeg
    119.7 KB · Views: 0
  • 0CDBE775-E33E-471D-8725-FDD92FBB104A.jpeg
    0CDBE775-E33E-471D-8725-FDD92FBB104A.jpeg
    119.7 KB · Views: 0
  • D00C6649-9E00-4FCA-867E-F77BEE0A4A91.jpeg
    D00C6649-9E00-4FCA-867E-F77BEE0A4A91.jpeg
    111.6 KB · Views: 0

MNhunter1

Lieutenant Junior Grade
Joined
May 12, 2014
Messages
1,053
Congrats! If you're going to gut it and rebuild it anyway, might as well do the transom as well. It's not all that difficult and will likely need to be addressed at some point even though it might not appear to need any attention today. Once you get her stripped all down, you'll probably find it'll be well worth your time.
 

SpartySteve

Cadet
Joined
Apr 28, 2020
Messages
24
Congrats! If you're going to gut it and rebuild it anyway, might as well do the transom as well. It's not all that difficult and will likely need to be addressed at some point even though it might not appear to need any attention today. Once you get her stripped all down, you'll probably find it'll be well worth your time.

Probably right. So how do I add the other side of the aluminum? I don’t weld lol.
 

SHSU

Lieutenant Junior+Starmada Splash Of The Year 2019
Joined
Mar 8, 2017
Messages
1,725
Probably right. So how do I add the other side of the aluminum? I don’t weld lol.

Not sure I follow, no welding should be needed to pull the transom wood. Just need to remove the end caps and transom cap (carefully as finding replacements are next to impossible). Unscrew everything that is screwed into it or bolted through, then pull out.

SHSU
 

GA_Boater

Honorary Moderator Emeritus
Joined
May 24, 2011
Messages
49,038
Howdy, Steve. Welcome to the Starmada!

You don't need to cover the transom wood with aluminum. If you did the wood probably will not fit because it's too thick.

The gunnel goes all the the way under the corner caps. It has to be bent up so the plywood can be pulled out and slid back in. You'll see what I mean when the caps are popped off.

The wood is in three pieces - The main section and two wings on top toward the caps. You can do the same thing with new plywood, but many of us make a one piece transom because we can. :smile:

Also the transom is a sandwich made of two 3/4" thicknesses glued together.
 

SpartySteve

Cadet
Joined
Apr 28, 2020
Messages
24
Not sure I follow, no welding should be needed to pull the transom wood. Just need to remove the end caps and transom cap (carefully as finding replacements are next to impossible). Unscrew everything that is screwed into it or bolted through, then pull out.

SHSU

Ok, I thought the transom was suppose to be wood sandwiched between two pieces of aluminum. So inside the boat the wood transom will always be exposed to water?
 

SpartySteve

Cadet
Joined
Apr 28, 2020
Messages
24
Howdy, Steve. Welcome to the Starmada!

You don't need to cover the transom wood with aluminum. If you did the wood probably will not fit because it's too thick.

The gunnel goes all the the way under the corner caps. It has to be bent up so the plywood can be pulled out and slid back in. You'll see what I mean when the caps are popped off.

The wood is in three pieces - The main section and two wings on top toward the caps. You can do the same thing with new plywood, but many of us make a one piece transom because we can. :smile:

Also the transom is a sandwich made of two 3/4" thicknesses glued together.

Thanks for the feedback! I’ve been following a few other builds and the transom doesn’t seem too terribly difficult. I was just expecting another aluminum plate on the inside. Threw me is all. I’ll post some more pics as I go. Cheers!
 

MNhunter1

Lieutenant Junior Grade
Joined
May 12, 2014
Messages
1,053
Ok, I thought the transom was suppose to be wood sandwiched between two pieces of aluminum. So inside the boat the wood transom will always be exposed to water?

You'll seal the wood with an epoxy and can throw on a coat of paint as an added layer of protection. The only area that would be exposed to water would be the top portion inside and above the spalshwell, which should be pretty minimal/short lived. It'll also dry out much faster than if water were to get trapped behind a sheet of aluminum.

If the water exposure is much more than that, you've got a sinking boat. Most of the trouble you see with these transoms is from water getting in at the thru holes/screw holes from the motor mounts and other hardware. A properly sealed transom and some 3m5200 for the hardware should take care of you for many many years.
 

SpartySteve

Cadet
Joined
Apr 28, 2020
Messages
24
You'll seal the wood with an epoxy and can throw on a coat of paint as an added layer of protection. The only area that would be exposed to water would be the top portion inside and above the spalshwell, which should be pretty minimal/short lived. It'll also dry out much faster than if water were to get trapped behind a sheet of aluminum.

If the water exposure is much more than that, you've got a sinking boat. Most of the trouble you see with these transoms is from water getting in at the thru holes/screw holes from the motor mounts and other hardware. A properly sealed transom and some 3m5200 for the hardware should take care of you for many many years.

Can’t wait to get started. I’m installing a new water pump now and need to get the hardware off the transom. Then I’ll be flying!

quick question... is it a bad idea to raise the seating a bit? I’ll be going with two captains chairs and the current seats seem too low. Cheers!
 

g0nef1sshn

Lieutenant
Joined
Feb 24, 2015
Messages
1,291
No meed to modify the splash well itself for a deck. I layed carpeted plywood over mine and supported middle of the splashwell to the deck with carpeted 2x4. Works out easy for me to stand on. I could put a flush seat mount there if i needed to.
 

Watermann

Starmada Splash of the Year 2014
Joined
Jan 12, 2013
Messages
13,787
:welcome: aboard Steve!

Nice SS with a great motor :thumb:
 

SHSU

Lieutenant Junior+Starmada Splash Of The Year 2019
Joined
Mar 8, 2017
Messages
1,725
Can’t wait to get started. I’m installing a new water pump now and need to get the hardware off the transom. Then I’ll be flying!

quick question... is it a bad idea to raise the seating a bit? I’ll be going with two captains chairs and the current seats seem too low. Cheers!

I went with captain chairs in mine and do agree Starcraft did make it a little low for my liking. Biggest thing for me was making sure when I sat in the chair my view wasn't obstructed by the top of the windshield.

SHSU
 

ShoestringMariner

Lieutenant Commander
Joined
Apr 18, 2015
Messages
1,593
Don’t use pressure treated wood or it will eat aluminum. You might find your entire head to be above the windshield if you go higher. The SS windscreens are shorter than modern models.

And congrats on a solid score! You stole it...I’m jealous
 
Top