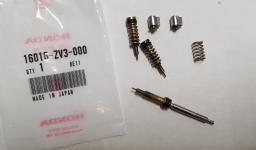
EPA mixture screw covers 2003 BF50

73 Dolphin

Petty Officer 1st Class
Joined
Oct 8, 2008
Messages
295
Recently went through the carbs on a 2003 Honda BF50A3.
The mixture screws had those EPA covers on them which seem to allow 1/8 turn adjustment. Well I left them alone and cleaned and reassembled the carbs.
Now running the boat on the water for the first time I'm having issues.
Started off ok then started surging and eventually left me limping home on one cylinder.
I really do not want to pull the carbs again.
Basically I have ignition on cylinder one and three. The middle cylinder is not firing.
It does have good spark and there is fuel in the bowl.
Interestingly after bringing it home I only had spark on the bottom #3 cylinder.
Spraying ether into #1 top woke that one up but #2 just isn't firing.
I read somewhere that I can remove the EPA covers, remove the screws and replace with standard ones. Does anyone know what I need to order to do this?
I really feel that I want to pull the EPA capped screws so I can clean out those passageways in place and try to get all 3 cylinders firing. Then I can get the mixture the best I can and then balance the carbs with a vacuum gauge. TIA.
 

dingbat

Supreme Mariner
Joined
Nov 20, 2001
Messages
15,500
Recently went through the carbs on a 2003 Honda BF50A3.
The mixture screws had those EPA covers on them which seem to allow 1/8 turn adjustment. Well I left them alone and cleaned and reassembled the carbs.
Now running the boat on the water for the first time I'm having issues.
Started off ok then started surging and eventually left me limping home on one cylinder.
I really do not want to pull the carbs again.
Basically I have ignition on cylinder one and three. The middle cylinder is not firing.
It does have good spark and there is fuel in the bowl.
Interestingly after bringing it home I only had spark on the bottom #3 cylinder.
Spraying ether into #1 top woke that one up but #2 just isn't firing.
I read somewhere that I can remove the EPA covers, remove the screws and replace with standard ones. Does anyone know what I need to order to do this?
I really feel that I want to pull the EPA capped screws so I can clean out those passageways in place and try to get all 3 cylinders firing. Then I can get the mixture the best I can and then balance the carbs with a vacuum gauge. TIA.
No spark has nothing to do with the carbs.
You need to sort out out the problems with the ignition (spark testing) first
 

73 Dolphin

Petty Officer 1st Class
Joined
Oct 8, 2008
Messages
295
No spark has nothing to do with the carbs.
You need to sort out out the problems with the ignition (spark testing) first
Like I said all 3 cylinders have spark. But also, I see at one point I said I only had spark on #3 cylinder. I should have said ignition. My mistake. Thay all have spark but the middle cylinder is not firing so fuel issue.
I can pull plug cap #1 and it struggles. I can pull plug #3 and it struggles. Pulling #2 has no effect telling me that its not firing. .
But the question I really want help with is, is how to remove those EPA capped screws and replace. Thanks.
 
Last edited:

MattFL

Master Chief Petty Officer
Joined
Oct 20, 2010
Messages
845
The caps break off, leaving a headless screw. I used a left handed drill bit to remove them on mine, they're not "tight" like a regular screw so they came right out super easy. The part numbers for the replacements are around here somewhere.
 

ahicks

Captain
Joined
Sep 16, 2013
Messages
3,957
Like it or not, it sounds like the carbs need to come off again, with particular attention paid to #2 carb. It should run, albeit maybe poorly, no matter what the setting is on the idle mixture screw.

You should also know there's an o-ring on the idle mixture screw, and if this o-ring is damaged you have a very good chance of a vacuum leak that will affect the fuel draw for the idle fuel circuit for that carb.

Point being, at some point those EPA caps will need to be removed - no "if" to it.....

The only way I know of to do that it to get them hot enough to release the epoxy that holds them in place. Then you have to pull straight out on them. Prying or pulling at an angle is guaranteed to break them. I use a HD soldering iron, and after doing maybe 50-75 of these, I have a success rate of 3 out of 4 or so.....

When you break one, you'll need to use a pick (and a TON of patience) to unscrew/remove what's left of the screw. I use a # 11 xacto knife for this.

The o-ring is one of the 3 that come in the carb kit that includes the float bowl gasket....
 

73 Dolphin

Petty Officer 1st Class
Joined
Oct 8, 2008
Messages
295
Like it or not, it sounds like the carbs need to come off again, with particular attention paid to #2 carb. It should run, albeit maybe poorly, no matter what the setting is on the idle mixture screw.

You should also know there's an o-ring on the idle mixture screw, and if this o-ring is damaged you have a very good chance of a vacuum leak that will affect the fuel draw for the idle fuel circuit for that carb.

Point being, at some point those EPA caps will need to be removed - no "if" to it.....

The only way I know of to do that it to get them hot enough to release the epoxy that holds them in place. Then you have to pull straight out on them. Prying or pulling at an angle is guaranteed to break them. I use a HD soldering iron, and after doing maybe 50-75 of these, I have a success rate of 3 out of 4 or so.....

When you break one, you'll need to use a pick (and a TON of patience) to unscrew/remove what's left of the screw. I use a # 11 xacto knife for this.

The o-ring is one of the 3 that come in the carb kit that includes the float bowl gasket....
I busted the heads off because I figured that the heat trick probably wouldnt work. I guess I'll try finding a left handed bit and then search for the replacements. Any idea if I should be looking earlier or later than 2003 for the mixture screws that fit?
Thanks and yes the carbs will come off again.
 

MattFL

Master Chief Petty Officer
Joined
Oct 20, 2010
Messages
845
Here's the part number I replaced mine with on my 99' 50, and the tiny bolt remover still attached to one of the screws I removed (notice the broken off heads). No need to remove the carburetors for the purpose of removing these screws (but yes if you're going to clean then more), get one of these little left handed screw removers and the screws come right out super easy.

1684717025226.png
 

73 Dolphin

Petty Officer 1st Class
Joined
Oct 8, 2008
Messages
295
Here's the part number I replaced mine with on my 99' 50, and the tiny bolt remover still attached to one of the screws I removed (notice the broken off heads). No need to remove the carburetors for the purpose of removing these screws (but yes if you're going to clean then more), get one of these little left handed screw removers and the screws come right out super easy.

View attachment 379612
Turns out these didn't work with my 2000 50hp. The thread is much further back than the ones that came with the motor and wont seat. Just ordered a set of original 16016-ZW4-D21 that Ill replace and just leave the cap off I guess. The 16016-ZV3-000s will just be added to my parts drawer!!
 

MattFL

Master Chief Petty Officer
Joined
Oct 20, 2010
Messages
845
Turns out these didn't work with my 2000 50hp. The thread is much further back than the ones that came with the motor and wont seat. Just ordered a set of original 16016-ZW4-D21 that Ill replace and just leave the cap off I guess. The 16016-ZV3-000s will just be added to my parts drawer!!
Interesting, I wonder why they changed that between years. Let us know how the new ones work!
 

73 Dolphin

Petty Officer 1st Class
Joined
Oct 8, 2008
Messages
295
Interesting, I wonder why they changed that between years. Let us know how the new ones work!
The new ones fit of course because they are stock. Rebuilt them again. Synced the carbs and it ran smooth in the tank on all cylinders. Took it to the water and tested it. Same issue. Running on 2 cylinders. So I need to do more work.
 

MattFL

Master Chief Petty Officer
Joined
Oct 20, 2010
Messages
845
When it's running on 2 cylinders, quick open the drain on each carburetor and make sure all 3 bowls have fuel. I was out fishing one day and suddenly mine started running on 2 cylinders. I took everything apart very carefully and found a tiny piece of rubber from an old fuel line blocking the float needle on one of the carbs. All new fuel lines and it has been fine since then (3+ years ago). The next thing you can check is get an inductive spark tester, and next time it's running on 2 cylinders, quick check all 3 spark plug leads with the tester and check if one of the cylinders isn't getting spark. With intermittent problems you've got to quick do the debugging while it's running in the failure mode.
 

ahicks

Captain
Joined
Sep 16, 2013
Messages
3,957
With it running on shore (with a kown good water supply, careful of the the 3rd unseen water intake port), you can often locate your issue shooting carb cleaner through each of the idle mixture jets - one at a time. If you identify one that suddenly brings a cylinder back to life - you've identifies a dirty carb. Each carb should have about the same reaction to the test...
 

73 Dolphin

Petty Officer 1st Class
Joined
Oct 8, 2008
Messages
295
Ok so on the sixth carb rebuild, each previous time with apparently super clean jets, it's now working. Took it out and it idled sweet and ran out great. So, if this helps anyone, it seems that it wasn't a spark issue - which I'd convinced myself of - just the carbs. Funny thing is that I've read a few posts saying that they need multiple carb cleanings before they come back to life after sitting. I was convinced that it was an ignition issue and was ready to dig a hole in the back yard and just bury the boat and motor!! It's on an 11ft AB Nautilus RIB which originally had a Yamaha 40 on it that gave up the ghost. I was happy changing it and rigging for a Honda 50 as it weighs 15lbs less than the Yamaha 40 that was on it. Now the issue I have is that the top cylinder is running 180 degrees using a digital thermometer, 20 mins after running WOT and bringing home to flush. No alarm. No temp warning light on control. Smells really hot and too hot to touch. Time to change the thermostat do you think?? any input appreciated. Thanks!! Also, the motor came off a pontoon boat, so it probably needs re-propping. Ran great though.
 

ahicks

Captain
Joined
Sep 16, 2013
Messages
3,957
I'd look to see if it even has a thermostat. While there, is there a lot of corrosion on the block in that area? That can provide a hint as to the condition of the rest of the block and head internals.....

Is this a salt water motor?

If the motor has been overheated badly enough, the head gasket will be destroyed, alowing water to mix with the oil.
 

MattFL

Master Chief Petty Officer
Joined
Oct 20, 2010
Messages
845
If it has an unknown or salt history, maybe flush it with some descaler. Something heavy duty like Rydlyme, Barnacle Buster, etc.. There's a thread on here where I showed how I did it to my 50 in case it helps.
 

73 Dolphin

Petty Officer 1st Class
Joined
Oct 8, 2008
Messages
295
I'd look to see if it even has a thermostat. While there, is there a lot of corrosion on the block in that area? That can provide a hint as to the condition of the rest of the block and head internals.....

Is this a salt water motor?

If the motor has been overheated badly enough, the head gasket will be destroyed, alowing water to mix with the oil.
It seems to be a freshwater motor, No obvious signs of saltwater use. I'll pull the t-stat cover and take a look though. Oil is clean - no water intrusion. Thanks for the reply!! Its running and running well. I'd hate to have it seize on me after all of the hours of work I've put into it! Is 180 too hot on the top cylinder or in spec? I'm using a laser thermometer pointing at the head near the spark plugs, Temp at t-stat cover is lower.
 

MattFL

Master Chief Petty Officer
Joined
Oct 20, 2010
Messages
845
180 doesn't sound super hot. If you have a thermostat handy, they often have the opening temp stamped on them, probably in C. If that's anywhere close to 180F then that's fine. Also there is a big exhaust cover plate near the spark plugs, so you might be aiming at that. Finally, 4-strokes will run hotter than the old 2-strokes, intentionally, as they run more efficiently with some heat, plus some temp in the oil causes any blow-by fuel or condensation to steam off.
 
Top