DF140 vst

robjq5i

Cadet
Joined
Oct 11, 2016
Messages
20
2019 df140. 77hrs. Vst issue. Smelled/saw gas on the water and traced it back to the vent tube on the vst. If you pump the bulb you’ll get overflow. I’m familiar with the basic setup, float/needle valve, reservoir couple filters and high pressure pump although I have never been into one. I’m thinking something with the needle valve, trash stuck in there, stuck float. I’ve got the parts coming to replace the popular items. Any thoughts on a diagnosis before I go in?

Thanks
 

stresspoint

Lieutenant Junior Grade
Joined
Sep 19, 2022
Messages
1,048
check the tang (whatever its called the little spring pin that rides on the float) on the float valve , is not stuck , (cant remember off hand if Suzuki have a solid or spring loaded pin) but it works like a dampener and if you over prime it will cause the bowl to flood.
there is also a vacuum switch on the VST vent tube that may have failed or the vacuum hose has fallen off .

why are you priming a 4 stroke motor ????, that's what the fuel pump is for, primer should only be used if you drain the system.
 

99yam40

Fleet Admiral
Joined
Sep 7, 2008
Messages
9,093
you could always check fuel pressure to make sure it is not too high and overcoming the float/needle/seat
 

99yam40

Fleet Admiral
Joined
Sep 7, 2008
Messages
9,093
check the tang (whatever its called the little spring pin that rides on the float) on the float valve , is not stuck , (cant remember off hand if Suzuki have a solid or spring loaded pin) but it works like a dampener and if you over prime it will cause the bowl to flood.
there is also a vacuum switch on the VST vent tube that may have failed or the vacuum hose has fallen off .

why are you priming a 4 stroke motor ????, that's what the fuel pump is for, primer should only be used if you drain the system.
I can see him trying to see if the primer would still cause an over flow at lower pressures.
but that would prove that my other post was not happening
 

robjq5i

Cadet
Joined
Oct 11, 2016
Messages
20
I can see him trying to see if the primer would still cause an over flow at lower pressures.
but that would prove that my other post was not happening
Yes even the hand bulb primer will push fuel out without much effort I forgot to add the boat runs fine otherwise
 

robjq5i

Cadet
Joined
Oct 11, 2016
Messages
20
check the tang (whatever its called the little spring pin that rides on the float) on the float valve , is not stuck , (cant remember off hand if Suzuki have a solid or spring loaded pin) but it works like a dampener and if you over prime it will cause the bowl to flood.
there is also a vacuum switch on the VST vent tube that may have failed or the vacuum hose has fallen off .

why are you priming a 4 stroke motor ????, that's what the fuel pump is for, primer should only be used if you drain the system.
Thanks…. I have some experience with some engines. (Not a boat engine other than a 1970 mercury 110 9.8hp!!! :) I’ve seen some needles with a spring assist some not. Most just gravity operated. I used the primer bulb to help diagnose where the fuel was coming from. I had to pull the lower side covers to see the vent hose. Out of the water it’ll still push fuel out. If the bowl is full and the float and needle is up it should seal it. Just wondering what I’ll find or if someone has seen this before. Unfortunately the boat is at the Lakehouse so I can only prepare. Reading a bit it seems the newer 140’s you can get to the vst without pulling the manifold.
 

stresspoint

Lieutenant Junior Grade
Joined
Sep 19, 2022
Messages
1,048
Thanks…. I have some experience with some engines. (Not a boat engine other than a 1970 mercury 110 9.8hp!!! :) I’ve seen some needles with a spring assist some not. Most just gravity operated. I used the primer bulb to help diagnose where the fuel was coming from. I had to pull the lower side covers to see the vent hose. Out of the water it’ll still push fuel out. If the bowl is full and the float and needle is up it should seal it. Just wondering what I’ll find or if someone has seen this before. Unfortunately the boat is at the Lakehouse so I can only prepare. Reading a bit it seems the newer 140’s you can get to the vst without pulling the manifold.
N/S could have broken the rubber tip off , seen it on older motors where that ethanol fuel was incompatible with the rubber.
again ?? off hand i cant remember if your motor has a metal tip of rubber , pretty sure its rubber :).old age and a long time since i a had a 140 in bits.
 

robjq5i

Cadet
Joined
Oct 11, 2016
Messages
20
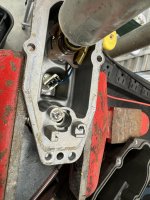
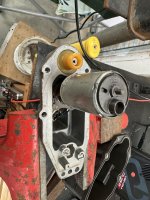
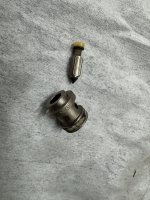
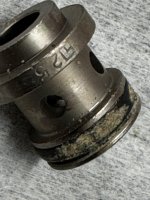
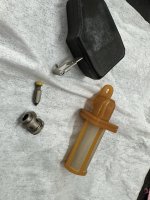
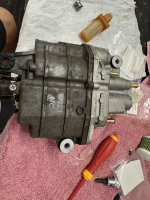
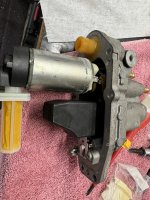
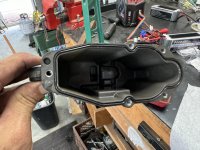
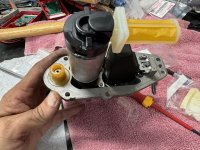
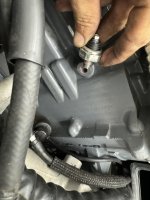
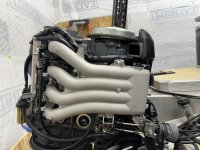
Follow up. Had some time and parts this weekend so here is the report. Nothing looked to terrible except the scaling on the o-ring of the needle seat. I replaced the seat and needle (comes as one). The internal filter wasn't bad. It was clean inside too. Had to groove the seat screw to get it out. It's aluminum and the replacement screw is coated steel. My trusty 1979 Snap-on hammer impact did the trick! I started with the "remove the intake" procedure and impacted all the bolts out and it looked like something near the valve body was holding it up. I read about removing the VST without removing the intake. I switched gears and this worked ok. Small 10mm wrench and a short ratchet wrench is handy. I didn't have the latter but made it work. remove the oil filter and the oil sending unit (grounded type NC until it sees about 4-5 psi) up top for more room. Little tilt and it'll come right out. It was overfilled with fuel when I pulled it apart. About 30 minutes to get the vst out. I didn't have that ratchet wrench so a lot was 2 fingers 60 degrees at a time, long screws. You also have to pull the top covers off.
 

Attachments

  • IMG_4770.jpeg
    IMG_4770.jpeg
    1.3 MB · Views: 3
  • IMG_4771.jpeg
    IMG_4771.jpeg
    1.1 MB · Views: 3
  • IMG_4772.jpeg
    IMG_4772.jpeg
    1.8 MB · Views: 3
  • IMG_4773.jpeg
    IMG_4773.jpeg
    560.7 KB · Views: 3
  • IMG_4774.jpeg
    IMG_4774.jpeg
    1.5 MB · Views: 3
  • IMG_4775.jpeg
    IMG_4775.jpeg
    1.6 MB · Views: 3
  • IMG_4776.jpeg
    IMG_4776.jpeg
    1.5 MB · Views: 3
  • IMG_4777.jpeg
    IMG_4777.jpeg
    882.8 KB · Views: 3
  • IMG_4778.jpeg
    IMG_4778.jpeg
    1.2 MB · Views: 3
  • IMG_4782.jpeg
    IMG_4782.jpeg
    661.3 KB · Views: 3
  • IMG_4789.jpeg
    IMG_4789.jpeg
    877.8 KB · Views: 3
Top