Changing transom wood

bsplit

Cadet
Joined
Aug 19, 2009
Messages
18
Re: Changing transom wood

Nice job!! Did you cut the splash pan and bend it to get the transom in and out? It's kind of hard to tell by the pictures.

Jim
 

JoeMan

Petty Officer 1st Class
Joined
Jun 29, 2006
Messages
322
Re: Changing transom wood

When clicking on his image, you can see he did not cut the splash well.

George, is your transom wood one piece? If so, how did you do this?
 

bsplit

Cadet
Joined
Aug 19, 2009
Messages
18
Re: Changing transom wood

George,

What did you use to bond the two pieces of plywood together?

Jim
 
Joined
Jun 18, 2010
Messages
19
Re: Changing transom wood

Since the lower part of my transom was rotted. I was able to remove it and then drop it down and remove it from the top. I did cut the splash well about 1 1/2 " on both sides this allowed me to bend the flange forward and to bend the sides slightly to pass the transom from the top. Since the lower portion of the transom does not extend to the floor I could drop it down enough to slide it in the upper channel. I used gorilla wood glue to adhere the pieces together and eposy resin to seal it. Good luck
 

JoeMan

Petty Officer 1st Class
Joined
Jun 29, 2006
Messages
322
Re: Changing transom wood

Ah, I was mistaken. Could not see the cuts in your metal. I did the same, but again, no loss since mine was in bad shape and ended up covered in new aluminum which I then painted.
 

drulon

Cadet
Joined
Oct 30, 2010
Messages
6
Re: Changing transom wood

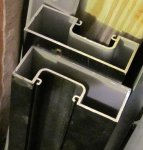
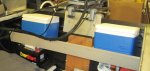
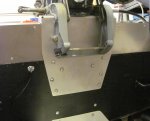
I cut the aluminum C-channel from the top, so that the sides of the C were intact, but I could slide the bad wood out the top, then slid the new wood down from the top (2 pcs of 3/4" oak planking coated in teak oil). I also converted mine from a 15" transom to a 20" by cutting the new wood longer (sticking out the slot) and used a piece of 2"x5" aluminum box channel that is normally used for storefront windows/doors to make a new crosspiece along the back of the boat. Used about 30 3/8" aluminum pop-rivets on each of the back corners of the boat tying the beam to the hull. Had a filler panel cut to provide a cover for the original stepped-down splashwell and then added a small "jackplate" that bent up and around the transom where the motor bolts on to sandwich it all together. To get my anti-cavitation plate to the right height, I made the "jackplate" about 1" higher than even with the rear corners of the boat decking. Looks a little unusual, but the boat goes 25mph now instead of 19 and still turns well without cavitation and can pull a tuber just fine.

My boat came with a rotted transom and all other wood GONE, so I've redone the floor and rigged-up a minivan rear removable seat as the main seat, we use a Cosco booster seat for my son, and a WalMart folding seat for my daughter for now. I plan to use some coolers for future seating and storage.

Hope to post and read more on this forum.

I have several of the original hardware items that I plan to sell - steering wheel, Johnson Shipmaster style ignition switch / choke bezel, may sell the shipmaster controls since my Evinrude is an "86 with OMC controls, cigarette lighter, speedo, front red/grn light, rear light w/pole, windshield hardware and more.

Darrell
1960 16 foot S169RF? (had blue duradecking, so was built in late 59, I think)
 

JoeMan

Petty Officer 1st Class
Joined
Jun 29, 2006
Messages
322
Re: Changing transom wood

Pics of the new transom work you did?

S=Sealine
16 = 16 feet
9 = 1959
RF = Fishing Runabout

That's the breakdown of your model. It's a '59.
 

drulon

Cadet
Joined
Oct 30, 2010
Messages
6
Re: Changing transom wood

Here's pics of the finished product and a pic of the cross-section of the aluminum channel that I used...
 

Attachments

  • Aluminum Channel.jpg
    Aluminum Channel.jpg
    85.8 KB · Views: 0
  • Transom front.jpg
    Transom front.jpg
    71.2 KB · Views: 0
  • Transom rear.jpg
    Transom rear.jpg
    61 KB · Views: 0
  • Transom rear closeup.jpg
    Transom rear closeup.jpg
    148.1 KB · Views: 0
Top