95 MCM 4.3LX Alpha (Alpha 1 Gen 2 Serial # 0F524631) Boat given to my wife 2 yr ago.
Prelude: This has been a great boat after solving water in the oil and cleaning the 4 BBL carb. Oh yeah, seawater impeller and exhaust flappers too. Growling noise late last season led to removal of sterndrive (upper and lower) revealing water in driveshaft bellows and rough gimbal bearing. Ungreasable U joints seem smooth and tight. Pressure testing revealed driveshaft bellows was leaking around glued joint on gimbal housing leading me to remove bell housing and drive shaft bellows. Obviously original and seriously degraded rubber and insulation will require replacement of water hose, gear lube monitor hose, and trim limit and position pucks as well as gimbal bearing and perhaps the driveshaft bellows. There is fairly significant paint loss and corrosion with pitting on upper gear case housing and gimbal housing. Lower gear case has been replaced by SEI unit due to (violent) contact with basalt according to previous owner who luckily didn't go over Willamette Falls. Transom plate looks like new.
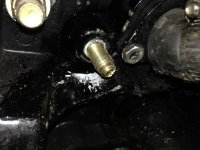
Present: Removal of gear lube hose from gimbal housing end of through transom brass fitting was difficult due to position of brass nipple practically contacting side of gimbal housing. I think that the fitting was put out of position during installation of nut on transom plate end. Brass nipple on gimbal housing side broke off while removing hose. My problem is I can't seem to get the brass gear lube monitor hose fitting out of the gimbal housing/transom plate assembly. I have tried twisting the fitting with double nutting on transom plate side then vice grips, etc. I have pushed quite forcefully on the transom plate side with a padded 4 ft steel bar as a lever to try to force the fitting out towards the stern. I can see some white powdery material between the brass fitting and the transom plate hole (see pic). I am not attaching a picture of my right wrist and hand from this process so far. I need some ideas for removing the fitting that seems now to be a part of the gimbal housing/transom plate assembly (this is a fresh water only boat). I don't see any more options from the transom plate side. Perhaps I should remove the end of the fitting on the gimbal housing side and try to drive the fitting through from that end, but I don't know if I might damage whatever seat the O-ring on that side has. Perhaps I should just forget about the gear lube monitor and seal off the fitting and hose on both gimbal housing and bell housing (this alternative is not in my nature). I am stuck. Open to suggestions. Jim. Thanks.
Prelude: This has been a great boat after solving water in the oil and cleaning the 4 BBL carb. Oh yeah, seawater impeller and exhaust flappers too. Growling noise late last season led to removal of sterndrive (upper and lower) revealing water in driveshaft bellows and rough gimbal bearing. Ungreasable U joints seem smooth and tight. Pressure testing revealed driveshaft bellows was leaking around glued joint on gimbal housing leading me to remove bell housing and drive shaft bellows. Obviously original and seriously degraded rubber and insulation will require replacement of water hose, gear lube monitor hose, and trim limit and position pucks as well as gimbal bearing and perhaps the driveshaft bellows. There is fairly significant paint loss and corrosion with pitting on upper gear case housing and gimbal housing. Lower gear case has been replaced by SEI unit due to (violent) contact with basalt according to previous owner who luckily didn't go over Willamette Falls. Transom plate looks like new.
Present: Removal of gear lube hose from gimbal housing end of through transom brass fitting was difficult due to position of brass nipple practically contacting side of gimbal housing. I think that the fitting was put out of position during installation of nut on transom plate end. Brass nipple on gimbal housing side broke off while removing hose. My problem is I can't seem to get the brass gear lube monitor hose fitting out of the gimbal housing/transom plate assembly. I have tried twisting the fitting with double nutting on transom plate side then vice grips, etc. I have pushed quite forcefully on the transom plate side with a padded 4 ft steel bar as a lever to try to force the fitting out towards the stern. I can see some white powdery material between the brass fitting and the transom plate hole (see pic). I am not attaching a picture of my right wrist and hand from this process so far. I need some ideas for removing the fitting that seems now to be a part of the gimbal housing/transom plate assembly (this is a fresh water only boat). I don't see any more options from the transom plate side. Perhaps I should remove the end of the fitting on the gimbal housing side and try to drive the fitting through from that end, but I don't know if I might damage whatever seat the O-ring on that side has. Perhaps I should just forget about the gear lube monitor and seal off the fitting and hose on both gimbal housing and bell housing (this alternative is not in my nature). I am stuck. Open to suggestions. Jim. Thanks.