Alpha one gen 1 bellows

Tjburden

Cadet
Joined
May 10, 2020
Messages
28
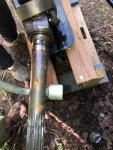
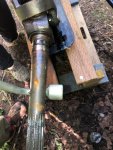
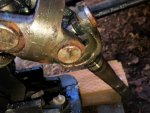
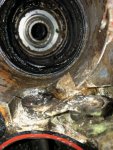
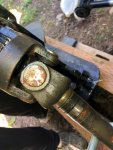
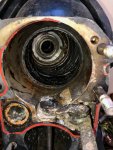
Alpha one gen 1 drive on 1987 mercruiser. Engine was dying when putting into drive and reverse. Pulled drive to replace shift cable. I was going to replace all bellows as I don’t know age of bellows. Some water in bellows and appears to be crystallized salt around shift cable. Some rust on ujoint assembly. See pics.
what are my option besides replacing bellows, shift cable and maybe gimbal bearing
 

Attachments

  • photo333265.jpg
    photo333265.jpg
    294.2 KB · Views: 0
  • photo333265.jpg
    photo333265.jpg
    294.2 KB · Views: 0
  • photo333266.jpg
    photo333266.jpg
    255.4 KB · Views: 0
  • photo333267.jpg
    photo333267.jpg
    265.7 KB · Views: 0
  • photo333268.jpg
    photo333268.jpg
    345.8 KB · Views: 0
  • photo333269.jpg
    photo333269.jpg
    326.4 KB · Views: 0

Rick Stephens

Admiral
Joined
Aug 13, 2013
Messages
6,118
Doesn't look too bad. The little rust on the drive shaft and u-joints is from not a lot of water and they wouldn't have rusted if were coated with 2-10C grease when last assembled. The deposits in the shift slide pocket are a bigger deal. Going to need to clean that all up and probably replace the lower shift cable. That water comes from either a poor gasket, the shift cable bellow is bad, or the shift shaft seal is bad. Also can happen if the water passageway o-ring isn't set right, your's looks pretty good though.

No one can tell you if the bellows are any good. You are going to have to get in there, clean everything up and inspect carefully. Any wear and hardness and might as well swap it out. Anyone on this forum is going to tell you only use OEM Mercruiser rubber parts. Don't cheap out with aftermarket. They leak, they are really hard to install and they don't last.
 

Tjburden

Cadet
Joined
May 10, 2020
Messages
28
Thank you Rick,
I was going to replace shift cable and bellows. I will get working on it over the next couple days. I have OEM parts already, but may have to order some more.

thanks again

ty
 

Rick Stephens

Admiral
Joined
Aug 13, 2013
Messages
6,118
I’d do gimbal bearing while in there. And if you are new owner, split the drive case and inspect and replace the impeller and possibly pump housing.
 

achris

More fish than mountain goat
Joined
May 19, 2004
Messages
27,468
Definitely replace the upper shift shaft seal. Looks very much like that's where the water in the slide cavity is coming from.And check the shaft itself. Also, I can't see a new style seal and carrier there either, though the camera angle isn't the greatest...

Chris......
 

Tjburden

Cadet
Joined
May 10, 2020
Messages
28
Thank you Ok I have the gimbal bearing and all the bellows with all the tools. Can a diyer do the shift shaft. Will I have to pull the gimbal housing off? Do I need to send another picture?
 

Rick Stephens

Admiral
Joined
Aug 13, 2013
Messages
6,118
Shift shaft requires pulling the arm off at the top and then pushing the shaft down. The screw that goes through the arm is locktited on, so you will need some heat. The new bushing and seal are easiest to put on by using a ;long 3/8 bolt up from the bottom, screw a nut add a washer and top it with the bushing and drive it in from the bottom. You'll get it when you get there. With everything out of the shift slide pocket it will be a lot easier to get cleaned up.
 

nola mike

Vice Admiral
Joined
Apr 22, 2009
Messages
5,371
Thank you Ok I have the gimbal bearing and all the bellows with all the tools. Can a diyer do the shift shaft. Will I have to pull the gimbal housing off? Do I need to send another picture?
It's not tough at all. Hardest part is getting the screw off that arm, but iirc the shift cable kit comes with a new arm if you end up needing to drill out the screw
 

achris

More fish than mountain goat
Joined
May 19, 2004
Messages
27,468
It's not tough at all. Hardest part is getting the screw off that arm, but iirc the shift cable kit comes with a new arm if you end up needing to drill out the screw

DON'T TRY TO DRILL OUT THE SCREW! It's stainless and the arm is ali. If you can't remove the screw with a normal screwdriver, you can either heat it and 'break' the loctite (which will damage the plastic washer under the arm ;)), or just whack the end of the arm from above and break it in half. New arm is cheap...
 

Tjburden

Cadet
Joined
May 10, 2020
Messages
28
Thank you Screw was not difficult. Just a little heat. Hard part was getting arm off. Just added some more heat at pushed down with a screwdriver between the slot. That wasn’t deforestation I tried to unscrew from the top. Haha. Felt really stupid. The shift cable was pretty bad off. Bellows are off. Water intake hose has some cracking. So will work on this. Anything else. Should I look at Trim wires? No issues on gauges.
again. Thanks for all advice.
any suggestion on what I shoul do to clean all the buildup ?
 

nola mike

Vice Admiral
Joined
Apr 22, 2009
Messages
5,371
DON'T TRY TO DRILL OUT THE SCREW! It's stainless and the arm is ali. If you can't remove the screw with a normal screwdriver, you can either heat it and 'break' the loctite (which will damage the plastic washer under the arm ;)), or just whack the end of the arm from above and break it in half. New arm is cheap...

So why not drill it? Pretty sure I've done that in the past, with subsequent destruction of the arm but no other issues.
 
Top