33 evinrude project solonoid placement

Woodstock60

Petty Officer 1st Class
Joined
Dec 14, 2008
Messages
238
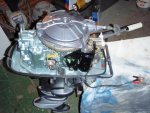
Here are some updated photos, almost complete. I only have the hood , which is a wreck, and I have to figure out where to put the solonoid and the battery wiring and where to put the starter button. The lower motor cover I had to use was off of a non-electric motor so there are no spots already in place and no openings for the wires to pass through. This is a tiller motor so I have to figure out where to conveniently locate the push button. if anyone has any thoughts on any of these questions about placement I would like to here them. Thanks Ronnie


http://i569.photobucket.com/albums/ss133/squid12121/complete1.jpg

http://i569.photobucket.com/albums/ss133/squid12121/33evinrudetop.jpg
 

tashasdaddy

Honorary Moderator Emeritus
Joined
Nov 11, 2005
Messages
51,019
Re: 33 evinrude project solonoid placement

here is the simplest take i see. red mark. drill hole for battery cables, and get grommet to protect them.

yellow just install a push button to activate starter.

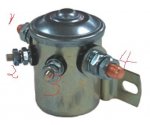
green, mount solenoid. this is the question of where it will fit.
 

tashasdaddy

Honorary Moderator Emeritus
Joined
Nov 11, 2005
Messages
51,019

Attachments

  • 18-5807.jpg
    18-5807.jpg
    14.4 KB · Views: 0

Woodstock60

Petty Officer 1st Class
Joined
Dec 14, 2008
Messages
238
Re: 33 evinrude project solonoid placement

here is the simplest take i see. red mark. drill hole for battery cables, and get grommet to protect them.

yellow just install a push button to activate starter.

green, mount solenoid. this is the question of where it will fit.

I don't see any attachments with the colored marks, Did you forget to attach or have I spent too many hours looking at a computer screen? Thanks Ronnie
 

tashasdaddy

Honorary Moderator Emeritus
Joined
Nov 11, 2005
Messages
51,019
Re: 33 evinrude project solonoid placement

sure did. clik on pic to enlarge green hard to see on starter bracket, may not fit there, but looks like a good start.
 

Attachments

  • 33evinrudetop.jpg
    33evinrudetop.jpg
    43.2 KB · Views: 1

Chris1956

Supreme Mariner
Joined
Mar 25, 2004
Messages
27,864
Re: 33 evinrude project solonoid placement

Ronnie, If you have the room for two 3/8" round holes, plus the two battery cables, you can mount a double pole double throw (DPDT) switch and a push to start button. Set the switch one pole (upper) to ground the points, and the lower pole to send +12V to the push button to energize starter solenoid. This takes the place of the stop button, and protects from trying to start the motor, when the ignition is off.

I had my '58 Fat Fifty set up this way, although I had a steering wheel and dashmounted the switches.
 

tashasdaddy

Honorary Moderator Emeritus
Joined
Nov 11, 2005
Messages
51,019
Re: 33 evinrude project solonoid placement

yes that will work as a safety to start.
 

jay_merrill

Vice Admiral
Joined
Dec 5, 2007
Messages
5,653
Re: 33 evinrude project solonoid placement

On starter equipped ERude 33hp motors, the starter solenoid is mounted in the cowl pan, just in front of the starter on the starboard side. If you look at your motor, you will see a flat area where the mounting bosses would be located, if your motor was originally equipped with a starter.

I would mount a solenoid in the same position, but would not use an OMC part. The original solenoid was mounted on its side and held in place with a semi-circular clamp, which fits around the barrel of the unit. Since your motor does not have the corresponding mounting cradle molded into the pan, this arrangement wouldn't work very well. What you can do, however, is to mount a Mercury solenoid. This part is smaller than the OMC solenoid and has a mounting base - all you have to do is to drill a couple of holes in the pan to correspond to the one in the solenoid base, and mount it with stainless bolts.
 

steelespike

Supreme Mariner
Joined
Apr 26, 2002
Messages
19,069
Re: 33 evinrude project solonoid placement

Mount the solenoid tashasdaddy showed you on the flat spot in front of the starter drill holes and attach with bolts and jam nuts.put the push button in the front face of the belly pan.Perhaps another push button as a kill switch
You could also use a regular outboard key switch to accomplish both operations and discourage hand cranking by thieves.
 

Woodstock60

Petty Officer 1st Class
Joined
Dec 14, 2008
Messages
238
Re: 33 evinrude project solonoid placement

Sorry it took me so long to reply, you guys gave lots of good Ideas to think over. You can't see it in the photos I posted but the kill switch is installed in the front where it originally was. I did alot of work to restore it from reconditioning the rubber to all new wires that had to be soldered to the orig. connections. also had to fabricate a back mounting plate because the cowl pan was from a different year 28 hp. and the kill switch opening was different. my point is I want to keep the kill switch. also the cowl pan was not from an electric start model so if I can fit the solonoid on the starter bracket I will. I like Tashasdaddy's idea of where to put the pushbutton and where to drill for battery cables, THANKS. in this scituation I won't use the DPDT switch, but thanks for the idea, will come in handy for future projects.

Anyway I haven't done any of this yet because I've been preoccupied with the cowl. besides the fact that its a complicated design ( aluminium bottom with a hinged door, several removable parts and a couple of rubber gaskets then a fiberglass top with more removable parts and several decrotive plates) the whole thig was beat up broken and filthy. just trying to remove the rusted and corroded mounts that hold the fiberglass down took me a day. The origional alluminum bottom peice was too far gone too use but I had a good one from a junk motor, but the hinged door was broken on that one. when I went to swap doors out I broke the good one trying to figure out how the hinges work ( fyi both hinges spring loaded ) so I stole the door off of the 40 horse I just picked up. I thought I would do the best job I could on the cowl because I think they either make or break the motors looks. so It will take me a week or two to finish then Ill work on the wiring and send some before and after photos.. Thanks to all for the help, I am really enjoying this work and can't wait for spring to dunk this thing and start my next project. Ronnie
 
Top