25HP powerpack was rubbing flywheel

Kplusten

Cadet
Joined
Jun 4, 2014
Messages
22
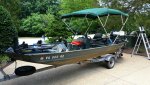
1991 E25ELEID has run perfect for past 3 years, recently lost spark 12 miles from dock out on the Potomac. 1977 Seagull 3HP and trolling motor to the rescue.
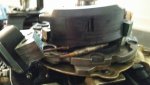
Would not jump any gap during spark test. Coil primary and secondary resistances per spec, kill switch tested good. Pulled flywheel and extensive scraping damage to outside of ignition module was evident, esp around "window". Charge coil had melted some black goo, assume it got hot from friction next to it? Some wires crimped but not shorted. Last install was far from perfect. Top powerhead bearing has no apparent play, key was intact, nut tight at 100 ft lbs. HOWEVER, ignition plate has some slight up/down wobble movement if I push on the outside edge, I doubt enough to cause the rubbing but don't know. Question #1: is some play normal or acceptable? Question #2: what else might have caused the rubbing? Can the plastic expand that much in the heat?
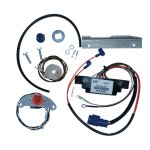
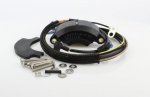
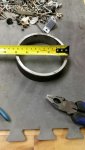
Manual says to install new ignition module using locating ring 334994. Of course I don't have one. Is it just a centering tool that you put in the screw hole? Maybe last guy should have used one?
Question #3: Can I install both parts without the tool? Nothing was loose, all screws had locking compound on threads.
Given the physical damage, I am prepared to replace both parts. I have the manual, but don't see electrical tests I can perform. Any recommendations would be appreciated.
BTW, I read this forum each morning having a coffee before sunrise and marvel at the wealth of knowledge members share!
Thanks in advance.
 

flyingscott

Fleet Admiral
Joined
Apr 8, 2014
Messages
8,014
There are 4 studs that hold the stator assembly down make sure they are in good shape. Now would be a great time to do the ignition conversion on your motor. This allows the ignition box to be mounted externally of the flywheel. The UFI ignition you have is troublesome because of the mounting location.
 

Kplusten

Cadet
Joined
Jun 4, 2014
Messages
22
Stator was mounted correctly. Will take apart entire assembly and look for play. The big bushing at the center was well lubricated and had only a very small amount of play. Given that the plate rotates only a small amount to change timing, I am surprised that this happened. Thanks for link to ignition diagram. At 72, I need all the help I can get when putting things back together. Have even resorted to taking smartphone pics of wiring before disassembly.
 

Kplusten

Cadet
Joined
Jun 4, 2014
Messages
22
Not opposed to updating ignition setup, will need help finding details. No sense having this happen again. See melted plastic and bent metal piece in trigger window.
 

Attachments

  • photo294414.jpg
    photo294414.jpg
    1.1 MB · Views: 8

F_R

Supreme Mariner
Joined
Jul 7, 2006
Messages
28,196
Look at the posts that the coil and powerpack are mounted on. See the machined edges on them? The parts are to be assembled so that they are flush with those machined surfaces. Of course if the plate or shaft are flopping around, all bets are off.
 

hardwater fisherman

Lieutenant Commander
Joined
Mar 19, 2010
Messages
1,725
I believe this is the ignition conversion kit you need. CDI electronics 113-4489. Also the second photo is a kit made by BRP that is supposed to eliminate wire abrasion and damage to ignition module. Part number 0584489. Both kits require the locating tool.
 

Attachments

  • photo294420.jpg
    photo294420.jpg
    82.9 KB · Views: 2
  • photo294424.jpg
    photo294424.jpg
    27.1 KB · Views: 2

Kplusten

Cadet
Joined
Jun 4, 2014
Messages
22
F R Yes, I see the four machined mounting posts and understand that the three electronic components need to be lined up flush with their outer edge. I note that one post has a horizontal scrape on it. I decided to buy the alignment tool which is nothing more than a big ring ($58 yikes) that makes it easier to keep all 3 parts inside the desired circumference and tighten down the screws all at once without movement. When it says "tool required" I figure they know more than me.
Hardwater fisherman, thanks for the steer on the part numbers. The CDI kit scared me despite Flying Scott's advice, so went with the improved BRP part 0584489 which was not easy to find. Most sites had the original powerpack number 0584331.
Grandkids will enjoy fishing on the Chicahominy river in VA when they come for Grampy Camp. Confident I'll have it running by then thanks to the help of forum members and will let you know the outcome...of the motor repair and the fishing!
 

Kplusten

Cadet
Joined
Jun 4, 2014
Messages
22
Success after repair. Replaced charge coil and powerpack (stator was okay) under flywheel. Centering tool which alone cost $58 was integral to getting 3 components located correctly. Routing wire harness was not easy but "got 'er done" with some help from friend. Link and sync was okay, decided to check timing using Joe Reeves method of using starter to spin motor and subtract 4 degrees from spec at WOT. Ended up retarding it 3 degrees. Now runs better than ever at all rpms. May have lost 200 rpm at top end, but probably much better for longevity of 1991 E25ELEID. Started first try after install and ran out to 27 mph which is plenty fast for porpoising jon boat. Thanks to forum members for advice on parts and install. Gave me the confidence to complete repair myself. The Green Beaver is at home on Aquia Creek in Stafford, VA and killing the bass.
 

Attachments

  • photo295936.jpg
    photo295936.jpg
    1 MB · Views: 2

w2much

Lieutenant
Joined
Jun 22, 2005
Messages
1,276
Glad you got it worked out. Feels good doesnt it? I am curious , did you hear any scraping or rubbing sounds before hand ? Would you purchase the centering tool .again or forego it because of your new found knowledge ?
 

Kplusten

Cadet
Joined
Jun 4, 2014
Messages
22
Son took boat out on final outing, said he did not hear scraping. But...four guys returning from restaurant on river probably didn't even hear each other. W2much, YES, I would use the centering tool again. Main reason is because the "trigger window" on powerpack sticks out about 1/16" beyond its plastic housing. If you just align the machined parts at bottom on ignition plate, you may risk getting powerpack too close to flywheel? Procedure is to place the large ring over 4 machines supports, push it toward center (did not move, tight fit in my case), then pull each component toward it and tighten screws. Would have been tough to get alignment exactly right without it and tighten all 5 screws simultaneously with thread lock on them. The ring did fit over 4 posts very snug, which is good, but was able to move components out against it some.
Still not exactly sure why damage happened, no play in top crankshaft bearing, but I must have moved the ignition plate or "bearing" some during recent reinstall of starter bracket of all things. Had to remove bracket to attach new starter, small bushings at top of throttle arm tricky to reinstall next to bolt. Ignition plate sits on a big plastic "bearing" that fits onto outside edge of a fixed plate attached to the crankcase. Things don't happen for no reason, so I point to myself.
 

Attachments

  • photo295986.jpg
    photo295986.jpg
    881.5 KB · Views: 2
Top