21' Holiday Rebuild

benfish909

Petty Officer 2nd Class
Joined
Jan 4, 2021
Messages
122
Hi everyone,
I am in the process of doing a rebuild on my 21' Holiday. Paperwork say 1969 but I think it looks like a 1972. The plan is to replace transom, floor, side panels, and all new wiring. Everything has been pulled out and hull has been pressure washed. Found a couple rivets to replace then gluvit for a little insurance. Hand to pull the stringers because they were screwed in with galvanized self-tappers. The floor was 2 layers of treated 3/4'' which will be replace with 1 layer of epoxied 3/4" non-treated.

My current question is when re-riveting the strings to the ribs, should you add a bit of silicone or some type of rubberized tape to help with vibration? or would this make it worse.
IMG_2606.jpgtempImagezWk7sa.jpgtempImageo8LmHt.jpgtempImagerwzrHQ.jpgtempImageHuVnu8.jpgtempImageTFuihY.jpg
The bottom layer on the bow appeared to be original
tempImageODUogF.jpg
Rough cut on the transom, it has been shaped and ready to fit but didn't get a pic.
tempImageY1A9mK.jpg

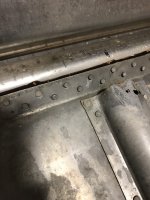
All clean and ready for rivet replacement
 

Watermann

Starmada Splash of the Year 2014
Joined
Jan 12, 2013
Messages
13,775
Welcome aboard, haven't seen too many 21' OB Hollys come by here, very nice! (y)

So the 60's models Hollys have the bow hatch while the 70's have the split windshield with steps.

Those deck support stringers don't need anything between them and ribs, less is more with AL boats especially under the deck when it comes to goopy stuff and such. ;) I don't get the double decking being 3/4" times 2, the original decking was 1/2" so someone removed the half, put down 3/4 and then decked over that afterward... oh man! :unsure:

Make sure you closely inspect the rib ends for cracks and think about braces for the side spray rail chine especially if the boat was used for years with bad decking and side panels.
 

benfish909

Petty Officer 2nd Class
Joined
Jan 4, 2021
Messages
122
Thanks Watermann, It was definitely a very poor job at overkill. I should be able to shed a good amount of weight with having the correct floor.

I am planning on riveting angle aluminum along the top of the ribs then tying into the gunwale supports and adding additional support that ties into the new angle AL and the shelf on the gunwale. Then the new side panels tie into it all. I will also add some 2" flat AL from one end of the rib to other and tie it into the stringer deck supports.

The floor would sit in the angle AL along the sides. The ribs and chines are in surprisingly good shape. No cracks and very minimal corrosion that I can see.

I hope this makes sense.
 

classiccat

"Captain" + Starmada Splash Of The Year 2020
Joined
Dec 20, 2010
Messages
3,411
Welcome to the mob!

Dues are paid in full with those great pics! (y) (y)(y)šŸ¤£

i'm surprised that you didn't have any corrosion with treated ply in there.

I had to perform quite a bit of outer chine reinforcement if you need a reference. It helps to have a bending brake (HF or DYI), then you can match the angles, fab custom supports, etc.
 

benfish909

Petty Officer 2nd Class
Joined
Jan 4, 2021
Messages
122
Welcome to the mob!

Dues are paid in full with those great pics! (y) (y)(y)šŸ¤£

i'm surprised that you didn't have any corrosion with treated ply in there.

I had to perform quite a bit of outer chine reinforcement if you need a reference. It helps to have a bending brake (HF or DYI), then you can match the angles, fab custom supports, etc.
Thanks, I have been digging through here for awhile and did see your posts about the brake.

I thought there would be a ton of corrosion as well. There is a good deal of pitting on the outside of the transom but I am going to add a 1/4" AL plate and 5200 to cover and reinforce. This is not a full restoration, rather just want to make it safe, functional and look decent but not show room ready.

With adding bracing, should I use solid rivets when possible vs just pop rivets. I have both
 

classiccat

"Captain" + Starmada Splash Of The Year 2020
Joined
Dec 20, 2010
Messages
3,411
Thanks, I have been digging through here for awhile and did see your posts about the brake.

I thought there would be a ton of corrosion as well. There is a good deal of pitting on the outside of the transom but I am going to add a 1/4" AL plate and 5200 to cover and reinforce. This is not a full restoration, rather just want to make it safe, functional and look decent but not show room ready.

With adding bracing, should I use solid rivets when possible vs just pop rivets. I have both

Solids if you have access to both sides.

Wide flange blind rivets if you have no rivet-head &/or buck-tail clearance issues.

I noticed that you have the infamous splashwell cracks. look closely at your kneebrace to see if the tabs are still in 1 piece.

1610044977510.png
 

classiccat

"Captain" + Starmada Splash Of The Year 2020
Joined
Dec 20, 2010
Messages
3,411
also, i see that outer chine bending down here so it's good you're thinking about reinforcement. double/triple check those outer rivets for stress cracks...maybe even a leak test.

1610045118853.png
 

benfish909

Petty Officer 2nd Class
Joined
Jan 4, 2021
Messages
122
also, i see that outer chine bending down here so it's good you're thinking about reinforcement. double/triple check those outer rivets for stress cracks...maybe even a leak test.

View attachment 331464
Yeah the SW cracks have been bugging me but not sure how to repair. I thought about adding a 4" wide 1/8" thick bar stock across the entire width of the SW on the under side and solid rivet but wasn't sure it that would be sufficient or if I need to find some one to weld it up.

The knee brace has some large angle AL on either side that was added at some point.

As for the leak test, should I just fill it like a bath tub to just above the chines?I didn't notice any stress cracks or anything but will definitely take a closer look
 

classiccat

"Captain" + Starmada Splash Of The Year 2020
Joined
Dec 20, 2010
Messages
3,411
Yeah the SW cracks have been bugging me but not sure how to repair. I thought about adding a 4" wide 1/8" thick bar stock across the entire width of the SW on the under side and solid rivet but wasn't sure it that would be sufficient or if I need to find some one to weld it up.

The knee brace has some large angle AL on either side that was added at some point.

As for the leak test, should I just fill it like a bath tub to just above the chines?I didn't notice any stress cracks or anything but will definitely take a closer look
i had that same kind of bending and a bunch of my rib ends were cracked.
1610051948471.png

1610052003956.png

yeah a floppy transom is the cause of the busted kneebrace and cracked SW. basically the SW becomes the kneebrace.

Once you replace your transom, and they already addressed the cracked kneebrace, the SW repair is mostly cosmetic but it won't hurt to beef it back up. I riveted some 0.090" 6061 over the cracks.

Regarding leak testing, most of us fill it up with a minimal amount of water b/c of the weight...and use the trailer to transfer the water to different parts of the hull. it would be even better if you can tow it to a ramp.
 

benfish909

Petty Officer 2nd Class
Joined
Jan 4, 2021
Messages
122
i had that same kind of bending and a bunch of my rib ends were cracked.
View attachment 331471

View attachment 331472

yeah a floppy transom is the cause of the busted kneebrace and cracked SW. basically the SW becomes the kneebrace.

Once you replace your transom, and they already addressed the cracked kneebrace, the SW repair is mostly cosmetic but it won't hurt to beef it back up. I riveted some 0.090" 6061 over the cracks.

Regarding leak testing, most of us fill it up with a minimal amount of water b/c of the weight...and use the trailer to transfer the water to different parts of the hull. it would be even better if you can tow it to a ramp.
I dug through a ton of your build and not to keen on doing that much bracing. you did an amazing job but it looks very difficult and scary to drill that many holes in my hull. I have minimal experience with AL, good amount with steel. my ribs appear to be in good shape. would it work to do one of the options below that I stole from your post

1610054524668.png
1610054561859.png
 

classiccat

"Captain" + Starmada Splash Of The Year 2020
Joined
Dec 20, 2010
Messages
3,411
I dug through a ton of your build and not to keen on doing that much bracing. you did an amazing job but it looks very difficult and scary to drill that many holes in my hull. I have minimal experience with AL, good amount with steel. my ribs appear to be in good shape. would it work to do one of the options below that I stole from your post

View attachment 331473
View attachment 331474
Thanks! I was new to aluminum as well but didn't have much of a choice since my hull was already swiss cheese šŸ˜¬ .

that top image is the original setup...i'm just illustrating the weak points of their engineered design.

I absolutely recommend adding those vertical risers (1) riveted to the shelf & hull (all above the waterline) with the reinforcements (2) riveted to the risers. I then pop-riveted the reinforcements to the rib ends when securing the deck.
1610055922887.png

If i were to go back in time, i'd smack myself for disturbing those seam rivets. šŸ¤£
 

benfish909

Petty Officer 2nd Class
Joined
Jan 4, 2021
Messages
122
Thanks! I was new to aluminum as well but didn't have much of a choice since my hull was already swiss cheese šŸ˜¬ .

that top image is the original setup...i'm just illustrating the weak points of their engineered design.

I absolutely recommend adding those vertical risers (1) riveted to the shelf & hull (all above the waterline) with the reinforcements (2) riveted to the risers. I then pop-riveted the reinforcements to the rib ends when securing the deck.
View attachment 331475

If i were to go back in time, i'd smack myself for disturbing those seam rivets. šŸ¤£
Thank you. I really like the bracing you did in the bottom left of that picture but I think I am going to go with the options you just mentioned
 

benfish909

Petty Officer 2nd Class
Joined
Jan 4, 2021
Messages
122
Practicing some solid riveting on my stingers first 1/8ā€ x2ā€ flat bar on the bottom 1/8ā€ angle on the top. I do have some crack on the starboard side. So I think I will end up doing some through hull rivets.
But on the bright side, my stepdad had a riveter and aluminum rivets at the warehouse DD4A5711-9C26-43EB-8DA9-88B3FA3716C3.jpeg7F17E06A-F52B-43D3-B10E-A2E184FB6615.jpeg04A5E22C-619C-4A6A-9A72-346E620637F0.jpeg
 

Attachments

  • D0822708-56CF-4993-9FE4-391624E02F91.jpeg
    D0822708-56CF-4993-9FE4-391624E02F91.jpeg
    1.4 MB · Views: 5

benfish909

Petty Officer 2nd Class
Joined
Jan 4, 2021
Messages
122
What if I did something like this. Red dots = rivets. Solid in the side and pop in the rib. This way I donā€™t have to trust my poor riveting skills under the water line1264D197-D5A5-4187-8E20-96BB4982159E.jpeg6B70A3E6-2EA1-4F93-8A7F-BD12EC5C77A3.jpeg
 

Moserkr

Chief Officer + Starmada Splash Of The Year 2021
Joined
Nov 23, 2020
Messages
869
Welcome! Boat looks like its in really good shape! Also in the process of rebuilding mine so will watch n learn from what you do. Im a few steps behind and my boats not that nice looking haha. I thought about adding bracing like that from ribs to hull, but angles get a bit weird especially when adding wood back along the sides. @classiccat ā€™s examples never rivet below the waterline. Ill be stealing his plans as well for my little 16ā€™er, just to a lesser extent though. Looking forward to what you decide to do!
 

classiccat

"Captain" + Starmada Splash Of The Year 2020
Joined
Dec 20, 2010
Messages
3,411
I'm not surprised you have the cracking. Now that's a riveting hammer! make sure she's oiled. You should also treat yourself to need a set of clecos since you'll be doing alot of patches.

Here's how @Watermann and I implemented external patches. You should also drill a small crackstop at the end of each crack so they stop propagating. At 21', you'll probably have more patches than Agua and I combined! šŸ˜
1610108817911.png

The bracing you're showing is better than nothing. At that angle and rivet spacing, that 1/8" stock is going to want to buckle inwards; that's one of the reasons why I fabricated those risers so that the force vectors pointing "out" from the braces are minimized. The risers also tie-in the shelf creating a box truss support. You'll also have fresh deck & side-panel wood supporting so just be sure to get a solid connection to both the deck & shelf metal.
 

benfish909

Petty Officer 2nd Class
Joined
Jan 4, 2021
Messages
122
Yeah I think clecos are in order and going to go with waterman and your design plans. My wife said to spend what I need as long as I donā€™t bring another boat home so might as well turn this thing into a battle ship. I think with enough practice and 5200 I should be able to make some water tight fixes
 

benfish909

Petty Officer 2nd Class
Joined
Jan 4, 2021
Messages
122
I have an Eastwood supply locally and they have Clecos and rivets in stock. Will try to make a trip out there today
 

benfish909

Petty Officer 2nd Class
Joined
Jan 4, 2021
Messages
122
So starting on the hull supports and there will be about 7 of them that need to have two bends like in the picture. I know itā€™s not ideal but will it be ok? The other should just have one bend but this area of the hull is bent the most 72411597-2472-466B-A9EE-526D269B9C6F.jpeg
 

benfish909

Petty Officer 2nd Class
Joined
Jan 4, 2021
Messages
122
Can I rivet through the sides with them painted. Wasnā€™t planing on repainting this time. Maybe next year
 
Top