1988 Mercury 70hp Rebuild, finally got my Block Back!

huntxtrm

Petty Officer 1st Class
Joined
Oct 10, 2007
Messages
253
Ok, I finally got my block back from the shop, bored out .015. New pistons and parts. Dang near all of them, and dang near all of my money out of my wallet! LOL. I ready to start rebuilding......Gonna need some pointers, never rebuilt an out board before. First question: Any suggestions on gasket sealer? Book says locktite master gasket. Book is old, sealants have come a long way since then. Any suggestions would be appreciated. Also any other block/crank/rod prep suggestions would be appreciated as well. I am going by the book, but I know you veterans have some tricks up your sleeve. I'll try and take as many pics as I can during the process, if anyone is interested.
 

huntxtrm

Petty Officer 1st Class
Joined
Oct 10, 2007
Messages
253
Oh, and what is the difference between crocus cloth and 320 emory cloth? always thought they where the same?
 

huntxtrm

Petty Officer 1st Class
Joined
Oct 10, 2007
Messages
253
I figured out the difference! Man that stuff is hard to find! Is it necessary? I guess i'll order some.
 

emckelvy

Commander
Joined
Jan 16, 2004
Messages
2,506
"Master Gasket" is just Loctite/Permatex 518 with a can of spray primer. The primer cleans & enhances the anaerobic sealer's bond. But is not absolutely necessary. You can pick up a tube of 518 on ebay, Amazon, or places like NAPA. You'll need to scrupulously clean/degrease the block & intake cover flanges.

If you're somewhere kinda cold (not so likely this time of year unless you're around the Great Lakes!), the primer will help with curing time. But I've done lots of crankcase halves with just the 518 and it does a great job by itself of sealing.

BTW it's the same type of product that BRP (Bombardier Recreational Products, formerly OMC, Outboard Marine Corp) calls "Gel-Seal".

Here's some at Amazon:

http://www.amazon.com/Permatex-51813-Anaerobic-Gasket-Maker/dp/B0002UEONM

BTW, the old manuals say to polish the crank journals with coarser paper (I think 320 is correct), and the rods with crocus cloth. Use a little Marvel Mystery Oil for lube while you're polishing. WD would work as well, but Marvel smells better and is cheaper for a big bottle of the stuff.

Both Mercury and BRP sell a tube of "needle bearing lube" or you can use Vaseline for loose bearings (works fine with caged bearings, as well).
I find the mfr's stuff doesn't melt so easily and holds the bearings better as you install.

Be very careful with installation of rods on the pistons. Don't pound the wrist pins in; heat up the piston with a torch and the wristpin should slide right in. If the piston is stamped with a "loose" or "tight" wristpin hole designator, start the wristpin in the "loose" hole and continue to the "tight" hole until the wristpin is seated against the previously-installed wristpin clip.

If you have to tap the wristpin in, don't beat on it. Make a cradle out of wood that has the same curvature as the piston; rest the "tight" side on the cradle, heat the piston with a torch and tap the wristpin in with a plastic or similar mallet. The cradle ensures you don't distort the piston as you're installing the wrist pin.

Use a drop of Loctite Red on each rod bolt. BTW, if your rod bolts screw directly into the rods, you MUST replace them. They are stretch-type and are used only once. Otherwise you risk the chance of your newly-rebuilt motor and all its $$$ parts flying to bits! Torque rod bolts to the specs in your manual. Probably 180 inch-lb but if your manual says other, do it. If you don't have a torque wrench, pick up one on sale at Sears. The small ones aren't too expensive.

Be sure to wash the cylinder bores with a scrub brush, in hot water and detergent. This gets all the abrasive from the boring/honing operation of of the cross-hatches in the cylinders. I find that a toilet bowl scrubber does a good job and is cheap. Scrub, Scrub, Scrub, until a cloth sprayed with WD-40 comes out clean when the cylinders are wiped-down. If there's any black residue on the cloth, keep scrubbing! Immediately after you rinse the block, spray or wipe down the cylinders with WD to keep them from rusting.

I like to use Permatex #3 gasket dressing on the exhaust manifold bolts, and also on the water jacket cover bolts (the cover over the back of the block). The layer of Permatex keeps out salt and other corrosion products, and keeps the bolts from seizing in the bolt holes.

Well, those are just a few fine points! There should be lots of Good Words in your tech manual.

HTH...........ed
 

huntxtrm

Petty Officer 1st Class
Joined
Oct 10, 2007
Messages
253
Thanks! That's good info! It took some time to type that up... I appreciated it. I really do. My new rod bolts say on the package "Do not turn 90deg" So I'm assuming where the book says torque, then go another 90 degrees, don't do it? Correct?
 

emckelvy

Commander
Joined
Jan 16, 2004
Messages
2,506
Maybe the new ones aren't torque-to-yield rod bolts. You might want to talk to the dlr and see if there's a Merc Tech Bulletin or something like that. Does your book give the rod bolt torque spec as 180 inch-lb, then? That's the torque used for years and years, and unless there's something radically different about the rod design on the later "Big Bore" inlines, I wouldn't be surprised that spec carries on.

In any case, the rod's bolt threads and the rod bolt should be free of oil and that drop of Loctite Red used. I've never lost a rod bolt with that technique, although have seen a few that weren't done right. Not a pretty sight!
 

emckelvy

Commander
Joined
Jan 16, 2004
Messages
2,506
OK, if your engine has 5/16" or 3/8" rod bolts it will have a higher torque spec than the older ones. But you still need to figure out why your bolts have the "no 90 degrees turn) instructions. I've noted that some bolts sold by Merc have a 30 ft-lb spec and some have the 30 ft-lb torque spec plus the 90 deg turn.

The caveat that came with your new rod bolts may just be a way of making sure you distinguish between those and the ones that do require a 90 deg turn after torquing, 'cause there's little difference between the bolts when you look at 'em. I can see that it'd be very easy to confuse the 2 different types.

And it may be just that; but better to know why before making an expensive mistake......ed

Edit: Here's a non-torque-to-yield bolt spec'd for the L3 engine: http://parts.promarineusa.com/productdetail/M50/1/1/RB9000

And here's a torque-to-yield bolt, also spec'd for the L3: http://parts.promarineusa.com/productdetail/M50/1/1/RB9000-1

Many mfr's have upgraded head bolts, etc to torque-to-yield because the clamping force on the part is typically more accurate with that kind of bolt. The metal in the bolt is designed to stretch a certain amount, such that it becomes permanently deformed, with a more consistent clamping force on the assembly line.

Lots of boat racers prefer the "old style" bolt, which theoretically could be re-used. Although I'm not sure how many racers re-use their rod bolts in a rebuild! But they're also easier to just torque-up and not worry about the extra 90 degrees.

So, I'd expect that your "non-stretch" bolts, torqued to mfr's specs, with a drop of Loctite Red, will keep the internals from flying apart quite nicely.

See how much we've learned??! ;)

I'd still like to see a factory dissertation on their use of torque-to-yield, if there's one out there.

Cheers.........ed
 
Last edited:

Faztbullet

Supreme Mariner
Joined
Mar 2, 2008
Messages
15,902
Use a drop of Loctite Red on each rod bolt.
Never use anything but a few drops of oil on bolts and torque to yield in 3 steps(10/20/30). You will never see in a Merc manual to use anything but oil on bolts....
 

emckelvy

Commander
Joined
Jan 16, 2004
Messages
2,506
Never use anything but a few drops of oil on bolts and torque to yield in 3 steps(10/20/30). You will never see in a Merc manual to use anything but oil on bolts....

To each his own, I've been using Red Loctite on rod bolts for over 35 years without a failure. Racers use the stuff as well.

We'll just have to agree to disagree!
 

huntxtrm

Petty Officer 1st Class
Joined
Oct 10, 2007
Messages
253
OK, if your engine has 5/16" or 3/8" rod bolts it will have a higher torque spec than the older ones. But you still need to figure out why your bolts have the "no 90 degrees turn) instructions. I've noted that some bolts sold by Merc have a 30 ft-lb spec and some have the 30 ft-lb torque spec plus the 90 deg turn.

The caveat that came with your new rod bolts may just be a way of making sure you distinguish between those and the ones that do require a 90 deg turn after torquing, 'cause there's little difference between the bolts when you look at 'em. I can see that it'd be very easy to confuse the 2 different types.

And it may be just that; but better to know why before making an expensive mistake......ed

Edit: Here's a non-torque-to-yield bolt spec'd for the L3 engine: http://parts.promarineusa.com/productdetail/M50/1/1/RB9000

And here's a torque-to-yield bolt, also spec'd for the L3: http://parts.promarineusa.com/productdetail/M50/1/1/RB9000-1

Many mfr's have upgraded head bolts, etc to torque-to-yield because the clamping force on the part is typically more accurate with that kind of bolt. The metal in the bolt is designed to stretch a certain amount, such that it becomes permanently deformed, with a more consistent clamping force on the assembly line.

Lots of boat racers prefer the "old style" bolt, which theoretically could be re-used. Although I'm not sure how many racers re-use their rod bolts in a rebuild! But they're also easier to just torque-up and not worry about the extra 90 degrees.

So, I'd expect that your "non-stretch" bolts, torqued to mfr's specs, with a drop of Loctite Red, will keep the internals from flying apart quite nicely.

See how much we've learned??! ;)

I'd still like to see a factory dissertation on their use of torque-to-yield, if there's one out there.

Cheers.........ed

Mine are the RB9000. Not the RB9000-1.
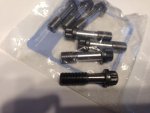
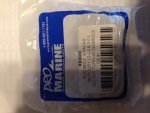
But they do look a little different than my originals? The threads are shorter? Will they still work with my treaded rodcaps?
 

huntxtrm

Petty Officer 1st Class
Joined
Oct 10, 2007
Messages
253
No Title
 

Attachments

  • photo223321.jpg
    photo223321.jpg
    54.2 KB · Views: 0
  • photo223322.jpg
    photo223322.jpg
    53 KB · Views: 0

emckelvy

Commander
Joined
Jan 16, 2004
Messages
2,506
Well, since these are aftermarket replacement bolts, you'd have to rely on their engineering to have confidence that they make a satisfactory product. You could send them a query asking about the thread length.

The original bolts are 'stretch' type and the longer threads are probably part of the 'stretch' design, since only the unthreaded part of the bolt is gonna stretch. I'm guessing that when Pro Marine came out with their own rendition of the Merc 'stretch' bolt, they did all the correct calculations for their bolt with shorter threads to stretch the proper amount as well.

Seems to me that there's plenty of threads in those Pro bolts to hold 30 ft-lbs of torque, but you might feel better hearing from them.

If you're not comfortable using Loctite, don't. It won't fly apart if you're assembling it correctly.

Be sure to put a drop of oil on the flange of each rod bolt, and if you don't use Loctite, on the threads as well. Forgot to mention that.

The torque specs are assuming a lubricated bolt, verses a dry one. Will definitely make a difference.

BTW, I just found an interesting thread (no pun intended!) at Screamandfly.com about rod bolt testing. Seems the Pro Marine bolts were stronger than OEM. SPS bolts were Very Very strong! And I imagine you'll pay for that quality as well.

It's a good read if you're interested: http://www.screamandfly.com/showthread.php?12478-SPS-Rod-Bolts

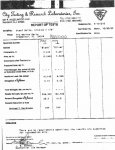
I've attached some test documentation of Pro Marine vs. Merc rod bolts, it's pretty confidence-inspiring!

HTH................ed


Pro Marine rod bolt test.jpg
 
Top