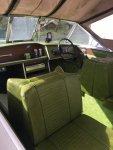
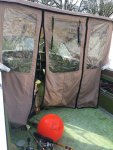
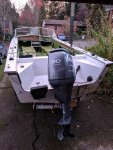
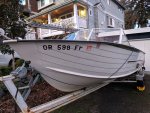
1972 Starcraft Holiday 21'

bchaney

Petty Officer 1st Class
Joined
Jul 3, 2018
Messages
246
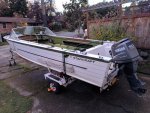
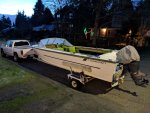
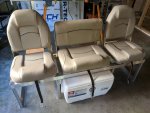
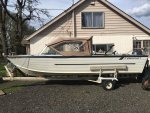
Hey guys, I just got me an old 1972 Holiday (pics below) and the previous owner removed the bench seat because it was damaged, but I really need more seating so I'd like to put a new one in.

For those of you who have seen the original starcraft bench in one of the 21/22 footers - how is it installed or how does it work? I still want to be able to access the battery and fuel tank under the splash well but I'm not sure how to mount a bench to allow that but also have enough support to hold the weight of 3-4 people.

Looking at the seats linked below because they're on sale, tho the inside width of the boat is 65-7/8. Think those 3.5" gaps on each side of the bench would look funny?

https://www.bassboatseats.com/products/58-fold-down-bench-seats?variant=25332033545
4C802A5B-.jpgCC6E51A5-.jpg6B4FC8B5-.jpg
 

Attachments

  • Screenshot_20181024-183231.jpg
    Screenshot_20181024-183231.jpg
    610.1 KB · Views: 22
  • Screenshot_20181024-183334.jpg
    Screenshot_20181024-183334.jpg
    609.2 KB · Views: 23
  • Screenshot_20181024-183348.jpg
    Screenshot_20181024-183348.jpg
    664.7 KB · Views: 27

Watermann

Starmada Splash of the Year 2014
Joined
Jan 12, 2013
Messages
13,786
No the gaps would look fine if even, doubt anyone would ever notice.
 

bchaney

Petty Officer 1st Class
Joined
Jul 3, 2018
Messages
246
Thanks for the response. I ended up ordering the seats, adding up the individual widths of the 3 sections totals 58" so I'll have about 6-7" of clearance. I'll mess with the layout and see what looks best. If anyone else is interested in seats from that site I found coupon code BBS10 for 10% off.

I have been brainstorming on how to create a platform for them to sit on, still not sure how I'm gonna do it. Ideally they would fold down so that the seat platform becomes vertical but I'm not sure how to do that yet. I believe that this is how the stock bench seat works but have not been able to confirm. If I can't figure out how to get them to fold down I could always create a frame out of wood or aluminum and then have a top plywood platform that hinges forward for storage under the seats

The weather was decent here on Sunday so I cleaned her up a bit. Just an exterior wash and an interior wipedown before storing for winter. I'll probably give her a more thorough cleaning in the Spring. I also ordered supplies to do some maintenance and winterize the outboard. Engine oil, crank oil, fuel stabilizer, etc. Will do plugs and impeller in the Spring. Motor only has 53 hours on it but not sure when these things were last done.

Here are some pics of her sitting in my driveway after cleanup for anyone interested.

IMG_20181111_164257.jpg
 

Attachments

  • IMG_20181111_164510.jpg
    IMG_20181111_164510.jpg
    1.1 MB · Views: 17
  • IMG_20181111_164442.jpg
    IMG_20181111_164442.jpg
    1.1 MB · Views: 17

Watermann

Starmada Splash of the Year 2014
Joined
Jan 12, 2013
Messages
13,786
There sure is a ton of room in those 21'rs. Yeah adding a seat box for storage is the way to go
 

bchaney

Petty Officer 1st Class
Joined
Jul 3, 2018
Messages
246
I received the seats, they look pretty nice. I laid them out and I think they'll look OK with some 1-2" gaps between them and 3ish inches of clearance on the sides. I figure that extra clearance on the sides would be good so that people aren't cramped by the gunwales.

I started making a plan for the box structure - I think I'm going to construct it out of 80/20 aluminum extrusions and CDX plywood panels that I will somehow coat/seal. I've never worked with 80/20 but this stuff seems pretty cool and versatile so I have a lot of options for maximizing the usefulness of the space under the seats. My plan is to divide the space into 3 sections - 1 section under each seat. I'm planning to have a door on the front face of a section under one of the side seats that hides a 48qt igloo marine cooler that can be slid out for access to the goodies it contains or to be used as an extra seat or a step into the boat from a dock so people don't have to step on the new seats. The other 2 sections will have hinged lids for access to storage compartments below. I started ordering some parts but haven't quite pieced everything together yet.

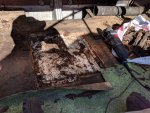
I noticed a bit of rot under the splashwell where the gas tank mounts to the floor. I will probably try to patch this area before I install the new seats since it will be harder to access afterwords. I also want to add a bilge pump and horn as well as wire up the nav lights that aren't currently working. I found out that my trailer VIN matches an existing trailer in the WA system (old 6 digit VINs sometimes have this issue, according to the DMV) so I need to take the trailer to State Patrol to get a new VIN assigned before I can transfer the title and get a plate. Of course I can't easily take the trailer without the boat, and they're only open M-Th 8-4.

The family ended up going out on the boat Saturday for a rip around Lake Washington before I winterized the motor on Sunday. We're planning on using the boat primarily on this lake since we have a launch 3mi from the house so it was cool to get a taste, though it will be hard to wait for nice weather to return. At least it gives me some time to work on the boat before next season.
 

Watermann

Starmada Splash of the Year 2014
Joined
Jan 12, 2013
Messages
13,786
Be aware that running your boat with rotten decking and or side panels, especially your 72 that does not have the rib end hull braces. The risks you run are rib end cracks and the most severe case can be the side splitting out along that side spray rail chine. I can provide many pics of these issues that others have found and repaired.
 

bchaney

Petty Officer 1st Class
Joined
Jul 3, 2018
Messages
246
Thanks for the heads-up Rob. I read about that issue before I bought the boat but forgot about it. It's disappointing that my 72 didn't get these braces from the factory. That said, the majority of the decking is solid, I have not found any soft spots in areas where passengers step/stand. I have not yet peeled back the vinyl to look at the extent of the rot, but it seems to be only under the bracket that is supposed to secure one end of the gas tank to the floor. I noticed the tank was a bit loose due to the wood under the screws of this bracket being soft/rotted. I will definitely get this fixed before the season. How does a rotted deck affect the rib ends - Is it just the extra weight of the wet wood that contributes to the cracking? Or is it that the rotten deck flexes and makes contact with the ribs when people stand on it?
 

Watermann

Starmada Splash of the Year 2014
Joined
Jan 12, 2013
Messages
13,786
The hull will flex more than it should while in use due to waves if the wood is compromised by rot having lost rigidity and loose rivets that secure the deck to the rib ends. The hull flexes at the rib ends until the bottom of the hull cracks out from the rivet holes. The side panels that attach also add rigidity to the hull as they attach to the deck and side of the hull. Everything ties together and keeps the boat sound only if the wood remains solid.
 

bchaney

Petty Officer 1st Class
Joined
Jul 3, 2018
Messages
246
Well I priced out the 8020 aluminum extrusions and hardware for a seat bench frame and it's over $400. Anyone successfully built a frame of of aluminum angle? How did you attach it together? What type of wood could be used for a frame? I know pressure treated is a no-no in an aluminum boat but I wouldn't want it to rot.
 

Watermann

Starmada Splash of the Year 2014
Joined
Jan 12, 2013
Messages
13,786
I used 6061 T6 1/8" angle and 1" square tubing to build my rear casting deck frame, it was very inexpensive. Anywhere I could I used solid rivets to attach everything and used blinds only if the frame was supporting itself not having the blind be what's holding weight.

y4m6s1nz7wX8ZSnFumRDikCg4cXgHv5fsaaDCqx0WQ6g50K73YfmmXLNeyeMHoAutkyPWraAst7Z3thzqQGi_lXzsQrX9YE0avN0O4afPJ4nfQdOEjThf8uMHTJoxjXB0Q_ntP0j0hQzf4TiBkgoRM6_uMZFx5R8D0tdIEl0XXp_nSo_WTWP-LOhwsQyzUHIZxad3cawS-twOMFhasvj78r2w


y4mhZtZ4dDOFib62zxLSiSmZ1xYUkVK2X4Pux-RyW38buIgK79ii3zLAGjZMVlIwt2xbIkqhM3UBRGDwnTHx1WoooimOVuS03ohXAVMXOdzbENtV9vMXjc6SmJO1lppPR3Jpxua5BvLmkpeOanlao1z7V7Zwx89RORD9mbVAS66XijAwHevgtSBcabAybU7oTBZgW_UnqvnqEmivtTTIlJa2g
 

bchaney

Petty Officer 1st Class
Joined
Jul 3, 2018
Messages
246
Wow that looks really nice. Thanks for the help! Looks like I have an excuse to buy some new tools :D​​​​​​​
 

bchaney

Petty Officer 1st Class
Joined
Jul 3, 2018
Messages
246
Well I picked up some aluminum angle and tubing, found a local place that to buy it for about 100 bucks. Quite a savings, thanks again WM.

Should I attach the frame to the gunnels?

The inside corner of the angle has a radius/fillet for strength, but that means I can't get the angle flush against the top of the tube at the joint.

Also just found a deal on some downriggers and poles for the boat. Gonna mount them up and try to catch some trout or kokanee. I may need to find a way to lower my trolling speed.

I want to work on the boat but it's so dang cold out here. Supposed to get more snow today.

I did finally get a plate for the trailer, it required a new VIN to be stamped on it. Title will be in the mail shortly. Glad to get that resolved. Luckily the weather was dry on the day I had to take the trailer and boat to get the new VIN, I'm not sure my cover would survive highway speeds.

IMG_20190130_070832small.jpg
 
Last edited:

No-AH

Petty Officer 1st Class
Joined
Oct 20, 2016
Messages
234
Should I attach the frame to the gunnels?
The inside corner of the angle has a radius/fillet for strength, but that means I can't get the angle flush against the top of the tube at the joint.

Correct. The gap from the inside radius on the angle wont let the tubing sit flush unless you feel you need to grind one edge down on the end of the tubing {I did on my re-do....both ends of the tubing, where it meets the angle because I'm anal like that ;]** accordingly to match that radius. I only found out after the fact that I could have ordered angle that has a true 90% inside angle and not a rounded inside radius. I believe this angle is considered more structural than the other. Anywhooo,
I personally wouldn't attach the frame work to the gunnels unless you're removing or re configuring the entire splashwell layout as I did. This would add the needed structural strength if you were planning on doing so. The plywood decking that will be laid over top will also strengthen and stiffen it considerably. Hope this helps?
 
Last edited:

Watermann

Starmada Splash of the Year 2014
Joined
Jan 12, 2013
Messages
13,786
I used my chop saw with a metal cutting blade to make all the cuts and a sander to smooth the edges. You could attach the frame to the side panels if you need more stability. You can also use the chop saw on an angle to nibble off the tube edges to fit in that angle fillet and a sander will do it too.
 

bchaney

Petty Officer 1st Class
Joined
Jul 3, 2018
Messages
246
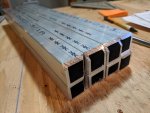
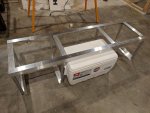
Well the weather was nice enough recently that I got out in the boat to measure and refine the bench design. I followed your advice and chamfered the corners on all of the legs so that they sit flush inside the angle. Also had to chamfer the top angles so they fit inside the angle running perpendicular. The chop saw with metal cutting blade worked great. Wish I had a drill press to keep my holes straight but oh well.

I haven't attached the 2 long pieces yet but I got all the legs drilled and assembled. I mocked everything up and I'm pretty happy with it so far. The cooler will fit under the center seat and I'll enclose and hinge the outboard seat tops for storage. I ended up using stainless bolts instead of rivets since most of my fasteners needed to go thru the tubes.

Hoping to finish assembling the frame and then see if I have enough CDX plywood for the panels. Need to figure out hinges for the tops.

I'm also wondering if there's some way to make the bench removeable or get it out of the way for fishing trips.
 

Attachments

  • photo308578.jpg
    photo308578.jpg
    1,004.3 KB · Views: 6
  • photo308579.jpg
    photo308579.jpg
    1.1 MB · Views: 9
  • photo308580.jpg
    photo308580.jpg
    1.1 MB · Views: 40

Watermann

Starmada Splash of the Year 2014
Joined
Jan 12, 2013
Messages
13,786
Very nice, looks great and sturdy as all get out :thumb:

fetch
 

bchaney

Petty Officer 1st Class
Joined
Jul 3, 2018
Messages
246
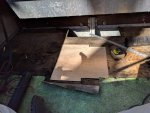
The weather was nice this weekend so I did some work on the boat in preparation for installing the new bench. As I mentioned I found some floor rot under the gas tank so I ended up removing the vinyl, cutting out the rot, and making a patch with new plywood. What would you guys use to bond the patch to the existing floor? After I bond in the patch, can I just coat or paint that area with something to waterproof it or do I need to replace the vinyl?

I also ordered a bilge pump and switch, I want to install that while I have better access before installing the bench. I may add a second battery and redo all of the wiring as well, I'm looking into bus bars, a circuit breaker panel, and a battery switch.


Click image for larger version  Name:	IMG_20190317_131541small.jpg Views:	1 Size:	299.6 KB ID:	10714272

Click image for larger version  Name:	IMG_20190317_144831small.jpg Views:	1 Size:	230.6 KB ID:	10714273
 

Watermann

Starmada Splash of the Year 2014
Joined
Jan 12, 2013
Messages
13,786
Sealing the new wood is sort of a lost cause as the surrounding plywood isn't sealed and will be rotted out long before the new patch. At this pont I would just be considering what looks better. In the seam to "bond" the patch to existing deck you could use something that isn't runny like PL premium.
 

bchaney

Petty Officer 1st Class
Joined
Jul 3, 2018
Messages
246
I know what you're saying, ideally the whole floor would be sealed, but I feel like I may as well seal up the area I'm working on. At least I'd prevent rot in that area. It seems to be the area most likely to rot since I can't find issues elsewhere.

I'll be cutting some new sliding vertical plywood panels to cover the area under the splashwell, so this patched floor area will all be hidden. I want to seal up those panels as well as the ones that I'll add to the bench seat, so I may as well use the same coating on the exposed floor. From what I've read, it looks like my options are 2 part epoxy or "old timers formula" and then paint over the top. Any paint recommendations? Latex, oil, or epoxy based?

Thanks for the suggestion on PL Premium, I'll check it out next time I'm at a big box store. I guess epoxy would be too runny for this joint.

In cutting up the floor I found some big foam blocks underneath as you can see in the picture. Any idea if these are factory installed? Wondering if this is a clue that the floor/flotation has been replaced in the past.
 

Watermann

Starmada Splash of the Year 2014
Joined
Jan 12, 2013
Messages
13,786
Pre-80's boats all had the white styrofoam for flotation from the factory.

I'd just get a quart of Helmsman clear spar and put on a few coats. Once completely dry use an oil based enamel paint like Rusto pro. The surface should be rough enough and clean so you shouldn't need primer but if you want use an oil based primer first it couldn't hurt.
 
Top