1986 Force 125hp Trim Tilt images

Torch

Cadet
Joined
May 18, 2010
Messages
19
Tilt/Trim Bleed Down; excessive!:eek: Decided to remove pump control valve (not the pump, didn't mess w/that, per RRITT suggestions). Parts are the issue, am posting images that hopefully will help someone else...:)
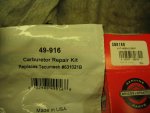
NOTE: the Tecumseh part numbers are no longer available according to my small parts vendor. The first image is from the "Oregon" brand parts, as in Oregon chain saw parts. Briggs & Stratton numbers were good. By the way, these are kits, all you need is the "tiny" O ring included, with concentric rings pointed out.
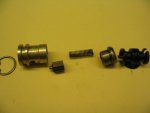
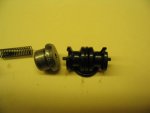
Taking the check valve assembly apart is tricky, getting hot in hot water is suggested (still tough to get apart), be careful, no maring! I changed all the o rings (tough to find correct sizes;metric might help.. 1/16th wall size), except the shuttle, it needs to move freely. I was afraid the ring would be the wrong size and either cause drag or too small and loose oil pres.
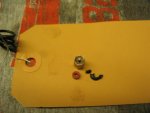
Last picture is that of the BAD check valve seal...was really trash, soft/gelled, NO GOOD.........
Good news: so far no bleed down, everything good..:)
Final note: make sure you put the lines back in the correct order...:D

http://forums.iboats.com/attachment.php?attachmentid=60230&stc=1&d=1279297346
http://forums.iboats.com/attachment...ent.php?attachmentid=60233&stc=1&d=1279297346
 

Attachments

  • IMG_0060.JPG
    IMG_0060.JPG
    45.2 KB · Views: 0
  • IMG_0054.JPG
    IMG_0054.JPG
    23.4 KB · Views: 0
  • IMG_0055.JPG
    IMG_0055.JPG
    23.4 KB · Views: 0
  • IMG_0058.JPG
    IMG_0058.JPG
    34.1 KB · Views: 0

Torch

Cadet
Joined
May 18, 2010
Messages
19
Re: 1986 Force 125hp Trim Tilt images

Good Morning, it is a press fit, no threads in mine. It is TIGHT!!! One suggestion, on this site, is to put it in boiling water, then take apart. I did that...What I then did, was wrap both ends w/cloth and use a Channel lock plier and a slip joint plier to first ever so slightly twist...just enough to start to loosen, then I pulled it apart. Just be real careful to not bugger up the surfaces...and IF you do............clean them up w/a file and sandpaper before you assemble. Cost for the two Briggs and Stratton needle kits was 12.50.

So far my engine has absolutely ZERO bleed down after fixing these two check valves.

One more thing; I had a heck of a time finding exactly the correct O rights for the check valves (2 on ea.), they are 1/16" wall thickness, went w/metric and got very close...and seems to work fine...did NOT change the shuttle O ring as that needs to move freely and I assume the tolerance is much more precise.

Best of Luck!!!:)
 

RRitt

Captain
Joined
Mar 30, 2006
Messages
3,319
Re: 1986 Force 125hp Trim Tilt images

the shuttle is size 011. BN70 is original but viton is better. Viton costs too much to use in most places but these small parts really benefit from it.

I machined my own tools to take valve apart. Basically, a piece of 3/32" steel plate with a 3/8" dia cutout too catch the top and a 12mm puller for the base.
 

Torch

Cadet
Joined
May 18, 2010
Messages
19
Re: 1986 Force 125hp Trim Tilt images

Thank you again for all the info'. I will store this; never know when it will be needed. The separation of that check valve is tricky. Your puller would be great!:)

If I may; one more question....

Suggestions on the best way to "flush" the t/t system....what line(s) would be best to take off? Can the system be "over filled" and cause damage?

Again, Thank you. BG.
 
Joined
Jul 16, 2010
Messages
8
Re: 1986 Force 125hp Trim Tilt images

Got mine apart today I used a small clam shell type puller and a pair of wire cutters(dikes) and pried the two pieces off by hand. very nice no marring at all. The o ring was trashed as I suspected under the seat. What size did you come up with It looks like a 2mm by 2mm would work fine but cant locate one locally.
Once I find the exact measurement I will post
 

Torch

Cadet
Joined
May 18, 2010
Messages
19
Re: 1986 Force 125hp Trim Tilt images

CCC: I used the ones in the Briggs needle valve kit, so don't have the size....but would be good to know for reference.......:)
 
Joined
Jul 16, 2010
Messages
8
Re: 1986 Force 125hp Trim Tilt images

Thanks, I picked up two kits just before closing time and got it all back together.bit works perfect. Everyone involved in posting these I want to thank. I look forward to researchin h more issues in the future. By the way that briggs part is a perfect fit, I wouldn't bother with an o ring for that seat. Thank you thank you all!
 

RRitt

Captain
Joined
Mar 30, 2006
Messages
3,319
Re: 1986 Force 125hp Trim Tilt images

when this was first posted I was looking at the needle valve and thinking "no way" what kind of half-baked thing is that. Even if you get it to fit it isn't going to work right with the shuttle and the spring tension will be all wrong. But, thanks to your pictures i see now. It isn't the valve, it's the little red washer. I ordered a pair to check it out and they arrived Friday.

No, it isn't a perfect fit but, yes, it is good enough. It is a little less in diameter and a little more in thickness than the original. I am guessing that over time it will flatten out under pressure and become the right size or very close to it.

I do not know what rubber they use in carberators these days. That is a possible source of trouble. The main concern in a carberator is holding up under ethanol. The main concern in hydraulics is oil. A lot of materials that are great for ethanol aren't so good with oil (and vice versa). I don't think we will know anytime soon. But even if they are not the ideal material, they should still last at least 5 years in a detergent free system.

So, yup. this is a good fix. Well, good enough. Just be careful not to stretch, scratch, or distort the aluminum valve housing when taking apart. And do not score the fluid channel.
 

Torch

Cadet
Joined
May 18, 2010
Messages
19
Re: 1986 Force 125hp Trim Tilt images

Thank you for all the help and time invested checking out these solutions; which may or may not pan out over time....I've had the boat in the water now, a few times, and the tilt works perfectly w/no bleed down... so all is well as of now.

Best to you Mr "RRitt"....have a good rest of the summer!!!
 

my1stboat1

Petty Officer 1st Class
Joined
May 31, 2010
Messages
307
Re: 1986 Force 125hp Trim Tilt images

im curious i took mine apart this afternoon after carefully looking at your images when i pulled the 2 halfs of the valve apart there a spring and a 6 side piece in there with alittle pintle on top. ( IS THERE SUPPOSE TO BE AN ORING ON TOP OF THAT PINTLE ???) cause what appear to once have been an oring on mine looks like a mushy black wax seal or something...
 

RRitt

Captain
Joined
Mar 30, 2006
Messages
3,319
Re: 1986 Force 125hp Trim Tilt images

generally speaking some additives will turn your orings to mush. other additives make them hard and crackly. water in oil makes them crusty. atf and high pressure over time makes them crystalize and become crumbly. age makes them hard but not cracking into fragments.
 

my1stboat1

Petty Officer 1st Class
Joined
May 31, 2010
Messages
307
Re: 1986 Force 125hp Trim Tilt images

but there are suppose to be small oring on top of the pintle of that 6 sided part
 

Torch

Cadet
Joined
May 18, 2010
Messages
19
Re: 1986 Force 125hp Trim Tilt images

Yes, there is supposed to be a tiny O ring........mine was mush and my bleed down was rapid...be careful not to damage any of the metal on the two halves. Funny as it might sound the Briggs and Stratton needle kits' O ring fits perfectly...but it is tiny!!!
 

jkoppe73

Petty Officer 3rd Class
Joined
Mar 17, 2010
Messages
79
Re: 1986 Force 125hp Trim Tilt images

If we could get these parts laid out in sequnce, and get good pictures of each part from different angles, I could draw these up in an exploded view in cad and call out each part, and the replacement parts needed, and this would make it a lot easier to help everyone in fixing thier units. Not that hard for me to do, just need good shots of each part...
 

Torch

Cadet
Joined
May 18, 2010
Messages
19
Re: 1986 Force 125hp Trim Tilt images

That's a great idea, mine is put back together, so hopefully will NOT have it apart again for a very long time!!!

Perhaps one of the recent posters still have the pieces apart for picture...

Best of luck and great idea!! BG.
 

my1stboat1

Petty Officer 1st Class
Joined
May 31, 2010
Messages
307
Re: 1986 Force 125hp Trim Tilt images

ordering rritt seal kit tomorrow, decided to take the cover off the trim piston housing tonight... Broke 2 bolts not really worried about the bolts... But are there only 3 seals in there.. the one on the piston that extrudes through the housing the cover seal and the ram seal... ....
 

RRitt

Captain
Joined
Mar 30, 2006
Messages
3,319
Re: 1986 Force 125hp Trim Tilt images

might want to deal with those bolts before ordering a seal kit. two broken bolts puts you at about 50/50 risk of having a cylinder sleeve that is fused into housing. major, major headaches.
 

my1stboat1

Petty Officer 1st Class
Joined
May 31, 2010
Messages
307
Re: 1986 Force 125hp Trim Tilt images

rritt ill get the bolts out tomorrow with alittle hit and some penetrating oil... the long shaft thats threaded on both ends that runs through the trim housing and tilt/shock rams is that pressed into that trim housing or is it suppose to slide all the way out through the transom brackets....
 

RRitt

Captain
Joined
Mar 30, 2006
Messages
3,319
Re: 1986 Force 125hp Trim Tilt images

rritt ill get the bolts out tomorrow with alittle hit and some penetrating oil... the long shaft thats threaded on both ends that runs through the trim housing and tilt/shock rams is that pressed into that trim housing or is it suppose to slide all the way out through the transom brackets....

it should move freely. it sounds like you may be near salty or brackish water. when you are all done buy a zinc anode merc# 818298A1 and bolt it to the bottom of your trim housing. You'll need to expose about a 1" patch of bare aluminum at each end so that you get a good aluminum to zinc contact. It will help with future exposure to a galvanically active environment.
 
Top