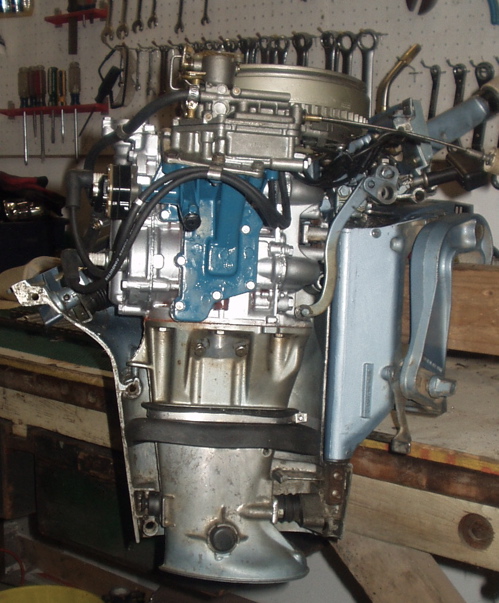
Re: Evinrude motor
Heck, the carb is the easy part....
But here ya go, here's the instructions that I wrote for somebody else but had enough sense to save them.
It’s been at least 10 years since I’ve torn one of these motors down so most of this comes from memory and I may miss a point or two…. But when I was a mechanic for an Evinrude dealer in the ‘60s I could almost do it in the dark. At the time, I maintained a fish camp full of them and was constantly replacing the rubber motor mounts.
Look at the speed control linkage. You will see a flat link held on by a couple of e-clips. Remove this link. Remove the pivot bolt and wave washer where the throttle linkage comes from the steering handle, and the flat washer underneath it. By moving the linkage aside, you can disconnect the arm going to the magneto. Look at the inner end of the gearshift lever shaft. You will see a hex head screw with a pin, holding the shift shaft to the linkage. Remove the pin / screw. DON’T attempt to shift it with the screw removed…you’ll likely break the slotted part that it goes through. Pull the shift lever & shaft straight out far enough to disengage it from the inner lever.
Remove the choke rod at the carburetor and slide it out of the front panel (catch the flat spring underneath the choke knob). Remove the coil spring that holds the slow speed cable in an arc. Pull the slow speed knob off. Looking on the inside of the panel, you’ll see an e-clip on the slow speed cable. Slide it off. Then the slow speed needle/cable can move outward and you can remove the c-ring and slide the cable toward the inside and out of the panel. Remove the starter handle and tie a slip knot in the rope (inside the housing) to prevent it from unwinding. Unplug the stop button wires, remove the push nut holding the wires to the cover. Remove the plastic panel if it’s a one piece. The stop button will come off with the panel. The two-piece ones do not have to be removed. Remove the fuel hose that goes from the connector to the fuel pump.
Pop the exhaust relief hose out of the lower cover. Loosen the screws holding the vibration damper to the exhaust manifold. Slide the vibration dampers off the screws in the exhaust manifold (holes are slotted). Remove the screws holding the other vibration damper to the carburetor.
There is a semi-circular, slotted, steering friction plate (co-pilot) under the front portion of the lower motor covers, held on by 2 screws. With the motor steered straight ahead you can remove the friction adjusting screw, which goes down through the slot in this part, along with the friction washers. Then remove the semi-circular plate. Remove the two screws holding the upper front rubber motor mount to the lower motor covers. Similarly, remove the two screws holding the lower motor mount to the lower motor covers.
Remove all the screws holding the starboard and port side lower motor covers together. There are several Phillips and a few hex screws holding them. Some are up underneath where you have to look for them, but are obvious once you find them. It’ll be practically falling apart once you get them all out. Don’t force or pry anything, if it doesn’t come apart, look for another screw.
Remove the acorn nut from the side of the starboard lower motor cover, about 1/2 way down. The starboard cover should now lift off. Remove the acorn nut from the port lower motor cover, and the powerhead / exhaust housing / lower unit should lift out in one piece….That is if we got everything disconnected. Be sure to catch all the loose rubber bumpers and stuff that will fall out and roll across the floor.
Simple, huh?
Feel free to inquire about anything I missed. Frank


