1966 starcraft chieftain

bogee

Seaman
Joined
Oct 11, 2018
Messages
71
Had a decent day today after the frost melted this morning. Took my metabo and a wire brush attatchment and started getting the rows of rivets cleaned up and the back wall of the transom.A drill with an extension, and many cup brushes of various sizes, and a soft 7 inch wire wheel adapted to a drill from a bench grinder and got a lot cleaned up today. I was surprises to see the pitting was only bad in 2 distinct places. Around where the gimble inner ring sits against the wall, and along the top of the transom from the top down about 6 inches. Found a few bolts hoses that where just sealed up with what looks like silicone. I wonder if there was a swim platform on this? I'm wondering about patching the holes. I don't know if I want to braze them, just put a bolt back thru them, or I wonder if marine tex will work and be permanent
 

bogee

Seaman
Joined
Oct 11, 2018
Messages
71
Got everything cleaned up and the gluvit on the seams and rivets that are exposed, Marine tex on the transom wall, skim coat needed. My poor torpedo heater is working OT. Keeping it about 85 degrees everything seems to be curing nicely. Tomorrow even if it's raining I'm going to get the transom support back on the wall, after I sand it and prime it of course, Probably throw a coat of paint on it also.
 

bogee

Seaman
Joined
Oct 11, 2018
Messages
71
Been working hard and just not taking the time to post. I removed the shelf the transom wood slides in, cleaned it up, no corrosion or pitting, surprising! Got it back on after reworking the whole inside skin. Reworked the outside where the gimbal sits against the boat. Not quite to my liking yet, need a little repair on it. The new plywood is in the boat! Fits like a glove. 3 coats of varnish on it and the epoxy made it a little tight. Now to remake the front engine mount! SNOW TOMORROW, that will slow things down.
 

bchaney

Petty Officer 1st Class
Joined
Jul 3, 2018
Messages
246
Nice work! Keep it up. And don't forget pics :)

Those transoms on the I/O models go really low to support the outdrive, its a shame because a couple inches of water in the bilge will get wicked up by the plywood. O well, at least it won't happen again, with all that varnish and epoxy she should be sealed up nice.
 

bogee

Seaman
Joined
Oct 11, 2018
Messages
71
Been at it constantly for a couple days, snow is gonna fly here this week, didn't take the couple minutes to get some pics. Almost to the point of being able to work on inside of boat instead of outside. At least it started going back together. Removed the wood out of the hull for the front engine mount on a 3.o merc. At first I thought it was a 2x6 screwed in, it is a laminated plywood, 2 pieces of 3/4. I gotta think about this!
 

bogee

Seaman
Joined
Oct 11, 2018
Messages
71
That front mount for the motor mount looks a little cheesey. I have 2 pieces of 3/4 marine plywood epoxied together and curing. I think I might bolt that to some 2x2 aluminum angle I have and then fasten it to the stringers thru the vertical section and beef up the stringers. Maybe brace them with a well varnished 2x4 riveted fast on the gunwhales sides and tie them into the transom wood. Should it be tied into the transom wood? Sorry bout the old pics.
 

Attachments

  • photo303866.jpg
    photo303866.jpg
    579.1 KB · Views: 2
  • photo303868.jpg
    photo303868.jpg
    575.3 KB · Views: 2

Watermann

Starmada Splash of the Year 2014
Joined
Jan 12, 2013
Messages
13,753
It may look a little on the weak side being all apart right now but the decking attaches to the stringers and the deck is attached to the side panels that are attached to the sides of the hull on the trays. It all adds up in the end.
 

bogee

Seaman
Joined
Oct 11, 2018
Messages
71
Hey Watermann, I drilled out and re-riveted the stringers today, what a difference, I got about 1/2 way thru, really stiffened up the stringers up, Ran out of rivets! I think you mentioned to do that earlier, THANK YOU! :)
Also have the front engine mount all fit up built, now to seal it up. Time to stink the place up with some more varnish!
 

bogee

Seaman
Joined
Oct 11, 2018
Messages
71
Maybe, never intended this one to be a like new restore, just looking to make it sound and half decent looking. The weather here is beatin me up right now on this one. Hoping to get the engine and outdrive back in sometime in the next 2 weeks. After that it's cosmetics. That one I just posted is close, if I could get them down to about $500 I would drag it home in a heartbeat and really take my time on it and make it like new! Right now just being a new retiree I want to get a boat on the water for some fishin missions, something I missed out on the last 20 years from working to much OT
 

Watermann

Starmada Splash of the Year 2014
Joined
Jan 12, 2013
Messages
13,753
Congrats on retirement! I retired last June for 3 days before I started a new job :lol:
 

bogee

Seaman
Joined
Oct 11, 2018
Messages
71
That gasket was miserable, it was all twisted up when it was glued. I fanally kicked some stuff around, cursed a lot and ran 30 miles to a boat shop and got another new one.
 

Attachments

  • photo304821.jpg
    photo304821.jpg
    512.7 KB · Views: 3
  • photo304822.jpg
    photo304822.jpg
    498.7 KB · Views: 3
  • photo304823.jpg
    photo304823.jpg
    545.5 KB · Views: 3
  • photo304824.jpg
    photo304824.jpg
    590.8 KB · Views: 3

Watermann

Starmada Splash of the Year 2014
Joined
Jan 12, 2013
Messages
13,753
Oh jeez what happened? I remember it was easy to just glue it into the groove on the outer transom assembly.
 

bogee

Seaman
Joined
Oct 11, 2018
Messages
71
I got an off brand one. When they glued the 2 ends together it was all rolled and just wouldn't lay flat. Even the 3m 77 wouldn't hold it even when spraying both the transom and gasket and letting it set up. i TRIED EVERYTHING TO STRAIGHTEN IT OUT. oops stupid caps lock. Should have returned it before I tried to use it, but decided when it wouldn't lay flat to get a new one. Way too much work to have that bad.
 

bogee

Seaman
Joined
Oct 11, 2018
Messages
71
Going to get some stuff done today. Been tinkering with little stuff for awhile. Things slowed up the last couple weeks with Thanksgiving, hunting season, we lost a family pet to bone cancer, that was quick, one week from taking him to the vet for a limp to him not being able to even lift his head up. Today I get something done.
 

Watermann

Starmada Splash of the Year 2014
Joined
Jan 12, 2013
Messages
13,753
Oh man it's never easy to loose a pet, I understand the loss as do most of us that love dogs.
 

bogee

Seaman
Joined
Oct 11, 2018
Messages
71
I have just a couple screws down on the floor to keep it in place. The rivets I ordered to fasten it down got lost in the mail. They are replacing them, might be here next week. Engine going back in tomorrow!
 

Attachments

  • photo305428.jpg
    photo305428.jpg
    531.7 KB · Views: 3
  • photo305429.jpg
    photo305429.jpg
    546.2 KB · Views: 3
  • photo305430.jpg
    photo305430.jpg
    573 KB · Views: 3

bogee

Seaman
Joined
Oct 11, 2018
Messages
71
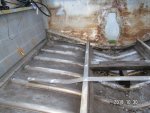
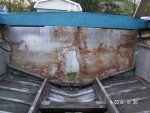
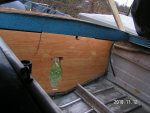
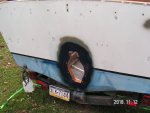
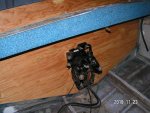
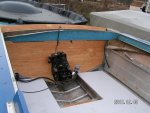
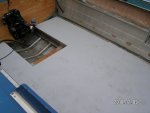
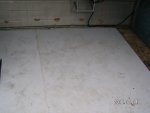
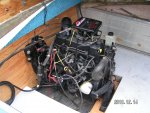
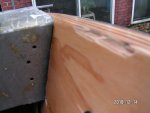
Engine sitting back in, I'm going to let it settle a couple days on the new front engine mount before I align it and fasten it down, the nes mount is really solid but everything wooden moves a little when weight is added. Have the frone decking fastened down, both the original rivets I ordered and the replacements showed up on the same day, LOL. only took 3 weeks for the first one to arrive. Back at the transom the gunwhales seemed to settle down a little, the last time this was done someone never reattatched them, I want to make 2 angle iron brackes and rivet to the gunwhales and screw to the plywood after lifting them to match the top of the transom, might have come from years of stepping on the stern engine compartment cove deck without being attatched to anything. I have a lot of cosmetic work to do, the 50 yr old vinyl covering looks like a swimming pool liner, maybe some I/O carpeting instead! It's getting there!
 

Attachments

  • photo305619.jpg
    photo305619.jpg
    473.2 KB · Views: 5
  • photo305620.jpg
    photo305620.jpg
    559.7 KB · Views: 11
  • photo305621.jpg
    photo305621.jpg
    533.8 KB · Views: 5
Top