Firestone 2hp 10A130 restoration project

Plankwalker

Petty Officer 3rd Class
Joined
Sep 28, 2020
Messages
79
Why didn't I buy a 1972 Johnson? I can still get carb kits for those.

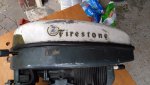
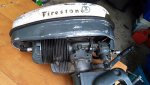
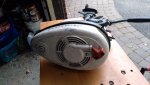
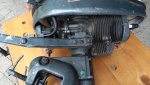
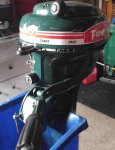
Instead, I picked up a 1960/61 2hp Firestone as a 20/21 winter restoration project. I plan to use this thread to post updates and hopeful chat with other small engine enthusiasts.

Why did I buy it? There is practically no online manuals or parts. I guess I bought it because its a piece of Canadian heritage. If I can get it running, I plan to use it on a Geisler cedar strip Wherry style row boat along the Rideau lock system near Ottawa.

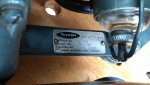
1960 marks the year when Firestone switched from Scott Atwater to West Bend as the manufacturers of their outboards. Based on the plaque on the engine, it was built in Barrie Ontario.

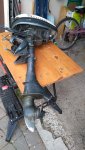
Of the various systems, I am going to work on the fuel system first. My biggest concern is the Carburetor. However, my first challenge will be to repair/rebuild two brass fitting that were bent when the engine fell over. I have no idea when the last time this engine ran. However, based on the dents and damage, its obvious it was allowed to fall forward. The fuel shut off and the fuel mixture adjustment are bent.

I will try too add some pictures with this post, but I may need 3-4 posts before I am allowed. Once I get my shop in order for the winter, I will likely be doing weekly updates to the thread. The worst case scenario is that I have to dismantle it for parts on ebay.

Paul
 

Attachments

  • photo340657.jpg
    photo340657.jpg
    1.5 MB · Views: 9
  • photo340658.jpg
    photo340658.jpg
    1.6 MB · Views: 9
  • photo340659.jpg
    photo340659.jpg
    1.5 MB · Views: 9
  • photo340660.jpg
    photo340660.jpg
    1.4 MB · Views: 8
  • photo340661.jpg
    photo340661.jpg
    1.7 MB · Views: 8
  • photo340662.jpg
    photo340662.jpg
    1.8 MB · Views: 7

brim_buster

Lieutenant Junior Grade
Joined
Jul 9, 2013
Messages
1,204
Nice grab. I restored one and it ran great. A gentleman bought it for his man cave even though it ran great. Im gonna send you a private message. Be sure to look at it
 

Attachments

  • photo329486.jpg
    photo329486.jpg
    1.8 MB · Views: 5

racerone

Supreme Mariner
Joined
Dec 28, 2013
Messages
36,306
Just find the CHRYSLER parts book and information on the 3.6 HP air cooled model.----Sure looks like the same thing.----mercruiserparts.com-----You will find the parts pages there for the 3.6 HP.-----Yes you will.----Just click away.
 

Plankwalker

Petty Officer 3rd Class
Joined
Sep 28, 2020
Messages
79
Thank you both for the advice. It won't hurt to order a carb kit for a chrysler just to see if the parts match.
 

racerone

Supreme Mariner
Joined
Dec 28, 2013
Messages
36,306
???-----Can you look at the parts diagram for the 3.6 and see that it looks very much identical to the Firestone branded product that you have , yes or no ?
 

Plankwalker

Petty Officer 3rd Class
Joined
Sep 28, 2020
Messages
79
Hello racerone. unfortunately the link you tried to provide did not appear in your comment. Please use the Post Link option. I can look for a parts manual and compare it to the engine I have. Did you have a particular year in mind. Just looking around on the net, it appears the Chrylser 3.5hp from 1967 and 68 do look very similar. 1961 was the last year West Bend (purchased Scott Atwater in 1960) built the one-cylinder 2hp outboards. In 1962, they built a two-cylinder 2hp, and that was the last year West Bend built outboards. Its possible Chrylser purchased the molds and associated patent rights and continue building the engine.

I also found a page description of a 1957 Elgin 2hp (see link below) that looks identical to the Firestone.
 
Last edited:

flyingscott

Fleet Admiral
Joined
Apr 8, 2014
Messages
7,991
Hello racerone. unfortunately the link you tried to provide did not appear in your comment. Please use the Post Link option. I can look for a parts manual and compare it to the engine I have. Did you have a particular year in mind. Just looking around on the net, it appears the Chrylser 3.5hp from 1967 and 68 do look very similar. 1961 was the last year West Bend (purchased Scott Atwater in 1960) built the one-cylinder 2hp outboards. In 1962, they built a two-cylinder 2hp, and that was the last year West Bend built outboards. Its possible Chrylser purchased the molds and associated patent rights and continue building the engine.

I also found a page description of a 1957 Elgin 2hp (see link below) that looks identical to the Firestone.

Scott Atwater had nothing to do with West Bend Ever. Chrysler bought West bend in the early 60s and continued the line. Chrysler sold the outboard line in the late 70s to U.S. Marine and the name was changed to Force. West Bend also built the 50s elgin line.
 
Last edited:

Plankwalker

Petty Officer 3rd Class
Joined
Sep 28, 2020
Messages
79
Its amazing what you find if you poke around long enough on the internet.
So the 1960 Firestone 2hp is exactly the same outboard as the 58 Sears Elgin. This information lead me to other useful leads in my quest to restore this engine. I could search for parts for the Elgin 2hp. I found a new midsection on ebay and decided to buy it, as the cavitation plate on mine is broken. I could see the part number stamped on the side and its the same as mine.
I also took a close look at my carburetor. A TILLOTSON MD59A. Turns out Tillotson still sells carb kits for this. The kit as no float, so I hope mine does not have a leak or is made of cork. I also needed a new brass fitting for the high speed fuel mixture. Mine was bent. I looked at all the available Tillotson carbs on ebay and picked out a MD42B as a close enough match to mine. A $30 purchase will give me several usable spare parts including the glass bowl.
Given the whole point of using a vintage engine is to have pride in using it, I also decided to take shots of my decals and send them into Discontinued Decals to see what they will charge for reproducing them for me. It also means I will be able to clean up the hood nicely and repair some dents.
I have several weeks before stuff will arrive by mail. In the mean time, I getting the shop ready preparing for some restoration of the cedar strip boat this engine will be used on.carb.jpghood.jpgshaft.jpg
 

brim_buster

Lieutenant Junior Grade
Joined
Jul 9, 2013
Messages
1,204
Its amazing what you find if you poke around long enough on the internet.
So the 1960 Firestone 2hp is exactly the same outboard as the 58 Sears Elgin. This information lead me to other useful leads in my quest to restore this engine. I could search for parts for the Elgin 2hp. I found a new midsection on ebay and decided to buy it, as the cavitation plate on mine is broken. I could see the part number stamped on the side and its the same as mine.
I also took a close look at my carburetor. A TILLOTSON MD59A. Turns out Tillotson still sells carb kits for this. The kit as no float, so I hope mine does not have a leak or is made of cork. I also needed a new brass fitting for the high speed fuel mixture. Mine was bent. I looked at all the available Tillotson carbs on ebay and picked out a MD42B as a close enough match to mine. A $30 purchase will give me several usable spare parts including the glass bowl.
Given the whole point of using a vintage engine is to have pride in using it, I also decided to take shots of my decals and send them into Discontinued Decals to see what they will charge for reproducing them for me. It also means I will be able to clean up the hood nicely and repair some dents.
I have several weeks before stuff will arrive by mail. In the mean time, I getting the shop ready preparing for some restoration of the cedar strip boat this engine will be used on.View attachment 327184View attachment 327185View attachment 327186
Dont get water decals they are horrible to work with
 

brim_buster

Lieutenant Junior Grade
Joined
Jul 9, 2013
Messages
1,204
I used to have a great source for decals from a gent on ebay. He did a fantastic job
 

Plankwalker

Petty Officer 3rd Class
Joined
Sep 28, 2020
Messages
79
COMPRESSION AND TIMING. I check my compression, cold. I won't be able to check it warmed up until I clean up the carb. I have a replacement High speed adjustment fitting and a carb kit on the way. Cold, the compression on my 1977 2hp Evinrude (yes, I went and bought one) is 90psi. That is fantastic!!! However, the 1960 Firestone was a miserable 50psi. There are a couple of reasons why its so low.
First, it did not turn easily. There could be alot of resistance from poorly greased and dirty gears. This makes it hard to crank it fast enough to get a compression rating. There is no neutral in this type of engine, but at some point I will have it mounted on a portable work bench without the lower units to work on it and test. Given it is an air cooled engine, there is little risk of running it out of water.
Second, the gaskets need changing.
Third, the exhaust port needs cleaning,
Fourth, it needs new rings. All of these are things I can fix.
The other likely cause would be severe scoring of the cylinder. This, I cannot fix. I would need to find a replacement.
I should be able to examine the cylinder this weekend as my shop is almost organized.

I just read that the magneto does not get timed with the crankshaft like modern engines. In this model, the magneto is adjusted with the throttle. I heard about his method in older engines.
 
Last edited:

Plankwalker

Petty Officer 3rd Class
Joined
Sep 28, 2020
Messages
79
So, the tear down begins. The cylinder block is one single cast and does not have a removable head. I have some tools on order including a puller. The carb was filled with flakes of old varnished gas, and the only piece giving me some trouble is the seat. It does not want to budge. I will let it sit in penetrating oil for the day and then apply some heat later. If that fails, I have some extractor tools.

I was only able to view part of the piston wall from the exhaust port. Its not perfect, but its not bad either. I saw one minor score mark. I have new rings in the mail.
122082224_10157940953301275_5075201427873841540_o.jpgIMG_20201019_101338.jpgIMG_20201019_101555.jpgIMG_20201019_101809.jpg
 

Plankwalker

Petty Officer 3rd Class
Joined
Sep 28, 2020
Messages
79
Flywheel woes.
Taking a close look at the flywheel, I noticed the the holes for the extraction bolts are not threaded! So, I guess that justifies buying a tap and die kit. Right? So, I won't get the piston out until the puller and tap and die kit arrive.
In the mean time I will be dismantling the lower unit, cleaning it, and getting the parts ready for sand blasting.

In the photo, I placed a bolt in the center to block the hole to allow for a small pool of penetrating oil to work its way down the flywheel shaft. Before using the puller, I will likely apply some heat to help loosen the grip.
IMG_20201020_132145.jpg
 
Last edited:

Plankwalker

Petty Officer 3rd Class
Joined
Sep 28, 2020
Messages
79
If possible, I suggest NOT removing the spring from the recoil unit. I did in this case because I plan on sending the cover for soda blasting along with other parts of the outboard. The one here has come broken strips. I have a used one in good condition in the mail. I figured I would take this one apart to see what it was like. Now I know. If anyone has some tips on reinstalling it, I am all ears.
Flywheel puller has arrived, but I still need to wait for the tap and die kit so I can thread the holes for extraction.
IMG_20201021_190103.jpg
 

Plankwalker

Petty Officer 3rd Class
Joined
Sep 28, 2020
Messages
79
I can't do anything further with the engine block until the tool and die set arrives, so, I turned my attention to the lower unit. Started dismantling it for degreasing and stripping. I removed the vent and grease plug, expecting a quick flow of oil. Instead, a dark black sludge oozed out of the gear box like tar. At least it was not white. I hope this is a sign my seals are still in good shape. I flushed with regular motor oil and will give it the evening to empty. I plan to completely dismantle the gear box to make it easier to blast and prime.
IMG_20201022_171543.jpg
 

Plankwalker

Petty Officer 3rd Class
Joined
Sep 28, 2020
Messages
79
Grrrrr. Two minor setbacks. The shipping company an ebay vendor used to mail me an old carburetor just listed it as a restricted item. it will not be delivered AND it will not be returned. I found another and had it mailed to a friend in NJ. He will send it by regular post to me.
The other problem is that the company I was depending on to make my decals wants me to send the tank. Not going to do that, especially given the risk I will never see it again. I looked at a local company and they simply will not dedicate the art work time for a single decal.
So, I ordered some Ink-jet, clear water decal sheets. I will take high res images and electronically trace the images and create my own.
Tonight, I will finish taking apart the lower unit and update this post with some images. I will also start packing all the individual parts for soda blasting.
 

Plankwalker

Petty Officer 3rd Class
Joined
Sep 28, 2020
Messages
79
This is important. I took the lower unit apart, and discovered a problem. You can see in the first picture, there is a square opening in front of the gear box seal. It extends downward, On the port side, at the bottom, there is a tiny little drain hole. Well, all the carbon from the exhaust drops down into this shaft and easily clog this hole. Clearing the hole from the outside did nothing to clear the blockage caused by about half and inch of black crud. Water can't escape and fills this area, and rises up to the next exit hole, where the brass inlet tube is. If this is allowed to freeze, it would crack the casing.
IMG_20201023_164137.jpgIMG_20201023_164147.jpgIMG_20201023_164341.jpg
 

Plankwalker

Petty Officer 3rd Class
Joined
Sep 28, 2020
Messages
79
Cleaned the lower unit and the carb today. The tool and die set arrived, so tomorrow I will be getting the fly wheel off and hopefully remove the piston and crankshaft. I expect that both the combustion chamber and the piston head will need cleaning.

I've taken another set of careful shots of the decals on the tank in order to reproduce them. I still need to deal with several dents in the tank before sending all my parts off for stripping and priming.
IMG_1270.JPG
 
Top