1986 OMC V6 3.8L tilt drive engagement

JBtwist

Seaman
Joined
Jul 22, 2018
Messages
58
Hey Everyone,

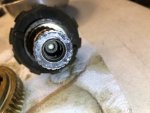
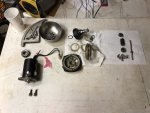
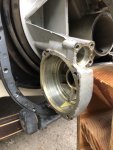
First post here. We just bought a 1986 fabuglas commodore 19' boat with an OMC sterndrive. We are having some inconsistency with the tilt motor engaging. The solenoid is clicking every time, but the motor isn't engaging every time. I put a meter on the wire coupler, but it's so inconsistent that I'm having a hard time determining if it's the isolated to the solenoid. If I jumper the solenoid, I can kick it on every time...so I think it's probably that part.

My question is - is there a better way to determine if that issue is specifically that part? I'm kind of an amateur with this stuff, but I'm fairly mechanically inclined.

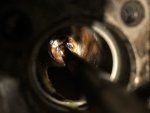
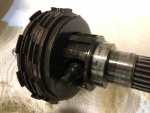
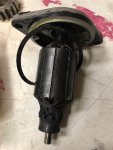
Additionally, I drained and replaced the oil in the worm gear for that tilt motor and it had a ton of water in it, about 40% oil, 60% water. I've read that people have taken it apart and packed it with grease instead of oil. Is that something I should do? When I filled it up with oil, there is oil leaking alongside the gear...about a teaspoon overnight.

I'm not a professional...just a guy trying to learn how to fix things up myself. Thanks in advance for your help! :)
 

Scott Danforth

Grumpy Vintage Moderator still playing with boats
Staff member
Joined
Jul 23, 2011
Messages
47,558
my guess is you have a stringer.

if you jump the solenoid and it runs, its the solenoid

if you jump the solenoid and it still doesnt run, its the motor. the tilt motor brushes and armature get corroded. half the time, simply pull the motor apart and clean the armature with 600 grit wet-dry sand paper and your back in business

or replace the motor - either way, you pretty much need to stand on your head to access the motor, which may be a bit harder with the V6.

BTW, the motor and drive were manufactured in 1984 or early 1985.

as for the tilt assembly and clutch, replace the cover gasket and the o-rings and you should be fine.
 

southkogs

Moderator
Staff member
Joined
Jul 7, 2010
Messages
14,796
I've heard of using grease in the clutch pack, but I never did. You're better off (IMHO) to make sure it's got the proper rings on it, tighten it down properly (not too tight - it will bind) and then just keep up with the oil.

Welcome aboard.
 

kenny nunez

Captain
Joined
Jun 20, 2017
Messages
3,075
If you decide to replace the clutch shaft seal it is not hard, the only special tool you will need is a pair of snap ring pliers.
With the cover off and the snap ring off just push the clutch pack out through the gear, the brass ring gear stays in the housing. Pull out the seal and either order one or take it to a bearing supply house and it can be matched up.
As Scott said get a new “O” and gasket. THose housings always seemed to get water in them, but the new gasket and seals should help.
 

JBtwist

Seaman
Joined
Jul 22, 2018
Messages
58
Wow, thank you for the quick responses! This is really helpful.

Do I need to remove the moon gear to get inside the clutch pack? Also, where would I find a new O ring and gasket?
 

kenny nunez

Captain
Joined
Jun 20, 2017
Messages
3,075
With the drive about 80% up you will notice there is a slight amount that the drive can be lifted, you need to support the drive at that point to take the weight off of the small gear. The quadrant gear stays on. Then the clutch pack will slide out.
The parts are available through Sierra Marine Supply. You also do not need to remove the small triangular cover either.
 

JBtwist

Seaman
Joined
Jul 22, 2018
Messages
58
Great. Very helpful. Thank you all.

I'm a bit confused about the identification of my boat. I see that it's an OMC, but I get confused about cobra vs stringer and the 3.8L motor...but it doesn't list horsepower. I believe it's a Buick, which is GM. How many different types of configurations were there with different motors, outdrives, etc.
 

southkogs

Moderator
Staff member
Joined
Jul 7, 2010
Messages
14,796
OMC Stringer:
OMC-Stringer-V6-V8-Sterndrive-Intermediate-Housing-Complete-_1.jpg


The Stringers were produced through 1986. It's called a "stringer" because the drive line (engine and all) is mounted to the boat stringers as opposed to the transom like a Cobra, Mercruiser or Volvo. The drive passes through the transom (you can see the big boot in this photo for the hole it makes in the transom). The range year the boat you have is in, you've got a mechanical shift stringer. If it's a 4 cylinder then the drive will be called a Stringer 400. If it's a 6 or 8, then it's a Stringer 800. You identify exactly what you have by a tag on the engine (typically on toward the rear of the engine on one of the mounts). It'll read something like 302APKWB 1986.

maxresdefault.jpg

The Cobra was OMCs second shot at stern drives. It's mounted more to the transom, has a more common gimbal and bellows connection and you can see the trim rams on the drive.
 

JBtwist

Seaman
Joined
Jul 22, 2018
Messages
58
Thank you. I'll take a look for the model number on the engine. What I have is definitely a stringer, it's a 6 cylinder.

I'm still trying to chase down the tilt issue...I haven't replaced the relays yet because the wiring attached is pretty chaotic. I need to take the relay in to the store to get a replacement and I'm concerned about connecting it back the same way...the wires are all pretty worn and might even break if I put too much on them. I'm wondering if I could find a wiring diagram?

Also, I got the drive stuck the other day and finally had a place where it would not move in either direction. The relays were clicking, and when I put a meter on the plug to the motor, I was consistently getting 12V when the meter was grounded to the motor. I was able to get it to move by physically removing pressure on the gear. Once it moved one time, it continued to move and I couldn't get it "stuck" again. I'm curious if that could be a grounding issue, the motor not getting enough power? ...or a relay issue or possibly a motor issue.

I'm hesitant to start replacing things before I can track down the issue to one thing...I guess it's possible I have a few issues? The motor is the hardest thing to get to, so I'd like to start with grounding, but I can't chase the wire...it goes into a bunch of wires taped up and I'd have to disassemble a large wiring bunch to trace it.

I'm trying to learn as much as I can before I get too far down a road I don't really understand.

Do you guys have any advice?
 

froggy1150

Master Chief Petty Officer
Joined
Nov 3, 2017
Messages
803
One other thing I didn't see mentioned here.... in the motor itself is an overload. I went thru the gears, solenoids and motor armature/brushes and could not get consistent operation out of it. After I bypassed the thermal overload it works well. I just have to AWARE of the position and not drive past stop or it will smoke the motor. For me this is a temp fix til I get a new motor. Just letting you know what I had......
 

Redrig

Master Chief Petty Officer
Joined
Oct 13, 2009
Messages
849
Since this is a "new to you" boat . I would remove the drive to do all of this maintence anyways .

becuase you need to change the impeller and grease all of the splines on the driveshafts and give everything a good look over .

plus that way it will be much easier to fix that tilt motor seal and gasket, removing a stringer is pretty easy anyways .

Edit - one other thing , with all of this troubleshooting of the tilt system . DONT hold the tilt down switch , always lower the drive in little bursts rather than holding the switch down . I wish I knew that when I first got my boat , the first outing out I snapped the motor prongs by holding the switch in
 

JBtwist

Seaman
Joined
Jul 22, 2018
Messages
58
I can't reply to one message at a time, so first thank you.

What/where is the "thermal overload"?

Also, removing the outdrive is pretty intimidating at this point...certainly a possibility after boat season. Do you need an engine hoist to do that?

I'm still trying to get clear identification of what I have. Here's the label I found on the motor near the back on the port side.
 

Attachments

  • photo299325.jpg
    photo299325.jpg
    211.8 KB · Views: 1

froggy1150

Master Chief Petty Officer
Joined
Nov 3, 2017
Messages
803
Inside the motor is a piece of spring steel that has contacts on it and is in the electrical path to ground. This "spring" is calibrated to "sprung" at a specific amperage/temperature and when it cools it Springs back. So if you put the motor In a bind it's the first thing to get hot and open. This is not a replaceable item. If I remember right the contacts were visible like a set of points so if you do open the motor to clean the brushes you can also clean this contact too. Mine was rusted rotten so I just cut it out for testing. Also a little trick to reassemble motor.....
the brushes are tricky to hold open when putting back on armature I took fishing line and looped it around wires on the brushes and tied it off to each other side and when ready for bolts just cut line and pulled out.
 

southkogs

Moderator
Staff member
Joined
Jul 7, 2010
Messages
14,796
Removing the drive is pretty easy actually, the biggest thing you'll need to watch is your shift cable. Those are hard to find and rather pricey. You don't need an engine hoist. Maybe a bud to help you position it, but i was always able to remove and replace mine by myself.

By your model number you've got an '86 3.8 liter, Mechanical Shift Stringer. The SPH in the model number I can't make sense of. I can only find SRM, but otherwise it works out.

On your tilt issue, I'm placing a bet on your tilt motor. They're a pain to get to, but you probably want to pull it and have it cleaned/inspected/rebuilt. If you've got power, and the solenoids are working that's the most likely culprit.
 

Scott Danforth

Grumpy Vintage Moderator still playing with boats
Staff member
Joined
Jul 23, 2011
Messages
47,558
pulling the drive is easy.

disconnect lower shift cable from ESA
take shift cable retention clip off of intermediate
take trunion caps off
have a helper guide the shift cable as you pick up drive off of tilt sector and tru-course steering gear

my guess is the drive without the prop is in the 80# range.
 

JBtwist

Seaman
Joined
Jul 22, 2018
Messages
58
OK, so I finally got the guts up to get the tilt motor out and wow! Everything was so old and stuck on that I ended up removing the boot and completely disassembling the entire clutch pack to get the tilt motor out.

I have all the replacement parts and I'm ready to put it all back together, so I have a few questions:

1. Anything I need to pay special attention to in putting it all back together?
-- I remember someone mentioning the little plastic washer that came off the old tilt motor, I have that.
2. When I put the boot back on, is that just silicone that was around the boot? Any special work I need to do to seal it?
3. There is a rod in the picture "tightening sproket" -- it appears that I put on the o-ring and then tighten down the clutch gears with that rod? It has an allen wrench screw in the end...how tight do I want to make that? It appears it's an adjustable screw even with everything back together.
3. What about that spring loaded mechanism that came out right after the motor? Is that to relieve tension from the motor once it stops adjusting?

Any other advice or words of guidance?
 

Attachments

  • photo300706.jpg
    photo300706.jpg
    281.6 KB · Views: 0
  • photo300707.jpg
    photo300707.jpg
    115.4 KB · Views: 0
  • photo300708.jpg
    photo300708.jpg
    152.1 KB · Views: 1
  • photo300709.jpg
    photo300709.jpg
    160.2 KB · Views: 0
  • photo300710.jpg
    photo300710.jpg
    249.3 KB · Views: 2
  • photo300711.jpg
    photo300711.jpg
    331.7 KB · Views: 2
  • photo300712.jpg
    photo300712.jpg
    376.6 KB · Views: 2

kenny nunez

Captain
Joined
Jun 20, 2017
Messages
3,075
The proper way to set the “break away torque” on the clutch pack has to be done with a special tool and a torque wrench and I am sure you do not have . The best I can tell you is to be sure that the drive does not lift when the drive is in reverse.
Start off with a loose setting where you can lift the drive by pulling or pushing it down then tighten the tension bolt a until you cannot move it then another 1/2 turn more.
 

JBtwist

Seaman
Joined
Jul 22, 2018
Messages
58
That helps me, thank you.

Any advice on sealing the boot? Is that just standard silicone? The stuff on mine is brown.
 

kenny nunez

Captain
Joined
Jun 20, 2017
Messages
3,075
Clear or black silicone will do the job. I always first got all the screws started the fed the sealer under the rubber then worked my around with the screws until they were all tight. The most important thing. is to have the clamp seated to the boot around the intermediate housing.
 
Top