My first bellows job and nervous

auger406

Seaman Apprentice
Joined
Feb 8, 2019
Messages
37
Good afternoon gents,
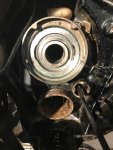
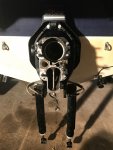
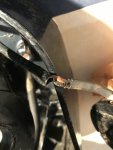
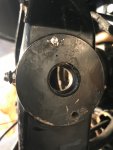
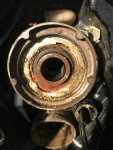
Tomorrow morning I will be starting the bellows replacement and gimbal bearing replacement. This my first attempt at this. i have been planning this for a while gather the tools recommended by OEM and the parts. I have a 1996 Bayliner 2050 Capri 40th Anniversary. Have since purchasing used in 2003, replaced the engine in 2004 (5.0 L MPI) and the upper and lower out drive with SE-116 in 2012. I have done the servicing by myself up to this point but left the repairs up to the professionals. I have decided to tackle this repair for not only the savings in labors and parts mark up but to increase my knowledge of the rear end of my boat. The U-joint bellows has a tear in it what is driving this and from what I have viewed and read, If you do one do them all. I have read many posts on I-boats and viewed many you tube videos and have the service manuals. I consider myself to be mechanically inclined. It just feels like there is so much to it and the potential is high for something to go wrong. I plan to post pictures of he progress and any learning that I have. Feel free to help pump me up or at least cheer me on.

Thanks in advance,

Lee Carlson
1996 Bayliner Alfa 1 Gen 2
2004 5.0L MPI
2012 upper and lower SE-116
 

Chris51280

Ensign
Joined
Jan 24, 2018
Messages
911
Are you doing the exhaust bellow or a tube? This is in my opinion the most difficult one to do since it is the last one doing the bellows style. I have the Gen1 but they are 95% the same. Use a long screw driver for the drive bellows on the bell housing and a flex screw driver to reach up to the other hose clamps.
If you look how the hose clamps are positioned right now, imagine which ones you can access first to disassemble and then reverse when putting it together.
 

alldodge

Moderator
Staff member
Joined
Mar 8, 2009
Messages
40,756
Follow the manual and yo will be fine

The U-joint bellows has a tear in it

Do a real good check of you U joints to ensure there is no water in them
 

Alumarine

Captain
Joined
Feb 22, 2005
Messages
3,695
If you are going to install an exhaust bellows and not the exhaust tube I would recommend buying an exhaust bellows tool.
Some people make a tool but personally I find the store bought ones work better for me.
 

thumpar

Admiral
Joined
Jun 21, 2007
Messages
6,138
I made the exhaust bellows tool but if/when I do it again I will buy the real tool.
 

tpenfield

Moderator
Staff member
Joined
Jul 18, 2011
Messages
17,711
I did the U-joint bellows on my twin Bravo drives. I am assuming that you have an Alpha drive, based on the boat?

The best advice I can give is to reference the Mercruiser manual for the drive, and take it slow, not getting ahead of yourself. I agree with the suggestion to check/replace the u-joint, since your bellows has a tear in it.

I could never get the exhaust bellows to stay on the mating flange on the bell housing, so I went with the exhaust tube. The Alpha may be a bit better than the Bravo in that regard.

Make sure you get the OEM parts and supplies (adhesive) as they will be the best and last the longest.
 

rickasbury

Senior Chief Petty Officer
Joined
Jul 13, 2011
Messages
756
So far as being nervous and I was also when I did mine- even if you screw up the bellows you be hard pressed to sink the boat. Consider you have the bearing with the drive shaft so water would not just over take the boat. If you have a biebie pump you'd still be ok! Go for it, take pictures...you might go ahead and look at the steering pin and the seal...
 

QBhoy

Fleet Admiral
Joined
Mar 10, 2016
Messages
8,310
You’ll be fine. As said. The manual will keep you right. Just remember the drive lube header tank pipe fitting. Seen many many people forget that and rip it off with the drive.
Rough up the bellow sealing surface on the drive for a better hold. Not unknown for people to do a great job on the day...only to find the bloody bellow come right off the first time the drive is tilted up. All the best.
 

auger406

Seaman Apprentice
Joined
Feb 8, 2019
Messages
37
Well day one went pretty well. At first it didn’t start out very well, after getting the stern drive off the Stbd trim sending unit one of the screws was stripped out, then easy out brok off in it but managed to get the screw head off. That same side had exposed wires that appeared to have been rubbing on the bell housing so will be replacing those. After that things went okay, the water intake hose and gear lube oil hose were a bear to get off. I cut them and will replace them both. I did not understand at first what the manual said about “ pull them through” until i was able to really spend some time reading last night after I was done for the evening. One thing i am debating is to pull the shift cable all the way out and replace the shift bellows. It is disconnected from the engine bracket but still threaded through the bell housing. My line of thinking is the less i take apart the less to put back together and the shift bellows is in good shape. However, i have it this far I might as well replace it, these are the things that we DIY folks with ponder from here on out. The great thing was the engine alignment was true before and after the gimbal bearing was installed. And from the pictures as you can see it need to be changed. I would like to hear some pointers on how to get the water and oil hose back on. Thinking of using a heat gun we wil see. As far as the questions about the bellows I have the tools OEM adhesive and the bellows tools. Steering pin is a different question all together. Thanks for all of the posts. I have some time to before other parts get in to think. Tough work but learning a lot.
 

Attachments

  • photo308824.jpg
    photo308824.jpg
    793.2 KB · Views: 1
  • photo308825.jpg
    photo308825.jpg
    756.5 KB · Views: 1
  • photo308826.jpg
    photo308826.jpg
    859.6 KB · Views: 1
  • photo308827.jpg
    photo308827.jpg
    542.1 KB · Views: 1

Grub54891

Vice Admiral
Joined
Jun 17, 2012
Messages
5,915
Do the shift boot, and normally I do the shift cable at the same time. You won't regret it. You will know that was done at the same time, and feel safer.
 

auger406

Seaman Apprentice
Joined
Feb 8, 2019
Messages
37
Oh still trying to figure out how to make those fancy signatures but here are two more pictures and the description again of what i am working on.

1996 Bayliner 2050 Capri
5.0L Mercruiser MPI (2004)
Alfa 1 Gen 2 sterndrive replaced original in 2010 with SE-116
 

Attachments

  • photo308830.jpg
    photo308830.jpg
    576.1 KB · Views: 0
  • photo308831.jpg
    photo308831.jpg
    843 KB · Views: 0

Grub54891

Vice Admiral
Joined
Jun 17, 2012
Messages
5,915
Them screws can be a pain. You can drill and tap new holes close to the old ones and still be able to index the puck.
 

alldodge

Moderator
Staff member
Joined
Mar 8, 2009
Messages
40,756
Do replace the lower shift cable, it wears and you don't want to have to go back in there again. When the cable outer jacket is removed, don't forget to attach a string to the cable to use to pull the new one back thru
 

JASinIL2006

Vice Admiral
Joined
Feb 10, 2012
Messages
5,548
Do replace the lower shift cable, it wears and you don't want to have to go back in there again. When the cable outer jacket is removed, don't forget to attach a string to the cable to use to pull the new one back thru

This is good advice... if you forget the chaser string, you’ll be sorry...
 

QBhoy

Fleet Admiral
Joined
Mar 10, 2016
Messages
8,310
Well done so far. Slightly ahead of the game...but when you finish that...change the damn diz cap on that 5.0 mpi too, haha.
 

auger406

Seaman Apprentice
Joined
Feb 8, 2019
Messages
37
Day 2, only about half the day. Ordered the parts last night. However, a productive day borrowed a heat gun and some dish soap and wow that water line slipped on like nothing. Spent about an hour yesterday cussing and pushing on that thing. It went on in less than five minutes. Prepped for the trim sending and sensor units, Bayliner must have had a special on screw-in zip ties to the transom there were like ten for 2 1/2’ of wire, the other side had none but is pinched under a section of the motor, it really amazes me that they worked. Then onto removing the exhaust elbows, rubbers, and enough worm gear clamps to hold down a house in a hurricane. Port side exhaust flappers were in tact , but removed them anyway. Stbd side had the missing one half but recovered everything everything else. Tomorrow with just clean up and get organized for the arrival of the parts. I am replacing shift cable and bellows, was leaning that way but thanks for the nudge needed it, it makes sense. For future info other than stiff or corroded u- joints is there a tell tale if I choose to replace them?
Thanks again for the kind words!!
 

alldodge

Moderator
Staff member
Joined
Mar 8, 2009
Messages
40,756
Port side exhaust flappers were in tact , but removed them anyway.

I would replace them

Dare I say this but “ Diz cap” ?????

Meaning the distributor cap. The cap on your motor is mostly called a crap xap. They can look great and still cause misfires and no starts. Its a good idea to replace the cap and keep the old one as a spare. This way if and when the cap goes out, you will have one to replace with if needed
 

auger406

Seaman Apprentice
Joined
Feb 8, 2019
Messages
37
So while I am waiting on parts. My intrest has increased in the notion of replacing the Distributor cap. If the one on the motor is crap , which is now 14 yrs old, what do I replace it with? Should I look for an up grade. Before I started looking into the bellows and gimbal bearing I replace the spark plugs,wires, oil and oil filter , fuel filter, and will change the gear lube and the impellor after the stern drive is back on. Never had a distributor problem before, but don’t want one either?
 

alldodge

Moderator
Staff member
Joined
Mar 8, 2009
Messages
40,756
Its the design of the cap that makes it a problem, and there is no newer design that fixes it. Going 10 years is great, but the issue has always been there is no warning when it starts to go
 
Top