Mercruiser 3.0L in 1984 Four Winns Marquise 170

highfigh

Seaman Apprentice
Joined
Sep 1, 2018
Messages
39
The boat in the title followed me home a couple of weeks ago and the add said it had overheated & he told the kids that if it started to cost him, the boat goes.

I should have asked more questions.

He said it wasn't run long after he saw that it was overheating, but I doubt this. the impeller had no vanes and I found them when I removed the water inlet water picks (that's what they're called in the parts diagram), which keep chunks from entering with the raw water. The water tube had melted and sagged over the rear bolt that holds the upper and lower water pump housings together and in the bearing carrier, I found more rubber, including what looks like shutters for the exhaust and water in the exhaust.

How much of a PITA is it to get to this?

Thanks
 

Rick Stephens

Admiral
Joined
Aug 13, 2013
Messages
6,118
If you overheat, the water tubes melt pretty easy. Pull the drive, split the halves, and go fishing for the junk. Should pull thermostat housing as well. Not that big a deal.

You should also pull the exhaust elbow off and check out the shutter. Something melts the water pocket it will crispy critter the shutter.
 

highfigh

Seaman Apprentice
Joined
Sep 1, 2018
Messages
39
Thanks for the reply. I worked at two boat dealerships and saw many overheated boats- after doing hundreds of these water pumps, the actual change of the pump doesn't take long, but digging for the untold info is where the time is spent/wasted. I think I had the lower gearcase off in about two minutes and the old pump came out without a hitch. When I saw that the impeller's vanes were gone, I went directly to the water intake slots, which is where I found a whole handful of rubber bits. I plan to pull the thermostat, mainly because I suspect that it's the OEM part and has never been touched in 34 years. The good thing about this engine and boat is that the whole engine and exhaust are exposed, not like some that are well-hidden and inaccessible.

I have never been a fan of the 3 liter engines, but I only paid $500 for the boat- on an EasyLoader trailer, with a new anchor & 50' rope, two props, fender & mooring ropes, an oar, battery, some safety gear and a cover. I have a friend at Lake Of The Ozarks and might take it down there since I'm nearing retirement, or at least backing my way out of the rat race. Besides, they have a problem with reliable boat servicing down there and it would be a good way to keep busy.

BTW- having a hard time getting the bearing carrier out- I know it has a small key, but I haven't done a Gen I outdrive in over 25 years, so I don't remember all of the details about removing it. I have the retainer off, as well as the stainless locking ring, but it hasn't budged, yet. I don't really like using a slide hammer on this part, either- it should come off with a puller and with the gear case in such good condition, I thought it would come out easily. I don't remember it being threaded and the diagrams don't show thread. Any ideas?
 

Rick Stephens

Admiral
Joined
Aug 13, 2013
Messages
6,118
Same bearing in Gen I as II, no key, just tight fit in aluminum. Easier to pull the carrier with the bearing in it than not. You can freeze it, use canned air turned upside down to spray it. Then the choice is a long puller against the bellhousing or a slide hammer. You are unlikely to harm the gimbal housing.
 

kenny nunez

Captain
Joined
Jun 20, 2017
Messages
3,075
What about the condition of the plastic upper water pocket cover in the upper housing? Most of the times it gets melted and distorted resulting in water squirting out the mating surface. Depending on where you are salt/fresh could be an issue removing the 4 bolts and not breaking them off.
In my area a “smoke wrench” was the tool of choice on most of the drives I serviced. I had a puller that I bought at a trade show that would lock in the fins of the carrier with a 1” threaded bolt that never failed.
 

achris

More fish than mountain goat
Joined
May 19, 2004
Messages
27,468
Gen I and Gen II, same same.

Best trick I've seen, and used, is to put the puller on and load it up, then start heating the housing where the carrier sits (2 spots. One right near the lock ring, the other just aft of reverse gear. Do both sides of the housing at those 2 spots) Once it's nice and warm, turn the screws on the puller and they slide right out.

Chris...
 

highfigh

Seaman Apprentice
Joined
Sep 1, 2018
Messages
39
Well, as I wrote, I should have asked more questions.

I went to the boat yesterday, to check into the damage a bit more and found:

the shutter had indeed been destroyed, so I disassembled the exhaust and removed the remnants, as well as the crumbling gasket for that area- it's now just a bit of carbon. The rubber mating bellows didn't seem to have any weak spots, so I may try to use it- if it leaks, it's not hard to replace.

The thermostat looked original and rusty- the gasket seems to have been original, too. The two hoses connected to the thermostat housing were soft and didn't want to come off; I didn't have my hose tool, so the ends were damaged when I removed them- no big deal.

Cap, rotor and plugs look new- it runs, just not well because.....

Compression test-

#1 had 120 lb
#2 had 0 lb,
#3 had 120 lb
#4 had 150 lb

I'm hoping it's just the head gasket, but will see when I disassemble. Will make sure the head is flat and not cracked when it comes off; if the cylinder is scored, piston burned, block is cracked, etc.

Water pocket cover assembly is already on my list- it was badly melted, too. This is in SE Wisconsin, so salt water isn't a problem unless maybe, it was run near a stormwater sewer after they salt the roads. The outdrive and engine look very clean- much cleaner than I would normally expect for an '84 model year boat .

Looking for the part number for the O-ring that connects the exhaust components at the shutter- haven't seen it in the Sierra catalog and haven't found my manual yet.

Also looking for part numbers for the hoses that connect to the thermostat housing.

This is Mercruiser manual 13, right?

I didn't expect this to be a "wipe the dirt off and have a good boat" experience, and this one didn't disappoint on that level but I thought that maybe the guy would have told the truth when I asked "How long did it run after you noticed it overheating". He's either FOS or not very observant.

I like the format of this forum- I accidentally closed this tab and when I came back, I found that the rest of the post had been saved. Woo Hoo!
 

highfigh

Seaman Apprentice
Joined
Sep 1, 2018
Messages
39
Same bearing in Gen I as II, no key, just tight fit in aluminum. Easier to pull the carrier with the bearing in it than not. You can freeze it, use canned air turned upside down to spray it. Then the choice is a long puller against the bellhousing or a slide hammer. You are unlikely to harm the gimbal housing.

I'm trying to remove the bearing carrier in the lower gear case, not the gimbal. Freeze Mist sounds like a good option- thanks.
 

highfigh

Seaman Apprentice
Joined
Sep 1, 2018
Messages
39
Used my heat gun- came right out and as usual, the can of freeze mist I have had for years had almost no pressure. I guess I always overestimate the heat required to expand metal, even though we covered coefficient of expansion & contraction when I was in school (fourty-some years ago).

Now, I need to see if the second half of the shutter is still in the exhaust, or if it already went through- the piece I found was in with the bearing carrier. I'll stick my camera scope in from both ends and look around. I think I'll do the same with the cylinder, if it fits through the spark plug hole.
 

highfigh

Seaman Apprentice
Joined
Sep 1, 2018
Messages
39
OK, so I used my air compressor to blow air into the cylinders yesterday, to find out if I would hear air leaking from #2 to #1 and #3, but #2 always had air going to the exhaust. I bumped the starter and heard air coming out of the intake at times, but it never stopped coming out through the exhaust. None of the other cylinders had this problem so I looked at the time and seeing that it was only noon, I decided to find the problem once and for all. I removed the intake & head- the #2 exhaust valve is stuck open and all of the surfaces of the head in the chambers of all cylinders are rusted, which tells me the pinhead I bought the boat from lied his butt of when I asked how long he ran it when it overheated and it's doubtful that anyone fogged it in the unlikely event that anyone Winterized it. I wonder when he was going to tell me it ran like crap.

Oh yeah, the head gasket was bad, too. I'll find out tomorrow if the valve is bent or if the inner spring is broken. Either way, it needs to be cleaned up and made right.

Now, I need to look at the cylinder walls with bright light to see if they have any cracks.
 

achris

More fish than mountain goat
Joined
May 19, 2004
Messages
27,468
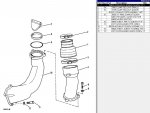
Here's your exhaust system, with part numbers...
exhaust.JPG

Unfortunately, cracks are usually in the water jacket, not the bores. And to test the block and head for cracks, you need to put the head back on. You might get away with a flat plate, with a rubber gasket to cover the top of the block, then somehow pressurize the block to see it it's leaking (cracked)...

Good luck.

Chris...
 

highfigh

Seaman Apprentice
Joined
Sep 1, 2018
Messages
39
Here's your exhaust system, with part numbers...


Unfortunately, cracks are usually in the water jacket, not the bores. And to test the block and head for cracks, you need to put the head back on. You might get away with a flat plate, with a rubber gasket to cover the top of the block, then somehow pressurize the block to see it it's leaking (cracked)...

Good luck.

Chris...

I have a link to the Mercury/Mercruiser site that shows exploded views for all of their engines and drives, thanks. The shutter valve was toast- I found almost half of it in the area of the bearing carrier just after I started looking for the missing rubber from the impeller.

Most of the cracks I have seen were visible from the outside- 4.3l & 5.0/5.7l tended to be horizontal, just under the plugs and the cracked 3.0l engines I saw were about halfway between the lip of the oil pan and the mating surface of the head. This engine is so clean- I really hope it's not cracked because the casting plugs are very small and it would seem less likely that they would push out as easily as the ones that are larger in diameter.

The exception to the external cracks- I had a guy come in with a Ski Nautique (351 Ford engine) that "needed a tune up because it runs rough". Right. I opened the engine cover and the first thing I saw was Permatex Ultra Copper gasket sealant that had squeezed out from between the head/block and intake manifold/head. I told him he probably had a bad head gasket, so he left it for me to check out. It idled great but on the water, it was bad as soon as I gave it a little throttle. No compression on #2 and 15 psi on #3. I got the OK to do the repairs and had the head magnafluxed, made sure it was flat and reinstalled it. It ran great- compression was beautiful but when I gave it some throttle, it clunked and started knocking. Upon removal from the boat, I found a nice, shiny casting/freeze plug between the #2 and #3 cylinders and after removing the pistons in that bank, I saw a faint line in the cylinder wall, which caught my fingernail when I scraped it. The piston skirt had caught it, cocked and distorted, then hit the crack every revolution.

The guy never volunteered info that it had frozen OR overheated- I asked when these events happened and he hemmed & hawed, trying to make me think he didn't know.
 

Rick Stephens

Admiral
Joined
Aug 13, 2013
Messages
6,118
Hope you find some good news. Realize there is really nothing called a 'freeze plug'. Nothing with the purpose to do any protection for frozen internal water. Core plugs sole purpose is to plug the casting holes. That they pop out when water freezes is solely incidental and almost always indicative of the greater problem, actual cracks in the block. It is good that you don't have any popped out, but they almost never do in the 3.0L engine.

Most common crack location on SBC, including 4.3L, is longitudinal cracks in the lifter galley right above the lifters. That location is thinner than under the plugs on the outside walls.
 

highfigh

Seaman Apprentice
Joined
Sep 1, 2018
Messages
39
Hope you find some good news. Realize there is really nothing called a 'freeze plug'. Nothing with the purpose to do any protection for frozen internal water. Core plugs sole purpose is to plug the casting holes. That they pop out when water freezes is solely incidental and almost always indicative of the greater problem, actual cracks in the block. It is good that you don't have any popped out, but they almost never do in the 3.0L engine.

Most common crack location on SBC, including 4.3L, is longitudinal cracks in the lifter galley right above the lifters. That location is thinner than under the plugs on the outside walls.

The distinction between 'freeze plug' and 'casting plug' is the reason I put the / between them- I have heard them called 'freeze plugs' far more than 'casting plugs' and I have corrected many people on this. The ones in this block are so small I seriously doubt they would ever push out in the event of a hard freeze, so it also explains why so many 3.0 liter blocks have cracked over the years, as well as their scarcity. I'm going to remove the cover on the side with the push rods, to make sure- if it's cracked, that guy is gonna have some splainin' to do.

I removed the valve springs on the stuck valve and even without them, it doesn't want to move very well. If it takes cleaning, a new valve & guide and a set of seals, it will be good to have a head that is known to be in good working order (assuming it's not cracked). If the block is cracked, the head will be worth more than a couple hundred bucks and that can go toward a different engine.
 

highfigh

Seaman Apprentice
Joined
Sep 1, 2018
Messages
39
OK, Winter is almost over (in theory) and it's time to get back into the boating season. Sort of. I still need to re-install the head.

Also, here's an update:

The seller lied his butt off when I asked how long it ran after overheating. He didn't shut it down immediately, unless he meant 'that time'.
It's not a 3.0L, it's a 2.5L
The engine was badly overheated- it had a bent valve, warped head, melted water pocket cover, melted raw water pump cover & water tube, charred exhaust bellows at the elbow, the impeller had no vanes but I retrieved the pieces from the water inlet below (thanks you Mercruiser, for making the covers for the raw water inlets removeable), melted exterior exhaust bellows, melted/almost non-existent water shutter and the O-ring at the shutter was a crunchy piece of carbon.

Since I needed to disassemble it, I replaced all of the gaskets involved, as well as the thermostat that had apparently never been. The good news- the head was magnafluxed and found to be free of cracks, so the shop media blasted it, flattened it, did a complete valve job, replaced the bent valve and valve guides. Looks like new. It seemed like a better choice than buying a used head and paying for checking it out and doing any work on it- the shop mainly works on performance cars, but they also work on boat engines.

The cylinder walls look great- cross-checking is still there, the push rods are very clean and the lifters look pristine, as does the whole area behind the side cover.

I decided to replace the bearing carrier- the cost of needle bearings, reverse bearing, seals and the time to replace them just wasn't worth it, so I bought a new one. The gears, prop shaft and inside of the cone look great, so I'm hopeful that this will turn out well.

I can't wait to replace the external exhaust bellows- I might opt for the one that uses a single hose clamp.
 

Bondo

Moderator
Staff member
Joined
Apr 17, 2002
Messages
70,525
I'm going to remove the cover on the side with the push rods, to make sure- if it's cracked,

Ayuh,..... There's No water on that side of the block, so there won't be any cracks on that side,.....

If there are cracks, they'll be on the port side of the block, either to the outside, or into the oil side,....
 

highfigh

Seaman Apprentice
Joined
Sep 1, 2018
Messages
39
Ayuh,..... There's No water on that side of the block, so there won't be any cracks on that side,.....

If there are cracks, they'll be on the port side of the block, either to the outside, or into the oil side,....


Right- I looked there to see the condition, whether it looked like the lifters were damaged, push rods bent, general condition- everything was immaculate behind the cover. The port side is where I looked for the rust line and it's clean. I guess he may have been honest when he said it was kept in the garage, but that's from a cosmetic POV- there's no guarantee it couldn't freeze in the Milwaukee area. I was really surprised by the appearance of the engine- much cleaner than I would have expected, based on seeing so many of these that had been treated like farm animals.
 

highfigh

Seaman Apprentice
Joined
Sep 1, 2018
Messages
39
Fast forward to now- I put it on hold while the Summer weather was hot & humid because I have already worked on boats in heat/humidity, but decided last fall that I would replace the U-joints and a few small/cheap parts like the thin Synthane washers on the bell housing, so I went to a local dealer to get them and accidentally got a job servicing boats. Unfortunately, I'm having some medical issues and won't be able to get the U-joints in place for a little while but I did set the timing and ran it for a few seconds last Fall so I could fog it and put it away for the Winter. Looking forward to getting it done and in the water.

I had to polish some gel coat at work in January and the shop manager let me use his SnapOn mini battery powered polisher- really a cool little tool, so I bought the Harbor Freight version when it was on sale and made a couple of shiny spots on the hull as a way to get an idea of how it might look if I polish the whole thing. So far, so good. At this point, I think I'll just remove the stripes, polish the whole boat and re-stripe it. Haven't decided what I'll do with the interior, but I have a friend who owns an upholstery shop and he told me he would teach me to sew and help do the interior if I decide to replace it. We trade labor, so it shouldn't be very expensive and I have already done a lot of upholstery- the sewing will be the only real challenge.
 
Top