bad ignition module???

tfret

Chief Petty Officer
Joined
Sep 6, 2006
Messages
469
1984 5.7L mercruiser, ran fine in the drive way before going to the lake. Cranked up just fine at the lake. Motored out about 50 yards and it began to spit and sputter really bad, then stalled. It dieselled really bad after stalling. It has never dieselled before. Never would start again but back fires out the carb. I noticed that with the key just turned to the ON position, I heard a continuous clicking sound. Turns out the coil is firing repeatedly with the key in the ON position. It stops if I disconnect the hall affect sensor coming from the distributor. I replaced that sensor about 2 years ago. Something is firing the coil and I figure it could only be the ignition module. It's a Thunderbolt IV. Any and all suggestions are much appreciated. Please advise.
 

Fun Times

Moderator
Staff member
Joined
May 16, 2009
Messages
9,085
If you bump the key to rotate the rotor just a bit, will the clicking/firing of the coil stop? Try removing the rotor and ensure it's not touching the sensor.
Is the coil actually producing spark?
Try tapping on the side/front of the ignition module, maybe something is stuck internally.
What color wire did you first remove to stop the clicking..White with Green or White with red?
Is this the style of your ignition module, http://www.ebay.com/itm/7804A3-Igni...4818161?hash=item43e762c2f1:g:iBQAAOSw~otWed~
If so, while that unit is used, that design is harder to come by as they've upgraded over the years with different style kits in the $500.00 range. Other designed complete ignition systems can also be found in the $300.00 range.
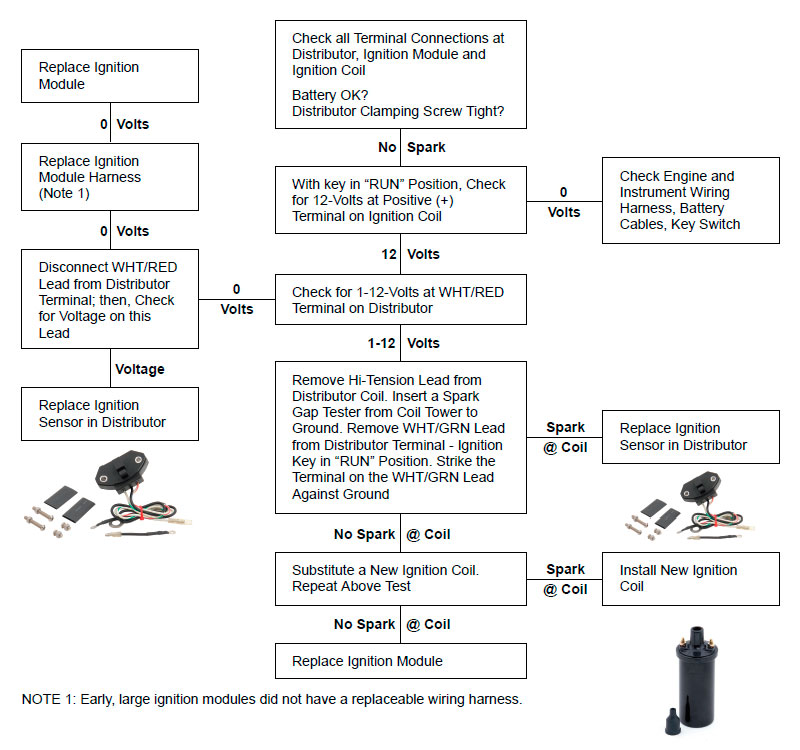
May want to try following all the steps of the ignition test below just to see if you can find something out of place.
MERCSB92-11-illus.jpg


2010-07-09_202914_scan0003.jpg
 
Last edited:

tfret

Chief Petty Officer
Joined
Sep 6, 2006
Messages
469
If move the rotor button so that no tab is inside the ignition sensor window, the firing stops. Or if I disconnect the green wire from the sensor. Seems either the sensor is falsely triggering the ignition module, or ignition module is falsely firing even though the rotor isn't turning. I don't know how to determine which one it is.
 

tfret

Chief Petty Officer
Joined
Sep 6, 2006
Messages
469
Yes that is the same module I have. The troubleshooting chart doesn't have my problem. And the wire I disconnected was green / white. Another observation, if I pull the rotor out and simply stick a flat screw driver in the sensor window the coil begins to fire continuously. Thanks for any help. I'm stumped.
 
Last edited:

Fun Times

Moderator
Staff member
Joined
May 16, 2009
Messages
9,085
The troubleshooting chart doesn't have my problem. And the wire I disconnected was green / white. Another observation, if I pull the rotor out and simply stick a flat screw driver in the sensor window the coil begins to fire continuously. Thanks for any help. I'm stumped.
I know it don't have your exact problem! But in this case it's going to be more of a guide to hopefully help figure something out in this odd case. There is one step in there that might help lead you to where the interlaying problem lies.

And yes, by falsifying the sensor with a screwdriver vs turning the rotor wheel will trigger the coil to fire as it thinks the rotor is turning. With removing the White/Green wire is removing the signal wire to first the module then to the coil via the gray wire. Even using the screwdriver, the coil should only fire once per pass/swing of the screwdriver...Not continuously.

In the middle test where it says strike the White/Green wire to ground... As a test/in this case you'll want to try striking the wire multiple times by hand, and also try just holding the wire there to ground to see if the coil is still firing. It should fire during the strike but it should not fire held to ground. I'm thinking possibly/just maybe if the coil happens to keep on firing held to ground then maybe while it's odd it is the module.

Test # 2 to try... Remove the white/green wire form the distributor sensor, remove the gray wire from the - side of the coil and run a jumper wire between the sensor to the - coil and see if the coil fires/continuously.
 

tfret

Chief Petty Officer
Joined
Sep 6, 2006
Messages
469
I follow ya. I'll try those next to test the module. I checked the voltages and they are correct. Can I use a volt meter to see the signal coming from the sensor? It shouldn't give repeated signals for a stationary object. I'd like to check that too if you know how. Thanks
 

Fun Times

Moderator
Staff member
Joined
May 16, 2009
Messages
9,085
I follow ya. I'll try those next to test the module. I checked the voltages and they are correct. Can I use a volt meter to see the signal coming from the sensor? It shouldn't give repeated signals for a stationary object. I'd like to check that too if you know how. Thanks
Actually a standard test light would be a better choice. The white/red is power going in, while the white/green is basically ground coming out. So you connect your test light to 12v + power and touch the white/green wire terminal of the sensor, (< both connected and disconnected for your odd situation) the test light should flash only once every time the rotor/screw drivers passes by.

To check for good 12 volts going into the sensor either use a multimeter with the black wire lead to engine ground and red wire lead of the meter to the white/red wire of the sensor. Or you can use the test light connected to ground for quick reference but it's always nice to know the actual voltage using the meter. Also like in the test I posted above, you may have to remove the white/red wire for a different volt reading while using the meter.
 

achris

More fish than mountain goat
Joined
May 19, 2004
Messages
27,468
Strickly speaking, the Purple wire is the raw supply. The white/red is regulated (and current controlled) 12v from the module to the sensor. The white/green is the sensor output, and switches between 5v and 0v (actually measured at more like 4.7v and 0.4v). It's these square wave pulses that the module reads as the setpoint for the spark timing. I say setpoint because using some mathematical trickery we can generate the required advance, based on the 'lookup' table, programmed into the module. The rate of the pulses gives us the engine speed (for a V8, 4 pulses per revolution) and that engine speed is used to calculate when the next spark is fired. Here's the trick (and it's very clever), as the spark needs to be fired BEFORE the sensor pulse is received (sensor is set at about 4 degrees BTDC), and let's say the engine is running at 3000rpm. The spark needs to fire 28 degrees before the module sees the pulse. So how does it know when to fire that cylinder? It doesn't fire that cylinder when the pulse is recieved. The next spark is fired 62 degrees AFTER the pulse is recieved. :D That's 28 degrees before the next one.... (sparks fire at 90 degrees intervals). And through maths we can calculate that the spark is fired 3.44mS (0.00344 Seconds) after the sensor pulse.

Told you it was clever.

Chris.......
 
Last edited:

NHGuy

Captain
Joined
May 21, 2009
Messages
3,631
Chris, you are a wealth of information to this of us who are interested in the "why" of things! Although this won't sink in completely, at least we have an explanation.
 

tfret

Chief Petty Officer
Joined
Sep 6, 2006
Messages
469
I know it don't have your exact problem! But in this case it's going to be more of a guide to hopefully help figure something out in this odd case. There is one step in there that might help lead you to where the interlaying problem lies.

And yes, by falsifying the sensor with a screwdriver vs turning the rotor wheel will trigger the coil to fire as it thinks the rotor is turning. With removing the White/Green wire is removing the signal wire to first the module then to the coil via the gray wire. Even using the screwdriver, the coil should only fire once per pass/swing of the screwdriver...Not continuously.

In the middle test where it says strike the White/Green wire to ground... As a test/in this case you'll want to try striking the wire multiple times by hand, and also try just holding the wire there to ground to see if the coil is still firing. It should fire during the strike but it should not fire held to ground. I'm thinking possibly/just maybe if the coil happens to keep on firing held to ground then maybe while it's odd it is the module.

Test # 2 to try... Remove the white/green wire form the distributor sensor, remove the gray wire from the - side of the coil and run a jumper wire between the sensor to the - coil and see if the coil fires/continuously.
​OK I performed these tests and here's what I found:
The "middle" test, First time I did this, I get a single spark each time I tap the green/white wires together. But also get multiple firing if I hold the wires together. It does nothing tapping or holding the green/white wire to ground.
Test #2 also does nothing.
Next I tried to see with an analog voltmeter the signal coming from the green/white wire while flagging the sensor with a flat blade screw drive. I couldn't see anything, even with the volt meter set all the way down on the 0.25 volt scale, no meter deflection at all. (sorry I don't have a test light for this)
Next I tried the middle test again. But this time I no longer get the multiple firing when holding the green/white wires together. Only once when they initially touch.
So, since it's no longer showing the problem, I wonder if by flagging the sensor with the screw driver, after tapping it many times, and the problem now appears gone, if the sensor is flakey and now functioning correctly? Or maybe disconnecting the gray wire somehow "reset" the TB module or something?
I haven't tried to start the engine, but I'll put muffs on it and try that next to see if the problem is gone. If so I still have a problem just waiting to return...

Update: I just tried to start the motor and all it does is crank and crank and I confirmed I'm not getting any spark now. This I have seen before when I replace the ignition sensor a couple years ago. I'm almost certain that is what is wrong and it has gone from flakey to just dead. If that's the case, I'm very disappointed in the Sierra replacement part I just purchased two years ago. The original lasted almost 30 years.
 
Last edited:

Fun Times

Moderator
Staff member
Joined
May 16, 2009
Messages
9,085
Next time you're out at a store, buy a test light or two and leave one on the boat as part of your tool set along with as unpredictable those ignition sensors under the distributor cap can be, I recommended that every boater that likes to be as prepared as possible keep an extra sensor and rotor on the boat as well as the rotor is easily damageable during removal as they are supposed to be locktighted down to keep the rotor from floating upwards at high RPM.

The thing with the sensors under the cap is there is no telling when or how long it will last... It could be 1 minute or out live the boat.

Heat and electrical spikes are the two main things that take them out and of course water/scuffing/corrosion, etc. will do it too....That mentioned, OEM is a little better overall.;)
 
Last edited:

tfret

Chief Petty Officer
Joined
Sep 6, 2006
Messages
469
Update: I received and installed a new ignition sensor today and she fired right up pretty as you please! I'm very pleased it was a fairly painless and low cost repair. Still miffed that sensor failed so soon. It still looked as pretty and new as it did the day I installed it 2 years ago. I noticed I had the old sensor torqued in really tight. I wonder if I stressed the expoxy case of the sensor perhaps and compromised something. I didn't screw the new one in as tight (they don't come with a torque spec or anything, just two Philips screws). Anyway, I'm back in business. Thank you to all who chimed in with your help. I hope this thread may help someone else some day. Happy boating!
 
Top