Johnson 1976 70HP (70EL76D) - Lots of water coming out bottom cylinder while running

comsci20

Cadet
Joined
Dec 28, 2014
Messages
18
Hello Everyone,

I just joined the forum after reading through a few threads and found there are a lot of knowledgeable people that might be so kind to help me with this old outboard.

Today I started up the outboard with the earmuffs on and found that the bottom cylinder is blowing out a spray of water while running. I found the below post which I think sounds very similar to my problem.


The questions I have are
  1. What is typically the more likely cause for water leakage, from my understanding on the below "Reference forum" there are two different areas the water is likely to be coming from. Head Gasket and Exhaust Gasket/Plates etc area.
  2. Does the volume of water give any clue as two which might be the cause of water leaking in ? Reason I ask is because I am in Australia and I can get my hands on the "313413 - GASKET,Cylinder head" but buying the Exhaust parts is going to be harder and take mucher longer to get hold of.
  3. What's the best way to confirm where the water is coming from ?
Thank you in advance for any advice or help you can provide, once resolved I will post the solution for others to learn from :)


Reference Details

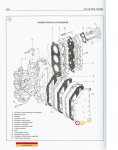
Outboard diagram and parts - > http://tinyurl.com/o549uux

Reference fourm -> http://forums.iboats.com/forum/engin...cylinder/page2
Head Gasket

71 - 313413 - GASKET,Cylinder head

Exhaust

28 - 317227 - GASKET,Plate to c'case
29 - 317215 - PLATE,Exhaust manifold
30 - 317228 - GASKET,Exhaust manifold
86 - 319097 - GASKET,Exhaust manifold

Background

The outboard has been well cared for before I purchased it and I have had it running on the water but admittly it was running bad with a big deadzone in the middle of the throttle range. If i managed to jump the deadzone it would get out of the hole for awhile but then bog down to just above idle speed. I think I might have been running on two pistons and found that the coil connection on the middle piston was not working (no spark) did the troubleshooting steps and confirmed. I have ordered a new power pack and will be working out how to install it but thats another thread...
 
Last edited:

racerone

Supreme Mariner
Joined
Dec 28, 2013
Messages
36,307
Is the spray coming out of the spark plug hole or near the sparkplug from the watercover gasket ?---------You need to be specific on this.
 

comsci20

Cadet
Joined
Dec 28, 2014
Messages
18
Hello Racerone , Thank You for quick response

The outboard was not starting so I diaconnected each spark plug in turn for troubleshooting when I disconnected the bottom spark plug I got it started. I could see the water coming straight out of the hole where the spark plug connects into on the bottom piston.

I turned the water off for a min and the water started to stop being sprayed out of the piston hole.
 
Last edited:

racerone

Supreme Mariner
Joined
Dec 28, 2013
Messages
36,307
You need to jump all over this and not waste any time !--------It may be too late already.------------If water sits inside the motor and gets on the bearings the corrosion starts immediately.-------Remove the exhaust covers and look for holes into the crankcase.
 

Will Bark

Lieutenant
Joined
Aug 1, 2010
Messages
1,470
Repaired a 76 70HP for my friend this summer that was doing the exact same thing, turned out to be the gaskets only that had failed; made sure the manifolds were still true according to instructions from FR and Joe Reeves and then replaced the gaskets. Motor was used often the rest of the year and is still running without any trouble. Hope that is the case with your engine but follow any and all instructions from Racer and the others. Good luck
 

comsci20

Cadet
Joined
Dec 28, 2014
Messages
18
You need to jump all over this and not waste any time !--------It may be too late already.------------If water sits inside the motor and gets on the bearings the corrosion starts immediately.-------Remove the exhaust covers and look for holes into the crankcase.

Thanks racerone, are you referring to looking for holes in the GASKET,Exhaust manifold OEM 0317228 ? I found diagram here -> http://tinyurl.com/o549uux
 
Last edited:

comsci20

Cadet
Joined
Dec 28, 2014
Messages
18
Repaired a 76 70HP for my friend this summer that was doing the exact same thing, turned out to be the gaskets only that had failed; made sure the manifolds were still true according to instructions from FR and Joe Reeves and then replaced the gaskets. Motor was used often the rest of the year and is still running without any trouble. Hope that is the case with your engine but follow any and all instructions from Racer and the others. Good luck


Hello Will, good to know someone else has had this problem before.

When you say gaskets how many and which ones are you referring to ? Did you replace all 4 gaskets ?

Also when installing these gaskets do I need to use any grease/adhesive/liquid ?

http://tinyurl.com/o549uux
Diagram Ref 29 - OEM 317215 - PLATE,Exhaust manifold
Diagram Ref 30 - OEM 317228 - GASKET,Exhaust manifold
Diagram Ref 86 - OEM 319097 - GASKET,Exhaust manifold
Diagram Ref 71 - OEM 313413 - GASKET,Cylinder head

Update

Reading my manual I can see they make reference to "OMC Gasket Sealing Compound" which should be used when replacing gaskets. I am trying to find the part number for this. Just to confirm is this the right silicon I should used to replace the above gaskets.

Update

I would have to order "OMC Gasket Sealing Compound" directly from the US which will take a long time to get hold of, I have found the below two equivalents but again the "Perfect Seal #4" is hard to get hold of in Australia. "Permatex Aviation Form-A-Gasket Sealant Liquid - No. 3" is much easier to get hold of and is sold in my local store. Anyone used this before ? Is it ok to use to replace the gaskets ?
  1. Perfect Seal #4
  2. Permatex Aviation Form-A-Gasket Sealant Liquid - No. 3
 
Last edited:

Will Bark

Lieutenant
Joined
Aug 1, 2010
Messages
1,470
We replaced all 4 gaskets and did use the OMC gasket sealing compound which was brushed on I am not familiar with Perfect seal or the Permatex but the OMC is a liquid to be brushed on; yes the manual did call for the sealant; You may want to wait for Racer or one of the other gurus to answer the question. Just go slow and take your time doing this. Good luck
 

laurentide

Lieutenant Commander
Joined
Jul 24, 2011
Messages
1,869
My '82 3 cylinder got hot (sucked up some weed) and warped the inner plate. I found a replacement plate on eBay and used Permatex #3 on the new gaskets. 100 or so hours since and no issues. Don't sleep on getting water displacer to the bearings and crank. I got lucky on mine thanks to this forum. Good luck.
 

boobie

Supreme Mariner
Joined
Nov 5, 2009
Messages
20,826
The Permatex # 3 does the same job as the OMC gasket sealing compound. Been there.
 
Last edited:

comsci20

Cadet
Joined
Dec 28, 2014
Messages
18
Thanks Boobie, Chemicalwire, Will Bark re gasket sealant I went out today and bought some Permatex Aviation Form-A-Gasket Sealant Liquid - No. 3
from "Supercheap" (Australian automotive store). For reference here is link to online store -> http://www.supercheapauto.com.au/onl...ecommendations

With all parts on order I have started to try a pull apart the Exhaust manifold (317228) by taking out the bolts but have run into a problem.

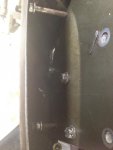
​The bottom three bolts seem to have corroded and are really stuck, one of them I have broken the head of and the other two are stuck (are starting to round the heads with so much trying). I have created a diagram with the problem. I have spread each bolt with WD-40 to lubricate them but that has not helped.

Here is my latest list of things I am trying to work out
  1. I am finding the bottom cowl is getting in the way but see no easy way to either drop it down further so I have more access or remove it.
  2. Thinking that I am going to have to remove the heads of the stuck bolts and try and pull the Exhaust manifold cover (317217) off and slide it to the side and then up and out followed by the Exhaust manifold (317228) then the manifold exhaust (0318309) then the gaskets and the rest of the exhaust manifold. This will leave the broken bolts threads exposed which I will then try and used vice grips to dislodge.
Any other ideas to get these bolts freed ?


70EL76D - Johnson 1976 70HP - Exhaust manifold stuck and broken blots.jpeg - Diagram of where broken bolts are located

70EL76D - Johnson 1976 70HP - Exhaust manifold stuck and broken blots photo.jpegPicture of where bolts are stuck
 

Attachments

  • 70EL76D - Johnson 1976 70HP - Exhaust manifold stuck and broken blots.png
    70EL76D - Johnson 1976 70HP - Exhaust manifold stuck and broken blots.png
    618 bytes · Views: 1
Last edited:

laurentide

Lieutenant Commander
Joined
Jul 24, 2011
Messages
1,869
You can drill holes in the lower cowling to access and remove those bolts, but I think it may be easier to pull the powerhead than to completely drop the lower cowl out of the way, especially with the frozen bolts. I'm not sure if I'm remembering this right, so someone please correct me if I'm wrong, but to actually remove the bottom cover the whole exhaust leg has to come off?

On mine I loosened the cowl but still had to drill for the bottom 3 bolts. It would have been easier to remove four bolts and pull the head (and replace the gasket under the head). I used stoppers to plug the holes I drilled.

The hardest part for me is getting the shift rod linkage back together in that tight space.
 

Will Bark

Lieutenant
Joined
Aug 1, 2010
Messages
1,470
On the one I worked on the owner preferred to use a dremel cutoff tool to cut a square section out of the cowl in order to get to those bolts; he cut it perfectly and then mounted it back with a metal strip on the inside. This worked like a charm but I wasn't about to do the cutting myself since he is a perfectionist! I guess you could cut or drill which will be your choice. Good luck in any case.
 

comsci20

Cadet
Joined
Dec 28, 2014
Messages
18
Hello everyone, the update so far.

Decided we didn't want to drill or cut into the cowl so for the three stuck bolts we hacksawed the heads off and filed them down till only the shaft of the bolt was visible. That was a lot of effort in a small working area and took about 2-3 hours.

We then wedged the exhaust manifold case off by scraping and wedging a flat head screwdriver around until we could slide the case off. It had never been removed before and took a lot of effort. We finally got it off and we can see lots of white gunk surrounding it.

With the three bots exposed we tried vice griping after soaking with Blot buster but still no luck ! Once again we cut and filed down another 2 hours.

We are no up to wedging the exhaust manifold off but this is a much thinker bit of metal and we are inching our way down from the top along both sides with screw driver trying to wedge it loose through the stuck bolts. We have been at this for about 2 hours and then called it a day.

Question : as we are wedging between the gasket and having to use a hammer to move the screw driver deeper we a scraping little bits of metal off, we being careful to not bend anything and moving slowly but does anyone see a issue with this approach ?

Getting these plates off is proving to be a real challenge, I sure hope it was the exhaust leaking and not the head gaskets, too late to turn back now :)
 

gm280

Supreme Mariner
Joined
Jun 26, 2011
Messages
14,593
What is your plan to get the bolt shafts out where you cut the heads off? That would be the number one issue I'd think. And make sure you chase the threads in every hole before trying to reassembly anything. Use the appropriate tap and then use air to blow out those newly chased holes. Then apply some anti-seize on the new bolts and that should work perfect...
 

comsci20

Cadet
Joined
Dec 28, 2014
Messages
18
Hello Gm280
We are hoping once we are down to the block and the remaining length of the bolt that we can finally get it to turn. We can see looking at the other bolts we were able to remove that only about 3cm is actually screwed into the block. We will soak in bolt buster and then vice grip to see if we can turn. Failing that was going to try and use a easy out aka bolt remover.

When you say chase each hole does this mean retap ? Can you please provide any advice on how we should do that ?
 

Will Bark

Lieutenant
Joined
Aug 1, 2010
Messages
1,470
Instead of a screwdriver you might try a stiff putty knife which would be less likely to bend something out of shape, You will need to lay each piece on a flat sheet of glass to make sure that they are still true and flat; be careful and good luck.
 

comsci20

Cadet
Joined
Dec 28, 2014
Messages
18
Hello Rolmops, at first I was trying to work out which one was more likely the issue and which would be easier to replace first. After all the effort we done to remove the exhaust manifold gaskets I am thinking maybe the head gasket would have been easier to do first ?
 
Top