V4 Crossflow Thermostat Housing Removal Question

mrmamiller

Petty Officer 2nd Class
Joined
Mar 7, 2011
Messages
167
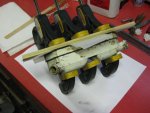
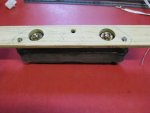
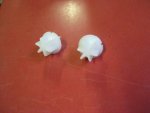
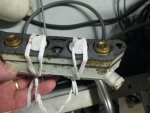
I have a 1986 110HP Johnson crossflow V4 (bubbleback). There are thermostat/relief valve issues which need to be corrected. I read all of the forum threads pertaining to this repair job and thought I was ready. I was all set to do the job, but got cold feet after looking at the clearance required in order to get the thermostat cover/valve body in and out as one assembly. I have removed the lower cover (the one that grants access to the Tstat cover bolts from below) and after doing so, concluded that the entire thermostat cover/valve body assembly is about 1 3/4 inches thick when assembled. I did not see any way that I could get this "package" back in under the bubbleback from the rear. The only place that I thought it would be possible would be sideways out the port side. I'm not prepared to pull the power head and I really don't want to get into dropping the lower cover (the cover that mates with the engine cover assembly). From reading the forum threads, I thought the big problem would be the bolts, but it looks like they will be the easy part.

Can anyone with personal experience suggest a method of getting the thermostat cover/valve body in and out without dropping the lower cover or pulling the power head? I plan on re-installing with everything rubber banded together. Thanks for any suggestions.
 
Joined
Aug 31, 2012
Messages
27
Re: V4 Crossflow Thermostat Housing Removal Question

MRM can you post a picture of your dilemma? I would like to do the same thing but I have an 88 and would like to see if we are talking the same vintage and work.
 

mrmamiller

Petty Officer 2nd Class
Joined
Mar 7, 2011
Messages
167
Re: V4 Crossflow Thermostat Housing Removal Question

BR, I'll attempt to add pics of the Thermostats in question. Views are from port side, rear view and from underneath.

Also, I may have been wrong in my assessment of getting things in and out. After measuring the large gaskets, I find that they are 1 3/8 inches high, thus maybe giving me clearance to just pull the assembly back and rotate upwards art 45 degrees and pull out (avoiding the pee tube connector on the bubbleback. Am I right on this?

Now, to try the pics...

Port End 1.JPGPort End 2.JPGRear View.JPGBelow View.JPG
 

Ibl0wstuffup

Petty Officer 3rd Class
Joined
Mar 10, 2011
Messages
85
Re: V4 Crossflow Thermostat Housing Removal Question

Remove the lower cowl bolts (holds the pan under the motor on) and push down the cowl while trying to slip it in. It's a tigh fit but do able. Use zip ties to hold the whole thermostat assembly together. Get the bolts started then cut the zip ties. Also helpsnif you use omc gasket sealer to hold it all together. I put gasket sealer on the gaskets to help keep em from slipping out. Rubber bands won't be strong enough to hold the springs in the relief valves. The only other advice I have is buy a good 1/4 drive swivel (u joint socket). It makes getting the bolts in and out 100 times easier. I bought an sk one at the auto parts store just for this job. If I remeber right it's a 5/16 socket.

Also helps to assemble the whole thing and let the sealer set up a little after you zip tie it together. I use a vice lined with rags to hold it all together while I zip tie it.
 

mrmamiller

Petty Officer 2nd Class
Joined
Mar 7, 2011
Messages
167
Re: V4 Crossflow Thermostat Housing Removal Question

lb10, So, are you saying that you compress the springs within the confines of your zip ties? I had always assumed that the springs were inserted into their bores, then the zip tied assembled was positioned, then bolts inserted/started, then zip ties cut. I just looked at the lower cover (cowling) and I guess I can lower it a bit. Originally I had thought that it was partially supporting the weight of the powerhead. Thanks for your input.
 
Joined
Aug 31, 2012
Messages
27
Re: V4 Crossflow Thermostat Housing Removal Question

MRM did you get it out?

you need to remove the two bolts in the last picture under the thermostat assembly correct? Then you have to remove the two bolts on the right and left of the assembly shown in the third picture right side in front of the hood latch? this will allow it to come out?

Or you need to remove the 3 bolts facing you from the back to get it out? These look like how to access the inside though.

Thanks for posting this MRM, I am taking good notes. Good advice 10lb.
 

Solittle

Fleet Admiral
Joined
Apr 28, 2002
Messages
7,518
Re: V4 Crossflow Thermostat Housing Removal Question

lb10 has nailed it - I have a pair of 1987 bubblebacks - the only thing I might add is to get a 12" extention to go with the 1/4" drive and universal. Set the sequence to socket-universal-extension-wrench.

For me taking the assembly out is a one man job. Having a helper makes the assembly possible. It is a pain in the butt job to do but it can be done. One other thing use a skinny 7/16" box wrench to get the lower to bolts out of the t-stat cover. Go for them from underneath
 

mrmamiller

Petty Officer 2nd Class
Joined
Mar 7, 2011
Messages
167
Re: V4 Crossflow Thermostat Housing Removal Question

Solittle...thanks for chiming in as well. Read all your posts concerning this before starting job. I'm not sure where you are using the universal joint/extension/socket. Was it to loosen the lower cover (cowling)? I never dropped the lower cover, just the rear cover. I used a socket/universal/8" extension for the center bolt through the Tstat housing and it worked fine. Offset box wrench (custom bent by torch) to loosen the end bolts.

Doing it again, I'd losen the center bolt first, then take out the end bolts, as the springs keep pressure on them until they are free. THEN, take the center bolt out all the way. Oh yes, the springs will go flying if you (me) aren't careful. Yes, I have it out, will continue tomorrow. Had to take it out port side. Looks like there was no sealant on the gasket between the valve body and the exhaust housing adapter (thankfully). There is existing residue from (factory) sealant that needs to be cleaned, but nearly inaccessible.

I'm wondering if you folks zip tie the springs to "the works" before putting it back in, or, put the springs into the bores, hold them in place, then put everything back in place???

Before resuming, I'll be grinding down a few wrenches to make the job easier on the reverse end.

BR...I'll post a few pics tomorrow sometime.

Time for a family outing and a break from being a mechanic.
 

boobie

Supreme Mariner
Joined
Nov 5, 2009
Messages
20,826
Re: V4 Crossflow Thermostat Housing Removal Question

There was a post on here sometime ago where the guy cut out the back of the lower cowling to work on the thermos.Then reinstalled it with plates, nuts and bolts or pop rivets. Looked pretty neat when done.
 

Bama Hound

Seaman Apprentice
Joined
Jul 30, 2012
Messages
47
Re: V4 Crossflow Thermostat Housing Removal Question

I did this little number myself, two weeks ago. I was cussin' a blue streak at that cowling. I was looking all over the place for some way to get to that cover low enough to get at the housing. I was also looking at the sawzall idea myself. I just hate to butcher something. When anybody approached from rear they could spot a patch a mile away and top cover would prolly not ever fit right again. You can get a little more "wiggle room" by removing plastic gasket on bottom of skirt. Mine was as hard as a rock and i split 3/8" fuel hose as a replacement. Yours might be O.K. Seloc manual dances around saying not much. OMC manual (which I didn't have at the time) shows naked leg with a straight on shot at housing, which isn't what you are dealing with.
What I did was use 1/4" drive with universal joint as Ibl0wstuffup said. I assembled mine and applied a see thru layer of Permatex #2 to gaskets and housing pieces. Don't get Permatex on relief valves or rubber grommets. (If you glue 'em shut by using too much sealer, they won't relieve much). I put relief valve springs in the motor side as there are two cast post inside. I used Vaseline to hold thermostats and relief valves in place. I put them in place after I had housing laying inside cowling with the holes looking up. I invited a buddy over for a couple of "cold ones" and we used flat head screwdrivers to flip housing up and start the center bolt. After that the rest is cut and dried. Vaseline will hold stuff in place long enough to do this. When motor gets warm it will melt Vaseline and you are good to go. By the pix yours had hose clamps mine had wire ties. Prolly somebody was in yours before. One of my thermostats came out in pieces, so it was not a wasted trip. The idea with the wire ties like Ibl0wstuffup said is worth a look at too. Good Luck!
 

boobie

Supreme Mariner
Joined
Nov 5, 2009
Messages
20,826
Re: V4 Crossflow Thermostat Housing Removal Question

It wiil also help on reassembly if you cut the head off of a 2" 1/4-20 bolt and install in the center hole using it for a guide. Then install the outer bolts, remove the stud and install last bolt. Been there.
 
Joined
Aug 31, 2012
Messages
27
Re: V4 Crossflow Thermostat Housing Removal Question

MRM Please post your pictures of the reinstall. That would be awesome. I know this is a project on the docket and having the instructions would make it that much easier.

Thanks again for starting this post.
 

mrmamiller

Petty Officer 2nd Class
Joined
Mar 7, 2011
Messages
167
Re: V4 Crossflow Thermostat Housing Removal Question

1st sealant question: Now that I have the Tstats apart, I found that the person before me that did the thermostats (authorized repair) used sealant on both sides of the round thermostat gaskets, effectively cementing the thermostats to the valve body. The factory manual makes no mention of doing this. Good idea or bad? Since the thermostat flange keeps it from going forward or backward, I can't see the logic. It was a PITA to get the gasket out of its recess in the valve body!

2nd sealant question: The manual says to use sealant on BOTH sides of the gasket which is between the valve body and the exhaust housing adapter. Mine did not have sealant on the side facing the adapter, and I guess if it did, removal would have been a bear. Can I forget about sealant on the forward facing side of this gasket? Sure would make things easier on subsequent repairs.

Today I assemble parts with sealant and clamp to let them set up, tomorrow starts the re-install process.

Thanks for your help.
 

mrmamiller

Petty Officer 2nd Class
Joined
Mar 7, 2011
Messages
167
Re: V4 Crossflow Thermostat Housing Removal Question

BR,

Per your question regarding the bolts in my pictures, I have edited my 3rd pic. The RED arrows are the 3 bolts which hold the thermostat assembly to the exhaust housing adapter. Remove these and the works comes off. The GREEN arrows are where the bolts were which held the rear cover on (the left bolt hole is behind the hose clamp). The rear cover is removed by taking out these two bolts, as well as four 5/16" bolts in the front of the cover. The YELLOW arrows are the bolts (still in place) which hold the lower cover (cowling) in place. So far, I have not had to remove these bolts.

I'm also attaching 2 pics of the thermostat assembly as out and pulled apart, just in case you didn't have any info on what it looked like. Somewhere on this forum there is a reprint of the factory manual page which shows the breakdown of the parts and the reassembly instructions (assuming the power head is off).

rear view 2.jpgTstat1.JPGTstat2.JPG
 

Solittle

Fleet Admiral
Joined
Apr 28, 2002
Messages
7,518
Re: V4 Crossflow Thermostat Housing Removal Question

Solittle...thanks for chiming in as well. Read all your posts concerning this before starting job. I'm not sure where you are using the universal joint/extension/socket. Was it to loosen the lower cover (cowling)? I never dropped the lower cover, just the rear cover. I used a socket/universal/8" extension for the center bolt through the Tstat housing and it worked fine. Offset box wrench (custom bent by torch) to loosen the end bolts.

Doing it again, I'd losen the center bolt first, then take out the end bolts, as the springs keep pressure on them until they are free. THEN, take the center bolt out all the way. Oh yes, the springs will go flying if you (me) aren't careful. Yes, I have it out, will continue tomorrow. Had to take it out port side. Looks like there was no sealant on the gasket between the valve body and the exhaust housing adapter (thankfully). There is existing residue from (factory) sealant that needs to be cleaned, but nearly inaccessible.

I'm wondering if you folks zip tie the springs to "the works" before putting it back in, or, put the springs into the bores, hold them in place, then put everything back in place???

Before resuming, I'll be grinding down a few wrenches to make the job easier on the reverse end.

BR...I'll post a few pics tomorrow sometime.

Time for a family outing and a break from being a mechanic.

First remove the plastic shroud at the rear of the engine below the pan at the base of the engine. Then loosen the bolts that hold the pan so that it drops from the rear. This will give you access to the two lower bolts of the t-stat cover. Loosen these with the 7/16" box. Remove the single upper bolt for the t-stat cover from the space between the bubble back and the pan using the 1/4" drive described above.

The reassembly is the nasty part. Get someone to help you. Assemble the relief valves and the t-stat assembly as described elsewhere using a tad of sealer, tie wraps and let it set overnight. Now the fun - put the three bolts (loose in the assembly. Place the springs where they should go. Have friend position the assembly through the gap between the bubbleback and the pan and guide it over the springs while you assist from underneath the pan HOLD IT place using a stick or long screwdriver from the back. Now go after the bolts to secure in the threads. When confident the bolts are secure cut and remove the tie wraps. Tighten all bolts, reattach the pan and rear cover and you are done.

A word of caution - Either stay away from consuming your favorite beverage whilst doing this mess or consume a batch - bitching and cussing are encouraged and will make the job tolerable.
 
Joined
Aug 31, 2012
Messages
27
Re: V4 Crossflow Thermostat Housing Removal Question

mrm great pics, exactly what I needed. Take some of reassembly if it is convenient, I would love to see, it is looking great.
 

mrmamiller

Petty Officer 2nd Class
Joined
Mar 7, 2011
Messages
167
Re: V4 Crossflow Thermostat Housing Removal Question

T-stats back in place. What a bear!!! Did the job myself, but I can see where it would go a LOT easier with 2. I needed to move a wiring harness which was between the T-stat assy and the "bubble"...FYI, when you disconnect the wiring on the stbd side end of this harness, you lose your trim/tilt), After I had started the re-assembly, I wished I had taken the advice to use a 2" bolt w/head cut off for alignment. I chickened out on that because of fear that I would have a very hard time getting that alignment bolt back out (due to the cramped quarters). I clamped the assembly overnight with sealant on the gaskets, using a customized piece of 1/4" x 2" wood with holes punched out where the thermostats would stick through. This was so that the thermostat gasket, thermostat and big gasket would compress and seal to each other while clamped (the round t-stat gaskets were very thick, causing the t-stats to stick up out of the valve body recess). For tying the mess together, I used wire ties that have a single thin wire covered with plastic (came on a short roll of hose I had bought). I opted not to use regular zip ties. The ties were arranged so as to hold the relief valves in place. The springs were installed by themselves. I opted to notch the relief valves for better bleeding of air. Also found that the factory bleed hole in the center of the valve body needed to be cleaned a bit with a wire after my messing around with things (also opened it up to .060" while it was apart).

Tools: I found that all I really needed was a 1/4" ratchet, short extension, 1/4" u-joint, 12" extension (yeah, worked WAY better than the 8"), 5/16" socket, 7/16" socket, and a customized combination box/end wrench. (The open end ground down so that the jaws were 3/32" wide and 1/8" thick, the box end was ground down similarly. wrench was 6 1/2" long...Ace #25763). Also ties for holding things together, wire cutters, pliers, misc screwdrivers AND 6 more hands..

Tomorrow I test everything.

B-R, ... Can't post pics of various parts of today's work below, says limit is exceeded. Maybe I'll try a new post. If you get started and have questions or want to see more pics, send me a PM and we can email or talk. Mark
 

Attachments

  • Clamped assy.JPG
    Clamped assy.JPG
    54.7 KB · Views: 3
  • Assy with clamp board.JPG
    Assy with clamp board.JPG
    41.7 KB · Views: 3
  • Relief valves.JPG
    Relief valves.JPG
    32.8 KB · Views: 4
  • Assy with ties.JPG
    Assy with ties.JPG
    53.2 KB · Views: 3
  • Sliding assy in from Port.JPG
    Sliding assy in from Port.JPG
    47.2 KB · Views: 3

mrmamiller

Petty Officer 2nd Class
Joined
Mar 7, 2011
Messages
167
Re: V4 Crossflow Thermostat Housing Removal Question

BR, Please check your PM's.
 

boobie

Supreme Mariner
Joined
Nov 5, 2009
Messages
20,826
Re: V4 Crossflow Thermostat Housing Removal Question

The 2" bolt trick with the head cut off always worked for me. The right needle nose pliers always got it out. I've always left the outer bolts in the hsg a little loose, removed stud, installed center bolt then tightened all three.
 

mrmamiller

Petty Officer 2nd Class
Joined
Mar 7, 2011
Messages
167
Re: V4 Crossflow Thermostat Housing Removal Question

Success!!!! After a thermostat replacement procedure that I don't want to repeat, my temp issues appear to be under control (aka, close enough for a small town). My engine temps measured by thermocouples epoxied to the heads near the alarm sensors are giving me temps that should probably keep me from "carboning up" when trolling.

trolling ~~700-1000RPM, temp = 135 port, 138 stbd (previously 106 to 110 degrees)
3000 RPM, temp = 120 port, 125 stbd
4000RPM, temp = 130 port, 134 stbd
4500RPM, temp = 135 port, 138 stbd
WOT (5050), temp = 140 port, 144 stbd
Prolonged WOT, temp = 142 port, 148 stbd

After seeing the RPMs vs temps, I have a much better understanding of what is going on within the thermostat housing.

Also found that the last person to work on the motor put L77JC4's in instead of QL77JC4's, and they were gapped .030-.035". My old plugs were QL's at .040". The plugs were heavily carboned after 60 hour of operation, split half trolling, half running (and, the power head had been completely apart and cleaned ... piston replaced, all cylinders honed, new rings, etc). After a THOROUGH decarb process today, put QL's in at .040" and I noticed temps came up a few degrees. Runs great, glad to have my motor back!

Now to attack the gas tank and the old fuel lines.

Thanks for everyone's help and suggestions getting me through the thermostat replacement procedure.
 
Top