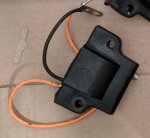
Johnson 1984 70 HP

oldboat1

Fleet Admiral
Joined
Apr 3, 2002
Messages
9,607
Metal tag (better than the newer variety, imo). The pump you purchased should be fine. Post back when you test run it, as you might want to talk some more about the starting issues.

Save the old pump.
 

flyingscott

Fleet Admiral
Joined
Apr 8, 2014
Messages
7,991
The 3 cylinder motors have a pump with 3 nipples. The 4 cylinder pump only has 2 nipples.
 

Tony L S

Seaman Apprentice
Joined
Feb 25, 2020
Messages
45
Cyl 1 140 psi
cyl 2 135 psi
Cyl 3 135 psi

At 1/2 spark gap cyl 3 sparks strong. Cyl 1 & 2 will not spark at this gap but will spark at a smaller gap.
 

racerone

Supreme Mariner
Joined
Dec 28, 2013
Messages
36,303
Some of us have the special tools to change the pins.-----Or we made up jumper wires to switch inputs to coils.
 

Tony L S

Seaman Apprentice
Joined
Feb 25, 2020
Messages
45
I have jumper wires. Can I just hook up one coil and test? Will it hurt to leave the other two coils off the boat?
 

racerone

Supreme Mariner
Joined
Dec 28, 2013
Messages
36,303
Not sure what you are trying to do here.----But those coils do NOT run with 12 volts from a battery.
 

Tony L S

Seaman Apprentice
Joined
Feb 25, 2020
Messages
45
I was referring to small jumper wires with clips not jumper cables. I was able to remove the coil wires.
coil a primary 1.1 sec 246
Coil b primary 1.1 sec 249
Coil c primary 1.2 sec 247 ohms
 

oldboat1

Fleet Admiral
Joined
Apr 3, 2002
Messages
9,607
https://maxrules.com/graphics/omc/wi...4_3-CYL_EL.jpg Blue stripe is top coil (1), green is bottom (3).

I can't figure out what you have been doing on the ignition. I think you should put it back together, and see how the motor runs in a test barrel.

You had not opened up the idle circuits on top of the carbs (under the plugs -- replacements in the kits). You will probably be better off working on that now if you still have the problems you described in your first post.
 
Last edited:

Tony L S

Seaman Apprentice
Joined
Feb 25, 2020
Messages
45
Sorry for any confusion. I am certainly not a mechanic but enjoy working on things. I have removed the ignition coils that feed the spark plugs. The top two cylinders would not spark when tested with a open spark gap tester set at about 1/2in. The bottom coil had great spark.

All three coils are wired to a plug as you can see in the photo in a prior post. I was able to remove the pins from the plug. After doing so I went ahead and tested the resistance of the primary coil and the secondary coil. These numbers are listed above. These coils are old and have some kind of clear looking goo that has ran down the back of them. I plan to just go ahead and replace them.

That being said I did not note that the cdi box was replaced last year.

Could anyone make a recommendation for the next step. Thanks again for all the help.
 

Attachments

  • photo325686.jpg
    photo325686.jpg
    1.4 MB · Views: 1

Tony L S

Seaman Apprentice
Joined
Feb 25, 2020
Messages
45
https://maxrules.com/graphics/omc/wi...4_3-CYL_EL.jpg Blue stripe is top coil (1), green is bottom (3).

I can't figure out what you have been doing on the ignition. I think you should put it back together, and see how the motor runs in a test barrel.

You had not opened up the idle circuits on top of the carbs (under the plugs -- replacements in the kits). You will probably be better off working on that now if you still have the problems you described in your first post.

To take these plugs out I use a punch to remove them? After cleaning everything up I should use a punch to hammer these plugs back into place? What keeps them from leaking?
 

oldboat1

Fleet Admiral
Joined
Apr 3, 2002
Messages
9,607
They are expansion plugs, so simply fitting them in straight and even is sufficient. I have an aluminum rod that I use to set them -- a tap or two on the rounded portion will set it. Some use some nail polish to make sure of the seal (color presumably your choice). I don't use any kind of sealant and have never had a problem that I am aware of.

To get the old ones out, I carefully drill through the top, then remove with a drywall screw -- seems to work for me. Danger, though, is drilling too far. Might initially try a punch to open a hole and allow you to pry them out.

Underneath, there are typically two or three small holes that need to be squeaky clean.
 

Tony L S

Seaman Apprentice
Joined
Feb 25, 2020
Messages
45
I was able to remove both Welch plugs and clean the small holes under them. It was very clean. I replaced the plugs and painted with nail polish.

I went ahead and removed the bowls on each carburetor. I did find a mistake. I had set the top of each float at the recommended height instead of the bottom of the float (the need valve is open). It was too far open by at least 1/2 inches. I'm pretty sure this would flood the motor? I bet that is my problem. I will reassemble the motor tomorrow. I will have to wait on the coil packs before I fire it up. Thanks for the help. I will post again when I try starting the motor.
 

flyingscott

Fleet Admiral
Joined
Apr 8, 2014
Messages
7,991
To set the float height, just hold the carb upside down and set the float to level. No measuring needed.
 
Top