Getting ready to work on the 140

emdsapmgr

Supreme Mariner
Joined
Dec 9, 2005
Messages
11,551
new head sample.jpg This is a pic of the lower compression head from the mid 80's through mid-90's for all crossflows. Be glad you have the heads you do. They are hard to come by. I run similar high compression heads in all my crossflows and always run 92 octane (ethyl) type gas. You should also, unless you retard the timing-resulting in less hp. The 79 did not make use of the intake manifold recirculation system. (with all the hoses.) Came out around 83. They are OK, but require that the one-way valves always work, and that the hoses don't deteriorate. I've run many without that recirc system and they run fine without it. One other point, you can tell you have a 79 140 block, because of the machined rib that's cutout just above the bottom of the exhaust chest. (outgoing exhaust chambers.) Cut back at about 1 1/4". That first appeared on the 79 140's.
 

interalian

Commander
Joined
Jul 23, 2009
Messages
2,105
Thanks all. Yes, the plan is more a rebuild than a refresh. The bores are worn smooh, no evidence of the original crosshatch, or any prior attempt at deglazing. I'd bet when the ring broke it made a bunch of noise and the owner said 'screw it' and replaced the whole thing.

I'm a bit short on dough right now, so replacing anything is out of the question. Just need to find a machine shop that knows how to properly bore this block. I'll order a set of pistons first. There was a suggestion for Wisecos earlier. I don't expect this motor to be highly stressed as it'll be a bit overpowered for my hull. Any reason not to use a more 'cheap and cheerful' piston set?

Once the teardown on the 140 is done, I'll yank the 90 apart. At this point I don't know which block will be the one to use, but suspect the 90 will be a bear to dismantle as she's a 'saltee daug', unlike the 140 'laker' which has only one broken bolt so far (cylinder head water cover).

The 140 has choke solenoid - I may try retrofitting the primer instead, since the linkage for the choke solenoid is broken.
 

Faztbullet

Supreme Mariner
Joined
Mar 2, 2008
Messages
15,619
I'll order a set of pistons first.
Wait and let machine shop check it out as it may to be a different size than you ordered,the cast pistons are fine and WSM has the best kits.80% on ebay are repackaged WSM pistons.
 

interalian

Commander
Joined
Jul 23, 2009
Messages
2,105
Wait and let machine shop check it out as it may to be a different size than you ordered,the cast pistons are fine and WSM has the best kits.80% on ebay are repackaged WSM pistons.

Exactly - I just meant so the machine shop would have them for fitting. Need to know where the bore sits now before knowing what size to buy.
 

interalian

Commander
Joined
Jul 23, 2009
Messages
2,105
Got the intake off.


Reeds and filler blocks. Pleased to see all the power bits are present and correct.


racerone

Supreme Mariner
Joined
Dec 28, 2013
Messages
36,300
Your next step is to remove the flywheel and then remove the powerhead.
 

Faztbullet

Supreme Mariner
Joined
Mar 2, 2008
Messages
15,619
Exactly - I just meant so the machine shop would have them for fitting. Need to know where the bore sits now before knowing what size to buy.
No you need to let machine shop tell you what size to buy, they do not need piston for sizing.
 

racerone

Supreme Mariner
Joined
Dec 28, 2013
Messages
36,300
Manufacturing technology has changed over the years.------I agree a good machine shop would not need the pistons for fitting !
 

interalian

Commander
Joined
Jul 23, 2009
Messages
2,105
Gotcha. Now to find a machine shop in this landlocked burg.

Stripping will continue today, and then the 90 strip begins. Think for that one I'll yank the flywheel first, then pull all the electrics off as a unit, just to keep it all together and connected. It's still possible the low-hours 90 will have a rotating assembly that only needs rings to freshen up. Fingers crossed.
 

interalian

Commander
Joined
Jul 23, 2009
Messages
2,105
Crankcase apart. Just need the proper 5/16" thinwall 12 point socket for the conrod caps. Wonder why there are two differently marked caps - some with BPS stamped on the head, others with a dimple.

 
Last edited:

glust

Petty Officer 2nd Class
Joined
Jan 23, 2012
Messages
141
If your going to "rebuild" it mike the cylinders and bore it . From the looks of cylinders they are worn and PO likely just refreshed it with a hone and rings. Remember this motor is crank rated and is equal to a 115hp, the heads will be fine as the dings will fill in with carbon over time. You 90hp has a primer for choking and on some models that was injected thru transfer cover instead of carb, the 140 will have choke shutters.

I like to buy the oversize pistons first and then "Mic" micrometer the piston to know how large to bore the jug. Sometimes pistons you get are a little out of spec so I like to check them before I start cutting a new hole.
 

interalian

Commander
Joined
Jul 23, 2009
Messages
2,105
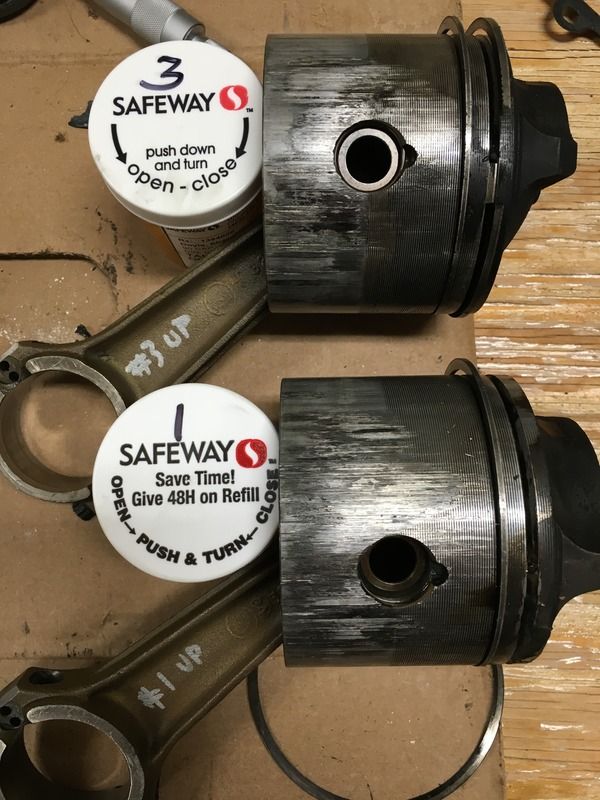
Progress has been made. Complete teardown is now done. Found something less than good when poking the pistons out. They're all pretty badly scuffed, and pot 3 had a broken ring as well. I'd hoped I might get away with just one new piston, but that's doubtful now - they're all scuffed about the same amount.


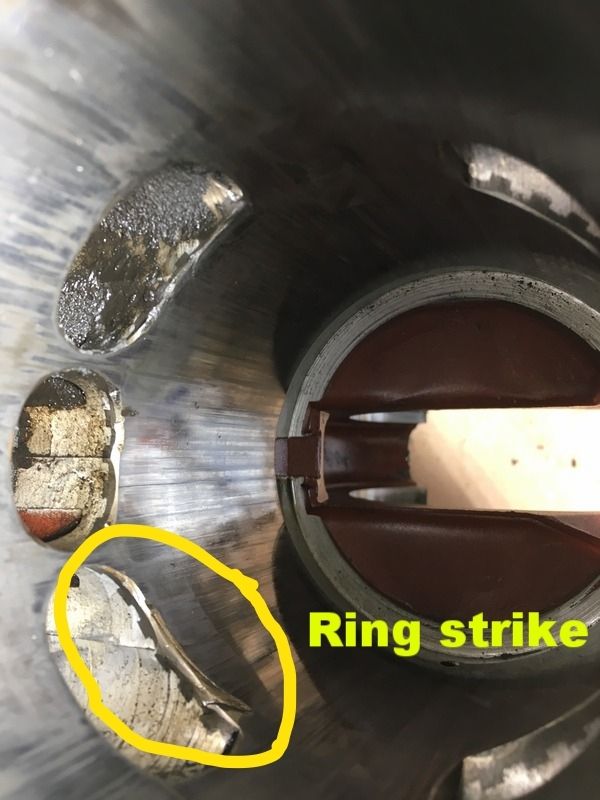
Here's bore 1 with ring strike damage. Probably no trouble to relieve it, right?


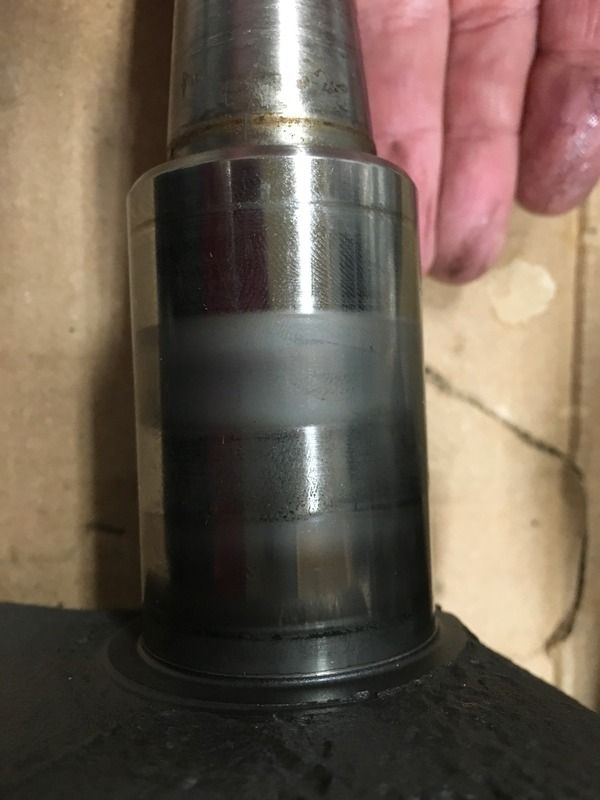
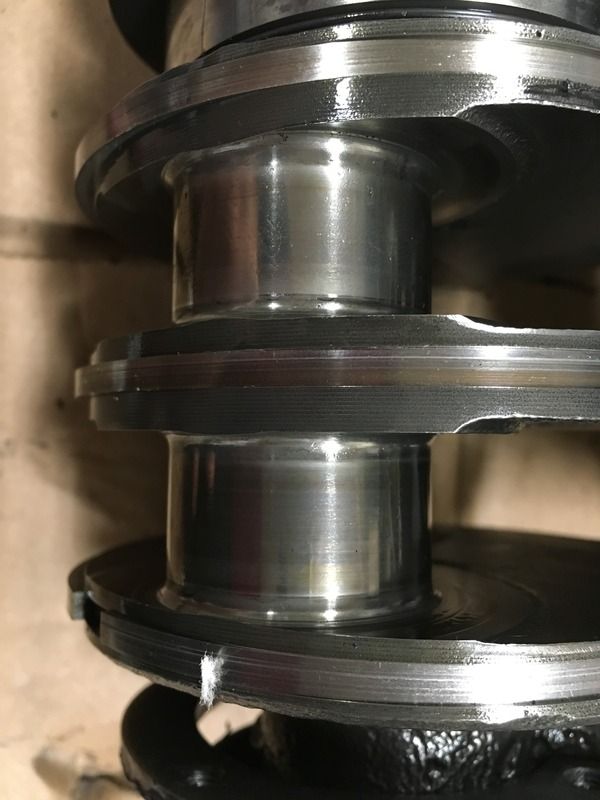
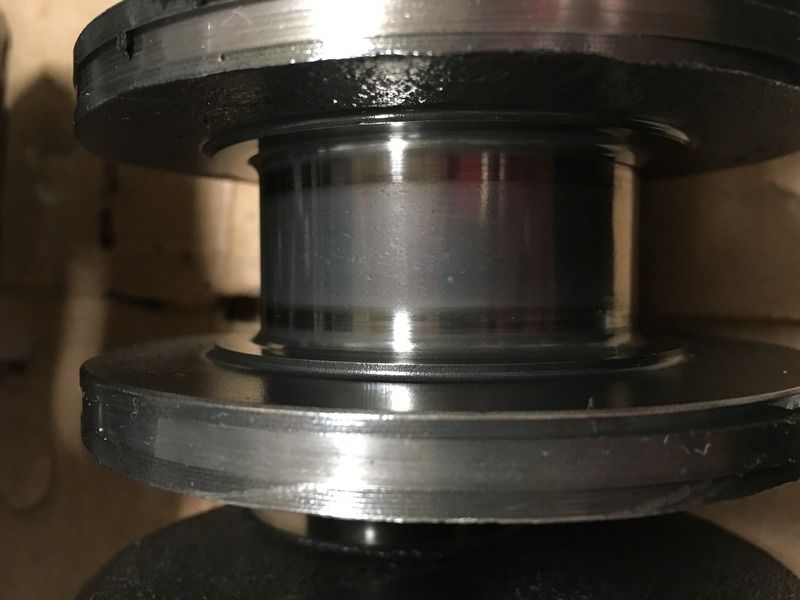
Top bearing journal:


One and two:


Three and four:


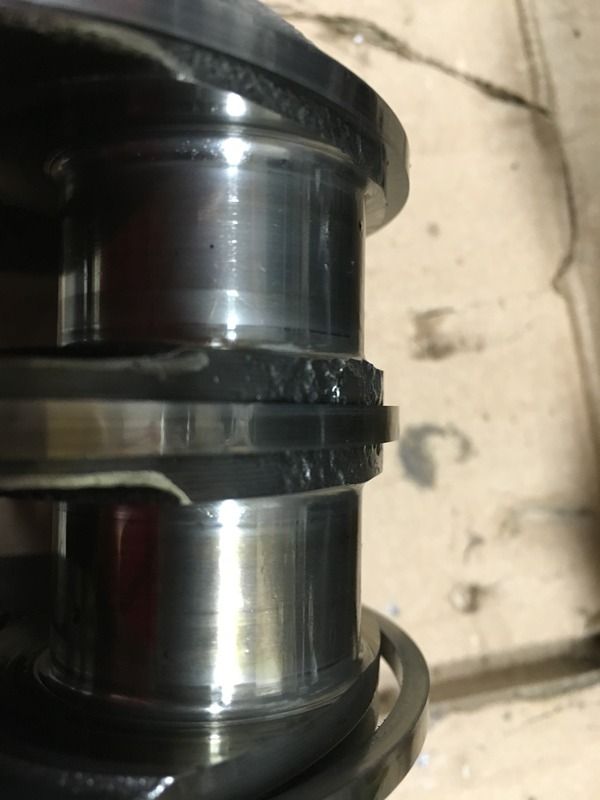
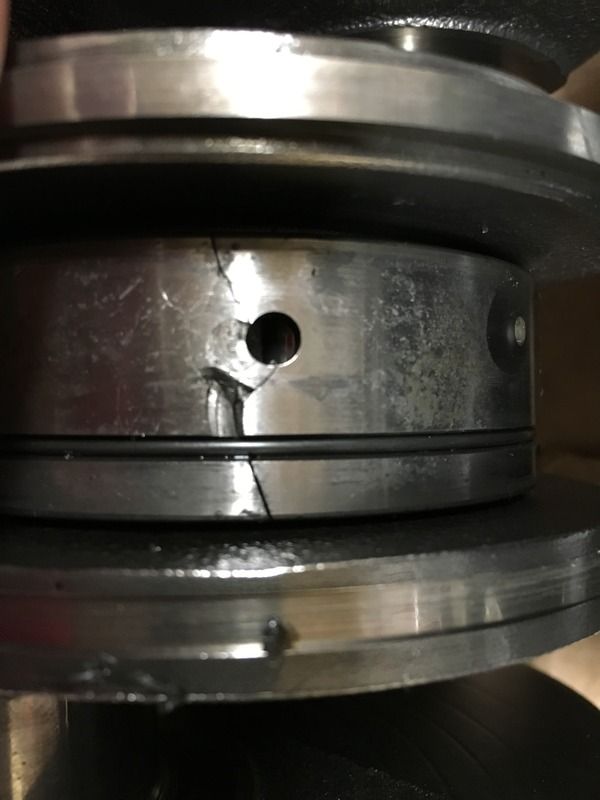
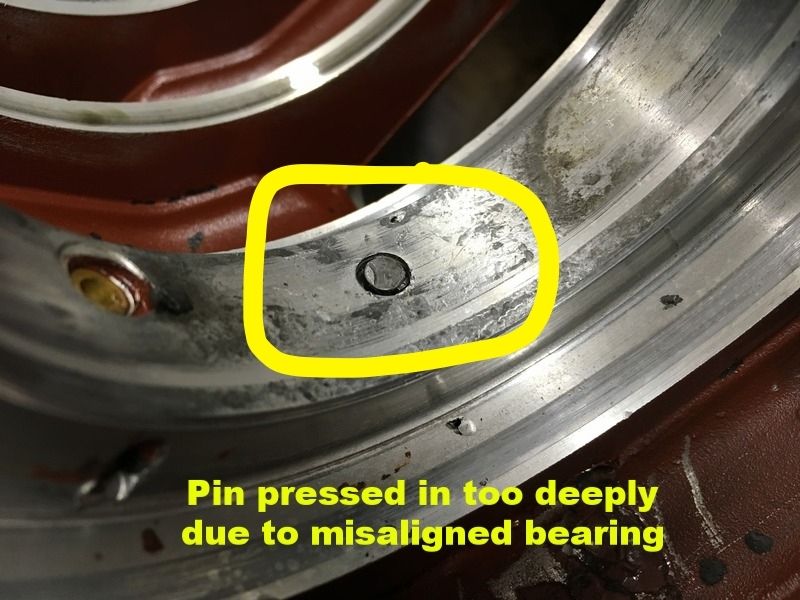
But. All was not right when the crank was pulled. Seems the last person inside didn't align the pin with the bearing hole.


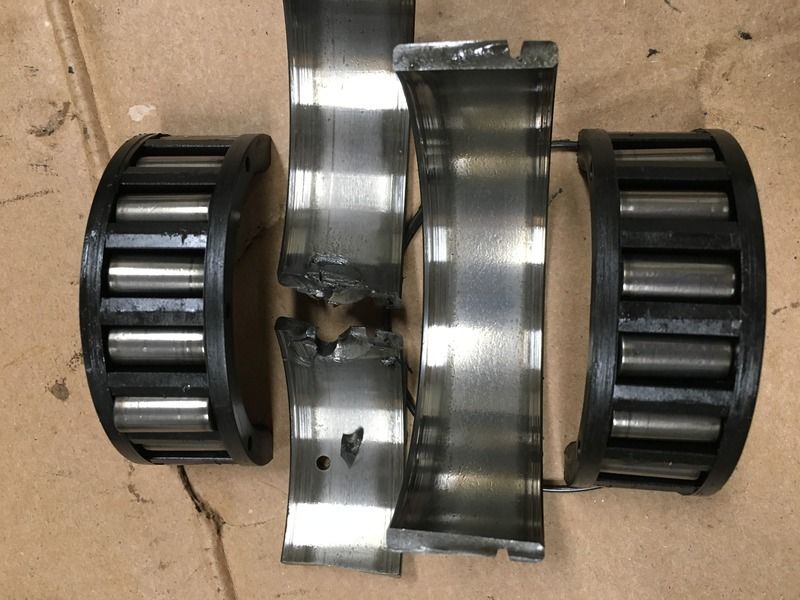
Center bearing journal is nicely shot-peened. All the conrod needles look good. Haven't pulled the wrist pins but there's no blueing on them either.

I checked and the crank is supposed to be the same for both motors, so probably the one from the 90 (which has never been apart until today) will be used in the rebuild.

Now, an odd question: I picked up a standard automotive harmonic balancer puller and used the supplied bolts and had no trouble getting the flywheel off the 140 ('79 vintage). The same bolts don't work on the 90 ('82 vintage). The bolt goes about a half a turn in then binds. Did they change sizes?
 

interalian

Commander
Joined
Jul 23, 2009
Messages
2,105
Further on the flywheel - both motors are supposed to have 0581850, but the '79 has a 581849 according to the casting. What's the difference?
 

interalian

Commander
Joined
Jul 23, 2009
Messages
2,105
Took the intake manifold off the 90 to compare with the 140. Aside from the recirculation system and the silencer drain repsoitioned, they appear to be identical. Looks as if they changed the silencer drain so it went into cylinder 4's crank case, where it had previously gone into the bottom bearing well?

I was surpsrised to find filler blocks in the 90 - read hear that 115s and 140s only got them:


Here's the front view showing the differences. Carb mount locations are the same diameter:


racerone

Supreme Mariner
Joined
Dec 28, 2013
Messages
36,300
Seen this kind of damage before many times !---------And parts for V-4 motors interchange from year to year.-
 

interalian

Commander
Joined
Jul 23, 2009
Messages
2,105
Do you know if the bearing pin needs to be drilled out and replaced, or is there another way to pull it?

And how about that darned flywheel bolt hole problem? What size bolts did OMC require for pulling the '82? I've tried a number of bolts from my junk bin but haven't found a fit.
 

racerone

Supreme Mariner
Joined
Dec 28, 2013
Messages
36,300
The bolts for pulling the flywheels are 5/16-NF and have been since the early 1960's.--So somebody messed it up.-----I drill a 1/8 diameter hole in those pins.--Just drill the pin.----Now fill the cavity with oil and grease.--Then use a 1/8" pin ( drill shank ) and a small hammer.--Believe it or not the hydraulic pressure lifts it out.--Just like a painless dentist !
 

interalian

Commander
Joined
Jul 23, 2009
Messages
2,105
The bolts for pulling the flywheels are 5/16-NF and have been since the early 1960's.--So somebody messed it up.-----I drill a 1/8 diameter hole in those pins.--Just drill the pin.----Now fill the cavity with oil and grease.--Then use a 1/8" pin ( drill shank ) and a small hammer.--Believe it or not the hydraulic pressure lifts it out.--Just like a painless dentist !

Thanks.

Now, on the flywheel bolt holes - I know for a fact it has never been removed. I've been doing all of the maintenance on this motor since it was new and there's never been a need to take it off until now. The threads aren't boogered up either. At any rate, NF would be 24tpi, NC is 18tpi. Pretty sure the bolts that came with the puller are NC (coarse). I'll try chasing it with a tap. Worst case, Heli-Coil.

Good tip on the pin removal. I've used the same trick on a larger scale to remove pilot bearings on driveshafts and clutch work. And I suppose I don't actually need to pull it all the way out - just pump it out so it engages the bearing hole properly.

This engine repair is starting to get fun.
 
Last edited:
Top