Replacing lower unit seals without total disassembly

Petesafloat

Recruit
Joined
Feb 6, 2014
Messages
3
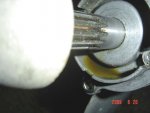
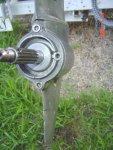
I have a 1987 35 hp Force outboard. Leaking oil from lower unit water intake and small amount of water in gear case oil. Figure I will drop lower unit and pressure test for leaking seals (replace impeller same time). Looking at Clymer Force manual (1984-1994, 25-50 hp all same), it says basically, disassemble entire gear housing and press out seals from now empty gear case housing. This is my dead last choice to solve problem. You tube videos show several methods to remove seals on other outboards without complete disassembly. Drilling carefully into seals, inserting screws and pulling out from above. This appears feasible for the drive shaft seals as drive shaft is removable with unit still assembled. Shift rod seal is the big question. Since it is not removable without complete disassembly, getting the seal out from above could be a real problem. Anyone ever replaced seals on one of these models without complete disassembly? Especially the shift rod seal. How far down in the housing does the seal sit and how much clearance is there to try the "screw" extraction method? Figure I'd give the forum a shot before tearing things apart. Any advice (besides, "Get an OMC or Mercury" ;>)) would be greatly appreciated.
 
Last edited:

Frank Acampora

Supreme Mariner
Joined
Jan 19, 2007
Messages
12,004
Re: Replacing lower unit seals without total disassembly

The prop shaft seal must be removed with the bearing carrier out of the gearcase--no way to get around it. The drive shaft seal can be pulled out in-case with the drive shaft removed. A new one can be pressed in. The shift rod seal is about 1/2 inch thick and sits in a socket in the casting.

To pull it you must unscrew the shift rod, use a lag bolt, and pull it out of its seat. The hole below the seal is about 3/8 diameter. To press in a new seal, you insert the seal metal side up and press into the seat. Insert the shift rod and--if you can find the threads,---thread it back into the linkage. Then, depending upon the length of the shift rod, use a socket and length of pipe. Hammer it down until it drags smoothly on the shift rod but does not bind.

Really, though, if you are replacing the prop shaft seal, you have drained the oil and it doesn't take a lot more to split the gearcase. You need not remove the gear-pak so why not disassemble the lower and replace the O-ring seal too?.
 

wickware

Lieutenant
Joined
Jun 20, 2009
Messages
1,286
Re: Replacing lower unit seals without total disassembly

Your Eng is above my 1970, 35hp Chrysler but I feel and see your points. The parts diagram at the address below might help to answer your questions. ?Disassemble entire gear housing and press out seals from now empty gear case housing?, was not my case and I feel w/n be yours. I was able to seal my leak w/o emptying the gear housing. I d/n need to replace the shift rod seal and have read you can press some down tighter vs replacing. I?ll attach my experience of just pulling my shaft?s seal and O-ring to the gear housing end plate.

I feel a Pro?s help is on the way.


1987 35 hp Force outboard parts diagram - Yahoo Search Results
 

Attachments

  • Boat's Lower Unit old Seal's  8 hrs Leak test.JPG
    Boat's Lower Unit old Seal's 8 hrs Leak test.JPG
    54.2 KB · Views: 0
  • Boat's Lower Unit's Prop Shaft Seal & Cage O-Ring Replaced.JPG
    Boat's Lower Unit's Prop Shaft Seal & Cage O-Ring Replaced.JPG
    70.2 KB · Views: 0
  • Boat's Lower Unit new Seal's after  24hrs Leak test.JPG
    Boat's Lower Unit new Seal's after 24hrs Leak test.JPG
    87.1 KB · Views: 0
  • 70 Chrysler 35 HP Water Pump Checked Last In 1985 4.JPG
    70 Chrysler 35 HP Water Pump Checked Last In 1985 4.JPG
    78.9 KB · Views: 0

Petesafloat

Recruit
Joined
Feb 6, 2014
Messages
3
Re: Replacing lower unit seals without total disassembly

The prop shaft seal must be removed with the bearing carrier out of the gearcase--no way to get around it. The drive shaft seal can be pulled out in-case with the drive shaft removed. A new one can be pressed in. The shift rod seal is about 1/2 inch thick and sits in a socket in the casting.

To pull it you must unscrew the shift rod, use a lag bolt, and pull it out of its seat. The hole below the seal is about 3/8 diameter. To press in a new seal, you insert the seal metal side up and press into the seat. Insert the shift rod and--if you can find the threads,---thread it back into the linkage. Then, depending upon the length of the shift rod, use a socket and length of pipe. Hammer it down until it drags smoothly on the shift rod but does not bind.

Really, though, if you are replacing the prop shaft seal, you have drained the oil and it doesn't take a lot more to split the gearcase. You need not remove the gear-pak so why not disassemble the lower and replace the O-ring seal too?.

Frank,
Thanks for the info. As is usual it raises a few more questions. I was hoping not to break into the lower gear case. As a matter of a fact if my pressure test shows the propeller seal is OK, I may just leave it alone. If not, I will pull the carrier and replace those seals, still planning to not disturb the gear train. If it leaks oil somewhere down the line I can work on it without pulling the lower unit. The real question, however, concerns the lower gear shift rod. No manuals have mentioned unscrewing it from the gear shift arm. All just say to break the gear case and later pull it out still connected to the gear shift arm from the inside. So the question is, if it is carefully (and luckily) unscrewed from the water pump top side of the lower unit, can it be carefully (and again luckily) screwed back in after seal replacement? That is, how stable is the position that the gear shift arm is left in when the rod is removed? Of course, if it will not screw back in, I will end up learning a lot more about the gear train than I planned. Hopefully not including too many worn bearings and washers. I have too many old memories of the only time I cracked an automobile transmission to deal with bad syncro rings. Auto transmission shops earn their money!
Thanks Again,
Pete

Sudden Bad Thought... This is a long shaft lower unit. Manuals don't cover how they are structured. Seals may be way down in there. Possibly necessitating breaking lower unit in two places. Have to see.
 
Last edited:

Frank Acampora

Supreme Mariner
Joined
Jan 19, 2007
Messages
12,004
Re: Replacing lower unit seals without total disassembly

There is a rectangular bar sandwiched between two lever arms the work the gear shift. If you lay the unit on its side so the gears do not move, there is a possibility that the threaded portion of the bar will not move and you will be able to screw the shift rod in--yeah, I'll respect you in the morning, the check is in the mail, the sun will rise in the west, etc. LOL.

Go ahead and try it, you have nothing to lose. Worst case, you fiddle around blind for an hour or so and then you open the lower unit. Best case, it goes right in.

Short shaft-long shaft, it makes no difference. Just remember that the slightly recessed screw on the side of the gearcase nose is the pivot for the shift yoke and must not be removed.

It is way different and way simpler than automatic trannys. A simple sliding dog clutch between two gears always in mesh with a pinion. One forward tapered roller bearing, one rear ball bearing, and one or two spacer rings to set gear lash.
 
Top