Re: Vacuum bagging questions
If you are going to vacuum bag "boat size" objects, you probably want a pretty high volume pump. The stuff we did was pretty small, so a small pump worked OK.
You understand that vacuum bagging requires the use of epoxy resin, which is a heck of a lot more expensive than poly or vinyl ester. You might be able to use poly, but it kicks off so much faster than epoxy you might be right in the middle of getting every thing bagged up and have it kick before you pull any vacuum. In fact I'm not sure poly resin is compatable with the release cloth and breather blanket materials used in the process.
Actually you can use epoxy or poly, depending on what you're making. The main prerequisite for the resin used is that it has to be thin, because usually it has to flow out and wet the entire layup at once.
Note that the rest of the comments I make here refer to vacuum infusion, which is I presume what the original poster wants. Vacuum bagging is a subset of this, where you use a vacuum bag to compress an already wet out layup and remove excess resin.
For basic vacuum bagging you need A) A vacuum pump, B) Fiberglass and resin C) Bag material and D) Tape or sealing clay. For most applications you also need additional layers like flow media and peel ply. Also, you'll probably want some specialized fittings and tubing to infuse more complex parts.
In its simplest form, a vacuum bag setup is a vacuum pump sucking air out of a sealed bag. The bag covers the layup of fiberglass on a mold or part to be laminated. The hose from the pump goes into the bag and is sealed to not allow air to leak in. The end of the hose may be covered with sponge or a similar material to prevent blockage of the hose with resin or plastic. Another hose likewise sealed into the bag at the other end of the part is crimped off outside the bag. When the vacuum is pulled and the bag tight, the end of this second hose is placed into resin in a container. The crimp is released and the vacuum sucks the resin into the bag and onto the part. Once the part is completely wet out you crimp off the hose again and hold the vacuum until the resin sets. The plastic bag won't stick to the resin, so you can then remove your part, which because of the vacuum has a very good resin/glass ratio and is well pressed together.
Of course, any real setup has to have some other things. First, the pump. Unless you set the pump up with a pressure switch to turn it off when the vacuum is pulled, it has to run all the time. Unless it's a more expensive industrial pump it's not meant to run all the time, so it overheats and breaks down.
It's a good idea to have an industrial pump brand that's meant for continuous running, but even if the pump doesn't break it costs $$ to run it until the resin hardens. So, you want to switch it off if the vacuum is "good" until it's needed. You need a pressure switch for this, connected to a relay that controls the pump. Most pumps can pull a lot of current when they start up, so you need a hefty relay. Since almost all bag layups leak, it's also good to have a reservoir.. basically a tank that the pump vacuums out before it starts on the bag. Otherwise even a tiny leak will let in enough air to start the pump.... which will shut off a few seconds later, only to start up again when the leak lets in enough air. Finally, you want a check valve to prevent the bag from sucking air back through the pump.. without this, air can leak through the pump when it's not running (or vapor from boiling oil or water in the pump) and kill the vacuum as well.
The reservoir also prevents the resin sucked out of the bag from making it to your pump, which would gum it up permanently.
Aside from the pump, you need a bag. You can use high quality window replacement plastic (eg. 10 mil) from your local home depot type store to try things out, but be aware that it's not ideal for anything more than simple parts. In particular anything that needs the plastic to stretch won't do well with this. Some people do use garbage bags or shower curtains too.. depends on what you're doing. But to avoid aggravation, professional vacuum bags don't cost that much and once you get the hang of things are re-usable.
To seal the bag you need tape. Good quality tape. The standard for this has the highly technical name of "sticky tape" or "tack tape". It's sort of a cross between weatherstripping and tape, you use it to seal the edges of the bag against air. If you're doing a two sided bag you'll seal three edges of the bag against itself, forming an envelope. If you're bagging against a mold, table or other surface you'll seal against that. Be warned that some otherwise solid pieces of wood can leak air through them, by the way. You need to seal the surface.
Inside the bag is your layup... all the layers of your part in place and trimmed, ready to go. To ensure they all get wet out you'll want to plan the path the resin will take. It's going to go from the inlet tube straight toward the vacuum tube, spreading some along the way. What most people do to infuse parts seems to be make the resin inlet in the middle of the part and use spiral tubing, similar to the stuff you wrap wires with to bundle them together, to channel air from the entire border of the part to the vacuum tube. When the resin is let in it goes in all directions toward the vacuum, covering the whole part.
To ensure the resin travels well, it needs a layer it can flow through. Plastic pressed hard against fiberglass with resin already in it does not make for an easy path for flow. You use a flow layer, which is a mesh or loose polyester batting (pillow filling) to let the resin flow around and over obstacles. The mass of the flow layer also prevents the vacuum from cutting off the flow. You can even get special flow cloth that becomes a permanent part of your part. Again you can start here cheap, using pillow filling, but the plastic mesh from a pro shop is easier to deal with.
So if you put pillow filling on your part, won't you get a fuzzy part? Yes, you will. So you use another layer, called peel ply, to prevent this. Peel ply is usually rip stop nylon... it's a fabric that is tough, resin won't generally stick to it (at least very well) and it lets resin flow through it. Peel ply gets peeled off at the end of the process to reveal the now laminated part. As a bonus it also gives the part a nice "fuzzy" surface feel that is ideal for further laminating work. If you would rather have a smooth, shiny surface you can use a different material.
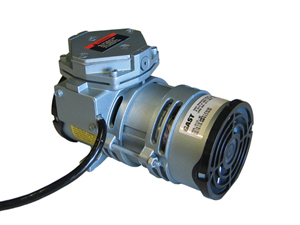
For your first part, I recommend the following: Poly resin (nice and thin), a low end industrial vacuum pump (Gast 1 cfm or better is good, but I have also used a harbor freight special) with clear vinyl tubing from the local home store. GET a check valve and vacuum switch, you'll need them. For your first attempt, do a simple part like a flat piece of plywood or some sort of near flat layup either in a wrap around bag or against a plastic or other sealed surface. You can start out with a shower curtain liner bag or similar plastic from the home center.
I strongly recommend getting the sticky tape from a real supply store, and the fittings for the hoses they sell are very, very nice to have too. On the other hand you can get by with good quality packaging tape and a couple pairs of vise grips for crimping. Look up how to do "pleats" in the bag and make sure you don't let any folds in the bag reach the edges.. they will leak like crazy.
Do your layup including vacuum hoses and tape it up. Then start the pump, together with your cutoff switch, reservoir, and check valve, and watch it suck out the air. By the way, if you think you need a high capacity pump to get the air out, you don't. You can use a shop vac to do the initial pull down. Don't try to use one later for holding the vacuum though, they aren't meant to run for a long time just like a cheap pump. Use the shop vac to get most of the air out, then connect the real vacuum pump.
Your pump has to pump fast enough to keep up with any leaks. In a perfect world the pump would pull a vacuum, nothing would leak, you'd let the resin in, it would saturate the glass, you'd crimp the inlet, and your resin would harden into a part.
In reality you usually end up with 1-3 tiny leaks you can't quite find, and if your pump can't keep up by continual running you'll have to re-do the whole bag and tape layup. Ideally your pump should only run once every 5 min or so at most, to keep the bag and reservoir evacuated.
So start out by running the pump. See if you can get the bag to not leak air (you may have guessed you'll want at least one, preferably two vacuum gauges also connected to the whole system). If you can get the bag leaks down so the pump only runs once a minute, give the resin a try. Watch how it flows, and note where it doesn't go easily... you may need to massage the bag to push it where it's dry, but again ideally you shouldn't need to do that... in the future you'll arrange the tubing and add-ons like fittings and spiral wrap to make the resin flow where you want.
If you haven't guessed you'll also need to pre-calculate how much resin you need to catalyze/mix. Ideally you'll want 1:1 or so by weight ratio with your glass, which is better than almost any hand lay-up, hence the reason we use vacuum infusion.
The other major reason to infuse is to let you have tons of setup time, getting the glass trimmed just so and laid in place, then wetting it all out at once. Which would you rather do: 10 layers of glass and resin applied by hand on a large part in a several hour marathon, or 10 layers of glass applied between other tasks over several days, culminating in a couple hours of bagging and infusion, resulting in a lighter part?
Anyway, my major thrust here is to learn by doing. The least aggravating way to do this is to pay the cash for a good quality 3-4 cfm pump, get professional bags, peel ply, flow media, tape, fittings and tubing, plus resin specifically designed for infusion. Start with a simple part. You can go cheap, but remember you're putting some extra barriers in your way, and it may go well or not. About the time you fix the 15th leak you may wish you'd used better materials.
All that said, I've done this successfully with a harbor freight vac pump, and others have used re-purposed refrigerator compressors. I've had ok luck using rolled plastic window material and rip-stop nylon in addition to commercial bags and peel ply.
I haven't graduated to using infusion for large parts on the boat yet, due to the difficulties in sealing the bag when not on a smooth table, but I probably will someday. In the meantime, it's a useful tool in the box, and it makes better composite panels than anything else I can do.
Erik


") Hopefully Yacht Dr (the master
Hopefully Yacht Dr (the master